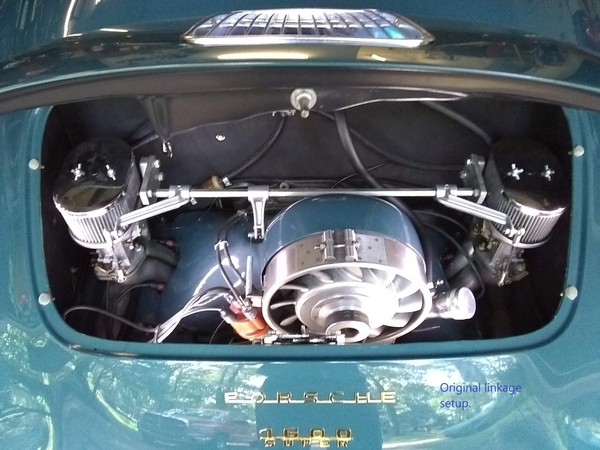
Turning the Carburetors around…
This post applies to engines with 911 fan shrouds. If you have the doghouse shroud please disregard.
What I thought would be an easy project turned out to be much more difficult. There is more to the job than replacing the intake manifolds with Space Saver manifolds. It always surprises me when the obvious jumps and bites you.
I suspect that blocked idle jets will always be a problem with these carburetors. On the Spyder it was an aggravation, but the carburetors were totally accessible…on the Speedster they are not. I could clean all of the idle jets on the Spyder in 5 minutes. To clean 1 on the Speedster was at least an hour. I have large hands and needed to remove the air filters and top of the carburetors to get access to the idle jets on the number 1 and 3 cylinders.
Something better was required, so I asked the group if there were intake manifolds that allowed the carburetors to be turned around. Several answered that CB Performance had such a manifold, so I ordered a pair. They were surprisingly inexpensive…there was a reason for that. What a piece of junk! While my Chineseium manifolds were smooth and polished, the CB Performance manifolds (made in the USA) were rough and poorly machined. The head flange was too thick for a proper bolt up. The thickness of the flange was different on both sides! I had to mill off .100” (1/10) of an inch from the face to get a bolt on properly.
That wasn’t all! The bolt spacing for the carburetors was not correct for my Italian Weber’s. I had to ream the carburetors to get them to fit the studs provided with the manifolds.
Finally, the new manifolds and carburetors were installed. All that remained was to reinstall the filters and linkage and go for a test ride.
No. This is where the not so obvious got me.
I have the CB Performance 3143 Filter and linkage package.
The linkage, as originally installed, operated from the front of the engine. That means that the operating arms were turned toward the front of the engine. When the carburetors are reversed the linkage must be turned toward the fire wall. The filter base is part of the linkage mount. What that means is that you cannot just turn the filter base around. The cast linkage mount, that is part of the air filter base, is now near the front of the engine and the linkage could not be mounted.
The filter bases had to have new mounting holes drilled to match the new position of the carburetors and move the linkage mount toward the back of the engine.
At the same time I was reversing the carburetors I wanted to upgrade the linkage. The ball end adjustment that is common to all of these linkages is very poor engineering done to save a buck. In a very short time they wear out and the carburetors cannot be properly balanced. I made two simple aluminum mounts that have a 8mm heim joint bearings pressed in place. They are attached to the two ears on the modified filter mounts with 4mm bolts into new tapped holes on each filter base. They adjust just like the original ball mounts, but the wear is gone.
On the original installation the throttle cable was a straight pull to the operating arm. That won’t work here. As the cable enters the engine compartment it now has to make a near 90 degree turn up to the arm. The linkage cable arm must be in the same plane as the linkage arms.
As much trouble as I had with this “simple project”, it is very worth doing. Now all of the carburetor adjustments are in the open except the heim joint links from the linkage to the carburetors, which are now at the rear of the engine. Once properly set up they shouldn’t need much attention. Everything is working well and I’m pleased with the installation.
This may not be the only way to do the job, but it was my way. Feel free to do it your way.
Naturally, since doing this I have had no need to clean the idle jets.


