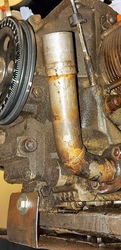
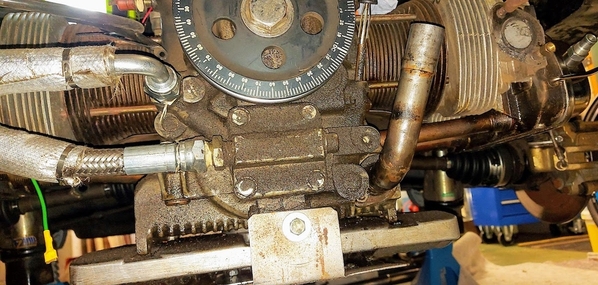
That sender sticking out of the case towards the distributor is the oil pressure sender.  It turns the idiot light on and off in the tach gauge.

Many of us run a "T" out of the case at that point, then attach both temp and pressure senders there.  Yours works just as well at the dipstick.  

Six of one, Half dozen of the other....

For a more detailed explanation of the gauge info, thou shalt consult "The Holy Book of Annunciators".

@ALB posted:

His words Danny- "And no internal vanes to route the air evenly over the four cylinders". It doesn't matter who made the shroud or what fan it's using; if there's no directional work inside the thing won't come close to even temps from cylinder to cylinder.  I stand by what I said.  Just look at all the work you did to make it work satisfactorily.

Actually, it DOES matter who made it. There are different shrouds, some are not shaped in a "cooling air flow" fashion. Bergmanns absolutely SUCK in this regard. Look at photos on the web, you'll see what I'm talking about. Al, it seems that you completely missed my point about a sealed plenum. Think about it for a minute.

It wasn't that much work. There is a factory part available for the P shroud, but only if it's modified a little. And it will only fit a real Porsche alternator and ring.

I stand by what I've said and done. The axial fan works on pressure, the regular VW fan works on flow.

The sled tins made a LARGE difference. TEN degrees cooler in all conditions. Why? I think because the air is forced to follow along the cylinder bottoms, thereby removing MORE heat than if the bottom of the cylinders is open.

The shroud Martin has looks really close to mine. The "wings" that he has that go under the stainless fan clamp are absent on mine, but the rest of the shape is the same.

Martin, I also used silicone to seal some areas that the foam weatherstrip wouldn't fit. AGain, pay special attention to the top and sides of the case, and your fan ring to shroud joint.

Here's the Porsche part I modified. There must be a reason the factory put it in there when they went to the 2.7 liter. The vanes go on the left, to turn the air opposite to it's natural direction on the 3-4 side:ALternator vane

Attachments

Images (1)
  • ALternator vane

Inspecting the dipstick, I spotted a very tiny '150C' cast into the plastic casing at the top and, testing it with a gas torch it read 0 ohms until it reached temp (presumably 150C/ 300F, although I've no real way of knowing) then generated a reading, so obviously a warning light switch rather than a gauge sensor.

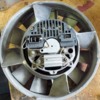
Looking at the 911 fan air guide/ Yoda Ears fabrication (thanks @DannyP), in theory it could be a reasonable task to create out of sheet metal - create a cone with tabs to allow mounting to alternator, then bolt or rivet vanes to the cone. The problem is knowing how sturdy to build it - I'm betting there's quite a force of air being blown down at high revs. As Danny says - with the 911 fan it's all about air pressure. Having seen this, I googled and found a useful blog of a guy refurbishing his 911 broken air guide - this image taken from his site to show just how it mounts on the alternator (picture credit: joe-engineer.com)

911-air-guide-repair-19

Here's the back of my alternator/fan to show where it would have to be attached.

20210128_095943

So, that's one to ponder for the moment. I have an old friend who does some fabrication so I may have to give him a call and see if he can help.

Another task to ponder is the oil breather system. Currently there is a large stainless steel breather box mounted in engine bay (nearest the bumper). Oil breather pipe layout

As well as the two vents at the top of the box, it has hoses going to:

  1. Left side rocker cover
  2. Right side rocker cover
  3. Crankcase - there's a fitting in the fan base that replaces the old oil filler casting.
  4. Oil filler tube - it taps into a bodged fitting screwed into the side of the plastic filler funnel which sits atop the oil filler pipe.

My plan is simply to clean everything up and replace the hoses with new hoses. So, is this a good idea or not? I'm also considering hoses with slightly smaller ID - they're a loose fit on the 11mm (7/16") diameter fittings, causing more oil leaks! There's hardly one part of the underside of the engine that is not covered in oil from one leak or another..

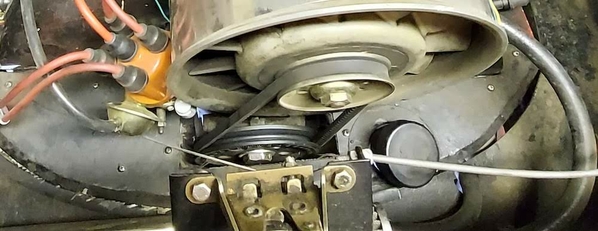
Tied in with the above task is the oil filler tube - it's far too short, causes oil leaks and is not easy or convenient to use for it's designed purpose - to pour oil into the engine.
oil filler tube

20210128_09565720210128_09573720210128_095812As you can see it's already been welded/modified to fit. It could do with being 3" taller. Is this a modified Type 4 filler? Any suggestions on how I can improve this situation please?

As always seems to be the way in car maintenance, my thread is a prime example of "While I'm in there" scope creep. :-)

Attachments

Images (7)
  • 911-air-guide-repair-19
  • 20210128_095657
  • 20210128_095737
  • 20210128_095812
  • 20210128_095943
  • Oil breather pipe layout
  • oil filler tube

I agree with Ed.  If anything, either try the right hose size for your fittings, whatever they are, or spring for fittings the next size larger with hoses to match.  

Smaller hoses might lead to restriction in the breathers and subsequent spewing of oil out of any space it finds.  I went through this a while back and ended up with a CB Performance upright breather, similar to the original Porsche breather but made up as a  spiffy-looking, ribbed aluminum box as part of the oil filler with 5/8" hoses from the breather to the carb air cleaners.

The oil filler tube looks like something for a Bus.  The new AS41 cases have that flange in the sump, too.  Since it has an extender on it already, you have the option of cutting that one off and welding a longer one onto the existing fill pipe or just adding an extension inside of the top section.

And then, of course, you'll find another few things that you think need attention along the way.  You should meet @Michael Pickett over in Hawaii.  He went through this on his car for what seemed like a long time (but was about a year).  He finally got it to where he wanted it and we haven't heard from him in a while so he must be out burning up the asphalt on Maui.

Now you know about the"Madness".  It consumes you........

Good luck fabricating that alternator cone. You can find them used instead of making one. It's not a simple shape.

I'd simply extend that filler tube and get new hoses. Make sure they are oil-safe. If you were going to increase the size of any of the hoses/fittings, the driver's side valve cover would be one and the pipe in the alternator base would be the other. The crank throws a LOT of oil toward the 3-4 cylinder side, not so much to 1-2.

On my 911 fan setup I plugged that pipe in the alternator base. I made a 3/4" I.D. pipe to my breather that goes in the distributor hole(I know not an option for you).

I agree with everything everybody's saying regarding pretty much just cleaning up the breather system you've got and running it. I also agree with @DannyP regarding buying a 911 cone and adapting it, rather than fabricating it-- but I didn't miss this:

oh, and one other thing - there was no woodruff key locating the fan to the alternator spindle. So I fabricated one up last night. Luckily it hadn't caused a problem in the past, but at least this should prevent a problem in the future.

It's hard to know on the internet who's god fabrication skills and who doesn't, but I get the feeling that Tigermoth knows his way around a shop.

Good on ya', mate.

Ok, @Stan Galat, I think I massively oversold myself with 'I fabricated..', more like 'I made' - there's not a lot to making a woodruff key, just a solid piece of metal in a particular shape. All I needed was a larger piece of metal, a hacksaw and a file! I only wish I knew my way around a MIG/TIG welder. I will have to call my brother (who's only 12 miles away) or friend to see if they can add on a few inches to the oil filler pipe.

Guys, thanks for the tip about breather hose size. I must admit I didn't think of a hose enlarging and sagging over time. The fittings are all 5/8" OD so I'll get a hose with 5/8" ID.

And as for the cone, thanks for reminding me to consider the easiest option, Danny. Obvious case of not seeing the wood for the trees.. A quick search on UK eBay and there's one in good secondhand condition for £100 ($137) including delivery. Sorted! And a LOT less hassle. Fingers crossed it will fit once I get it next week.

.

"...there's not a lot to making a woodruff key, just a solid piece of metal in a particular shape..."


Still, some of us would have just jammed in a screw driver and broken off the handle.

Some others would have worked out the forces applied, calculated a 50 per cent safety factor, and ordered in a slab of a suitable alloy from the Frumpster-Magee catalog.

Some members would have researched which woodruff key was specified in Germany by the original German engineers for the exact German model upon which your car is based, and would have then tracked down an old-stock part from that year of production, even though shipping times from the Alsace region are currently running from six to eight weeks.

There are those who would have used a similar VW part but, figuring that was about 40 per cent stronger than required and thus 40 per cent too heavy, would have then spent several weeks making suitable modifications to reduce the weight by 39.7 per cent.

And then, there are those of us (a very small number) who would have built a steam-powered woodruff key fabrication machine, just for the sheer joy of having accomplished such a task.

I commend you on having focused on the task at hand and having found a simple, workable solution close to home so that you could ask what is probably the most important question in these projects:

What's next?

.

@Sacto Mitch posted:

.

"...there's not a lot to making a woodruff key, just a solid piece of metal in a particular shape..."

Still, some of us would have just jammed in a screw driver and broken off the handle.


...There are those who would have used a similar VW part but, figuring that was about 40 per cent stronger than required and thus 40 per cent too heavy, would have then spent several weeks making suitable modifications to reduce the weight by 39.7 per cent.


.

That's cutting it a little close.  A really smart man would only rework it to 25 or maybe 30% lighter; then there's a little room for miscalculation/error

@ALB wrote “A really smart man would only rework it to 25 or maybe 30% lighter; then there's a little room for miscalculation/error”

True.   Maybe it would be better to Laser-drill a bunch of “micro-holes” in it instead, thereby attempting to maintain structural integrity?    😆

🙄

When I had a bunch of mechanical designers working on my projects I was forever impressed with how much those guys knew about basic metallurgy, almost as a cultural thing.  Things I never even thought of, but they just knew.

I was first impressed by the electronics guys achieving what seemed like “magic” out of electronic circuitry, especially on the scale of a large-scale computer server, but those Mechanical guys just quietly went about their work and knew far more about working with different metals (and against a product cost target) than I’ll ever know.  Those guys were Rock Stars!

Post Content
×
×
×
×
Link copied to your clipboard.
×
×