DANG! That look pretty cool! Looking forward to hanging out with my knucklehead SOC friends in SLO, my brutha! ![]()
It's been a while since I posted an update.
I have been too busy driving! Since the SLO meet I've had nothing but smiles. I will say this, we had an odd moment with the tow bar on our trip home, but I'll save that story for another time.
I wanted to share my latest update!
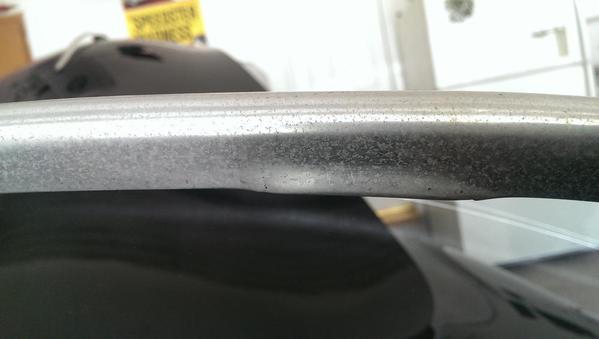
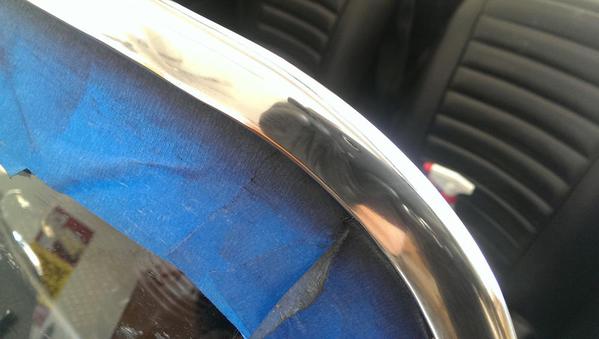
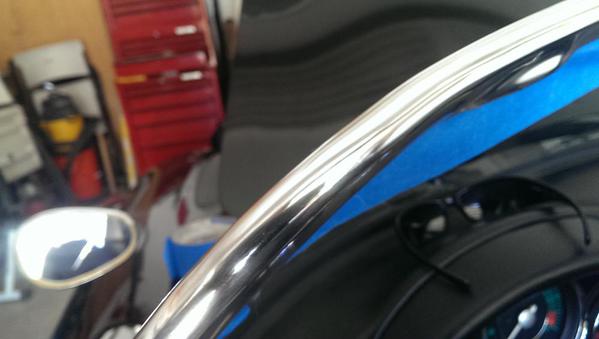
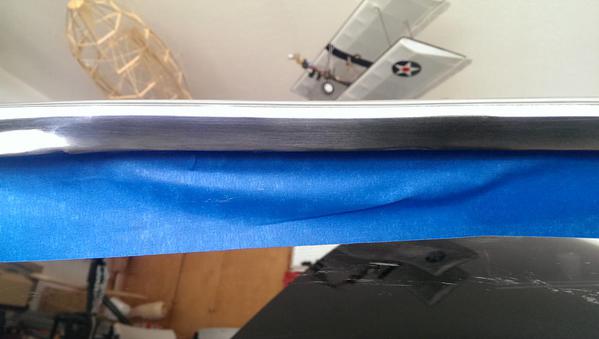
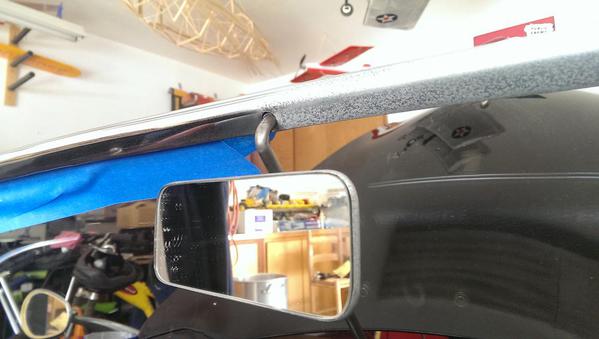
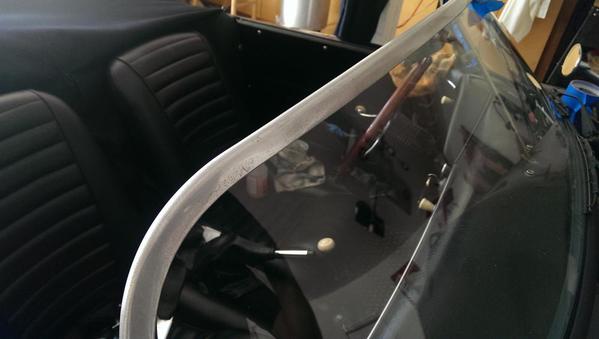
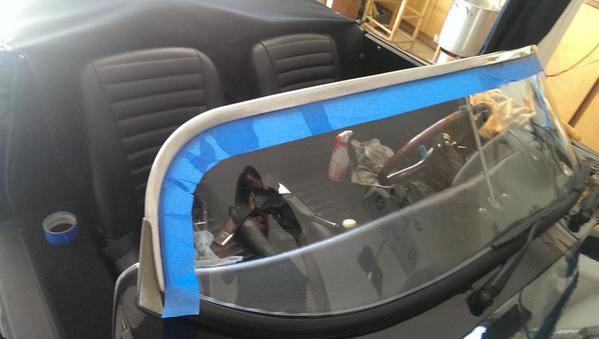
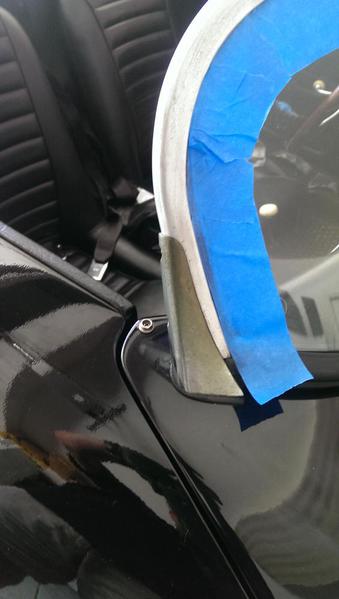
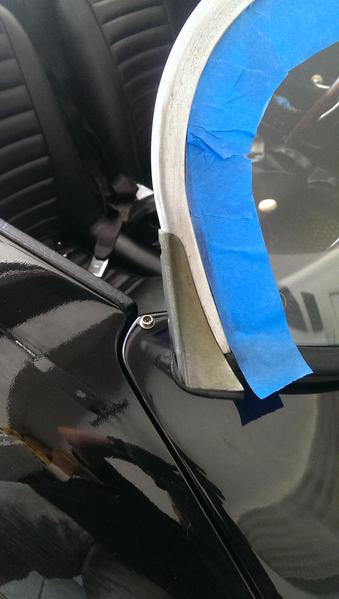
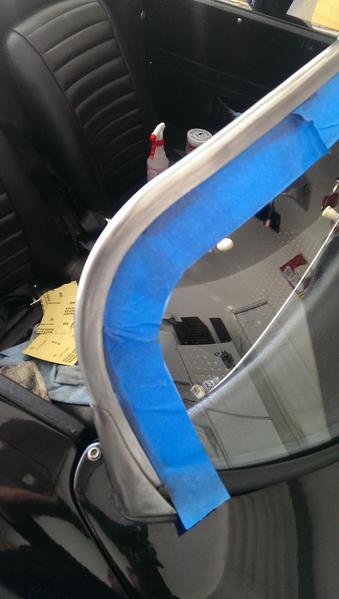
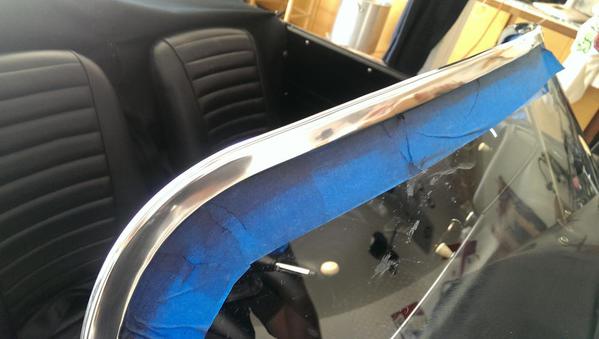
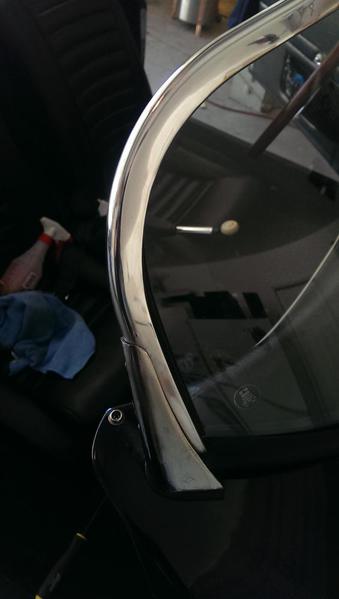
My Black lady, the Shwarz Frauline, spent from 1996 until 2014 in Seal Beach, CA. That's like... two blocks from the ocean. As such, she spent some time breathing in the salt air. Her bright work may not have fared so well. Lots of corrosion. Last weekend I decided I was tired of looking at the sad state of her aluminum bits and went to work with some Neverdul, 400&600 grit wet dry, and some mothers. DO NOT TRY THIS WITH CHROME. This process worked ONLY on the aluminum bits. The chrome posts were pretty far gone. They will need to be replaced. As such, I cleaned them a bit with steel wool. They bounced back, but you can still tell that they are roached.
Basic steps are:
1) Tape off what you don't want to sand
2) Check that you really taped it well
3) By hand (no need for power tools here) Sand with 400 ( I hit the immediate area with a swipe of a wad of "Never dull") This lubricates the area. You could use water if you don't mind the mess. Using Never dull or some other product means you will use more sandpaper in the process.
4) After the 400, hit everything again with Never dull and 600. Sand with the grain. If you can't find the grain, sand the 'long direction' of the frame.
5) DO NOT get all crazy cranking on the windshield frame. Use only about as much pressure as if you were waxing the car by hand. Just sand the aluminum like you were sanding some soft pine. Nice and easy with the grain. Lots of lubrication.
6) Make sure your paper isn't all clogged up. After a little bit, you will no longer feel the roughness of the corrosion. Once you have a nice smooth and uniform surface, switch to the mothers.
7) Using mothers or another aluminum polish - polish the surface until it shines. the rag will quickly turn black. Keep using a clean part of the cloth. In no time you will have a black rag and a shiny chrome like surface!
8) Sit back and enjoy your refurbished apart~
Below are the before, during and after shots. This took me about an hour and a half from start to finish.
Attachments
Looking good, Ted!
Even in the dry climate where I live, I have to pull out the Simichrome at least once a year and polish the windshield frame, along with all the other aluminum bits.
Looks fantastic Ted!
Ted.
Are you sure you really needed to use the sand paper? I have never seen a case where Simichrome or Mothers and elbow grease or a buffing wheel didn't bring back a mirror like shine.
I would highly recommend that you stop using steel wool and go to bronze wool. There is a 100% chance that you will leave tiny bits of that steel wool in nooks and crannies. IT WILL RUST!! Bronze wool will not. It is available at marine stores i.e West Marine get fine grade.
Good idea on the bronze wool but I have done exactly this same treatment on my VS with sensational results. Where it really made a hugedifference was on the bumber gards which were a mess and the only popolish that ever had a chance to shine them up was Rusty's secret polish he sends me from time to time. Both my windshielsdframe and bumper guards look like new with a shine almost as bright as chrome plating.
It was scary to apply the sandpaper to the windshield frame but I had used this process before on my airplane's aluminum nose cone with great results.
Ted said to sit back and enjoy the refurbished parts and that's exactly right because it truly is completelt refurbished.
Ted.
Are you sure you really needed to use the sand paper? I have never seen a case where Simichrome or Mothers and elbow grease or a buffing wheel didn't bring back a mirror like shine.
The pitting was quite severe. The car spent 10 years two blocks from the coast sittin in an uncovered car port. The trim looked like the surface of the moon. I used to have a vintage travel trailer and the sandpaper treatment never failed me when I polished that sucker. I've never actually seen Simichrome. Is it more abrasive than mothers? I will say that now that I've knocked down the rough surface of the initial oxidation I'm sure I won't have to go that route again.
Good idea on the bronze wool. The bumpers / chrome seem to really come alive with once you cut the surface crud.
Ted
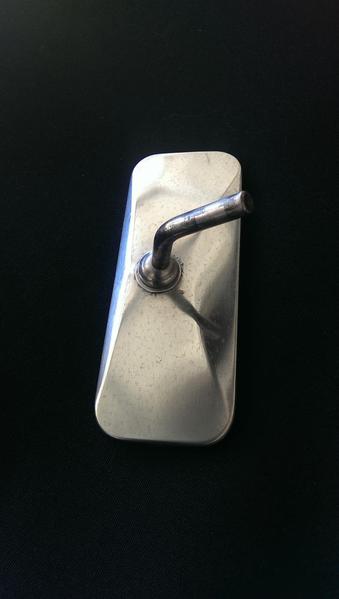
Speaking of oxidized parts! I just received a large box from Sierra Madre!!
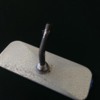
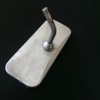
New fender mirror
New horn grills
New horn grill gaskets
New ignition switch (with the proper bezel and two keys)
4 new moon hubcaps
Back ordered:
4 drum skins. ![]()
I can't wait to get everything installed. All of the parts, with the patina intact, will be for sale - cheap!
Ted
Beautiful, Ted!
Ted, it looks like you learned quickly on the color sanding topic. Nice job!
Hey guys!
Thanks for the kind words. I appreciate it. I only did the one side and boy what a difference. Looking at it again, it could still use more sanding in some areas. I was just telling Carl that it was a multi step process that took a good part of the morning. I can't wait to do the hood and the rest of the car.
Highlight of the day yesterday was when a bunch of Harley riders pulled up next to me and said "That Black paint looks great. What do you use to get rid of the swirl marks!?..." ![]() Their bikes looks fantastic too!
Their bikes looks fantastic too!
I used a Cyclo Polisher and some Chemical guys Black wax as the final step. I don't know if it's better than any other wax, but it looks deep.
I highly recommend anyone to check out autogeek.net and watch a couple of videos. I learned a ton just from watching them.
I'm about to crawl under the car to change the gear oil and install new boots.
Wish me luck! Need to keep one eye on the car and the looking out for that damn raccoon / German Shepard from SLO.
He's still out there...
Ted
Wow, Ted! Great job.
What a great job on that color sanding, Ted! A world of difference. You are a MACHINE!
BTW - That raccoon and his buddies are getting some serious mileage outta that hotel parking lot story!! ![]()
This made a cold shiver go down my spine... I realized I had better go at least look at it. An hour later I had it completely apart and was removing a piece of bone or rock out of the internal garbage disposal / chopper assembly. Naturally the hard material deformed a blade and the chopper screen. Out to the garage to sharpen and straighten the assembly. While in there, I figured I had better de-scale and clean all the crud. All on all, I had it back together and running in a couple of hours. But the speedster is still apart.
She who shall be obeyed... Always wins.
The upside is that the dishwasher looks and runs like a top! Funny side note is that my brother in law came over. He saw what I was up to and said when their dishwasher died, it took two weeks for somebody to come look at it. Alexis said... "Two weeks?...". All I was thinking was "you hired someone to come look at it?!"
I'm so glad I'm handy...
Ted
My hat's off to you, Ted. I work on commercial refrigeration equipment for a living. I HATE appliances.
I went back out to install the new boots. Couldn't get them to seal correctly. I would squeze one like a bellows and I could hear air rushing out. The silly Mexican hose clamps exploded under any sort of load. Need to go back to the store and get better ones. Should I expect air to escape out of the boots? I'm using oem split boots.
When I was cleaning out the oil drain pan I found a sliver of metal about the size of a pinkie finger nail. The drain plug was packed with a mud like sludge. Such a bummer. I'm guessing a new trans is in my future. I'll run this one till it scatters itself beneath me.
How the he'll do I seal these boots?!
Ted
Here is a little trick to use on chrome that is hazy or spotty like this... instead of sanding or wet sanding.... take Coca-Cola and aluminum foil. Poor the soda onto the aluminum foil and use it as if you were clay-baring your car. Rub with the grain. Takes off the spots, rust, etc without dulling the chrome or removing a layer of finish. Then buff or hand polish with chrome polish.
Ted - You could have said "You wanted to finish your axle boot project, and Alexis (SWSBO) wanted the dishwasher fixed. So you compromised….and fixed the dishwasher"! ![]()
Ted- If the trans is a high mileage unit that hasn't had an oil change in too long there's going to be some sludge around the drain plug. The sliver? Who knows; is it aluminum, steel or brass? Doesn't matter- as long as the thing runs, doesn't clunk or do anything weird, then run it until you're ready to replace it. IIrc, guys used to use silicone around the axle tubes and in the joints to make sure they didn't leak.
And smart man, listening to SWSBO! Makes life easier in the long run...
You said it.
Remember back in the day, when everything had an electro-mechanical timer, which had 42 micro-switches, a timer motor, and more gears than the average Breitling? I thought solid-state controls would be the do all and end all for 95% of what ailed appliances, but no... now it requires a computer interface module to get the failure codes cleared from the freaking clothes dryer. GE. No joke.
Appliances are built to be sold at a price-point, with some profit at every stop along the way. They are now built to last as long as the warranty, plus one day or so before the control module, drive motor, or other really expensive, really buried part dies.
They are wicked little pieces of junk, and I'd rather toss them and start over than spend even a few hours of my life fighting them. I need that time for more useful pursuits like burning time on the internet, or twin-plugging a glorified lawn-mower engine.
You might have noticed: I really don't like working on appliances.
Notice we don't fix things anymore. They are either too expensive or too complicated to repair. Our cars are trouble prone, but fairly easy to repair...sort of.
Can you imagine trying to repair a 2014 Mercedes, Porsche, or BMW (or any new car) when it's 10 or 15 years old?
Probably not.
By 10 years old any failure of the many computer controlled system will cost more than the car is worth.
Today we'll throw away old TVs, receivers, microwaves, etc.
Tomorrow we'll throw away (recycle) older cars.
I don't mind taking things apart to fix them. It's the putting-them-back-together part that I find hard. ![]()
Ted - now that you buffed your paint to a mirror finish, we can see in the reflection that you're still sporting those Dolphin shorts when you're working on your car! ![]()
While the dolphin shorts were in the wash, I replaced the old generic CMC ignition with a genuine Bosch unit with period correct Porsche style keys.
I posted the updates to the blog, but I'm not sure if I'm going to continue to go that route.
Today I decided to replace the original cmc ignition switch for a quality Bosch unit. Very straight forward update. Had to enlarge the existing hole by 3/32nds all the way around. Once it was enlarged I just dropped the new unit in. Once it fit, I swapped the wires over. Very straight forward.
The back of the original unit:
The back of the new unit:
Beautiful Chrome Speedster bezel and correct shaped keys:
Terry Knuckles captured the SLO Raccoon and brought me a souvenir. An authentic raccoon tail key chain.
Next up? replace the headlight and wiper switch bezels.
Thanks for checking in,
Ted
Been too busy working and driving to check in much here on the site.
Oh, yeah... I also settled on a motor.
1915 CC
- New Heavy duty aluminum engine case with case savers and reinforcements around #3, full flow, etc.
- New Counter weighted balanced 69mm Crank
- New I-Beam rods (balanced)
- New Bearings and all of that good stuff
- High pressure oil relief valves and springs
- New Scat 120 Cam
- Cam oiler lifters
- New Lightened Flywheel
- New Heavy duty Oil Pump & Cover
- New 94mm Mahle Pistons Cyls
- New Cool Tins
- New double o-ring aluminum push rod tubes
- CB Perf 044 heads, 40 x 35.5 (Stainless Steel Valves, Dual Hi-Rev Springs, Chromeoly Retainers, etc)
- New Chromeoly Push Rods
- Heavy Duty Rockers
- Thin Line Oil Sump - 1 1/2 qt.
- 1.5" A1 Sidewinder
- Dual Kadrons (Proper Jet's & Venturi's)
- SVDA Distributor with electronic ignition
- 8.5:1 compression
Now I need to figure out what trans to get!
This engine will be fun! A couple of things-
Unless there's something about the aluminum cases I don't know about, stock oil control and oil relief springs are fine; as a matter of fact, a stronger spring at the flywheel end will blow up the cooler.
Are you going to be using Scat lifters as well? They have a reputation of not lasting very long. Send them to Steve Long for his treatment (I don't know what it is).
What length gears are in the oil pump? Any thing bigger than 26mm and you're wasting power by continuously pumping the extra oil back into the sump. I've never liked the Melling pumps- the cast iron bodies don't expand with the case as the engine heats up and sometimes they are the source of lower oil pressures at idle when hot.
I would use the type 1 sled tins, bottom diverters and industial tins; they were made for the upright cooling configuration. The sled tins also protect the cylinder bottoms and the thermostat from colder air (and water) while the car is moving.
Do you mean C35? C25? C45? Engle W120?
I know they are more money, but Aircooled.net's aluminum pushrods are easier on the valve train (because they are lighter), their expansion characteristics match the engine better, and you may find the chromoly ones are noisier when the engine is up to operating temps.
If you're buying rockers, buy 1.25's; they'll give close to 1/2" lift with the cam you're looking at, which is perfect for those heads. Anything less is leaving power on the table.
You could bump up the compression a 1/4 or 1/2 point (depending on the cam).
PS- A magnesium case would be perfectly adequate for this build.
PPSS- Consider modifying the engine case, followers and rockers for better oiling-
http://bobhooversblog.blogspot...007/05/hvx-mods.html
Good Info! Thanks. The motor is supposed to spool up pretty high in the RPM range. With everything being balanced and lightened it should be fun. The cam kind of eats up the low end torque. Not sure exactly how the power band will look. I may even bump up a few extra $$ and go with some ported heads and webers. (I can't have that ole dirty SOB Musbjim taking me in SLO next year. ![]() )
)
I'm headed to look at the motor tomorrow. I'll let you know what's up with the oil pump size, the cam and the relief springs. The builder said "Scat 120 cam with straight cut gears". I'm guessing a C45 as thats as close to an Engle 120 as you're going to get. Not super excited about the straight cut gear noise, but I'll learn to live with it. I'm on the fence between just the dog house oil cooler or running an external cooler (plus fan) and the stock dog house cooler.
This motor won't go in until the winter when the new trans is ordered and installed. I guess at that point I should upgrade to rear disks as well.
Tomorrow will tell the tale.
Giddy up!
Ted
Is the engine already built?
Do you have concerns?
Ted
"Yes. Shop built it for a customer. Customer's wife said no fn way. Shop is selling motor to cover losses." -TRP
I see he is also married to She-Who-Must-Be-Obeyed! ![]()
Concerns- An engine that revs to 6500 with power isn't exactly what I call a reliable cruiser. It will need a little more messing with than normal and the bottom end/midrange (where we do most of our driving) will be a little "soft" to 3,000rpm (or so). I've run an engine like this on the street, and while it's a lot of fun off the stoplight, if I was building an engine that size for someone that wants more power but is looking for reliability as well I'd use a C35 or W110 (with 1.25 rockers) so it would only go to 5800 or 6,000rpm with power. This would provide more power through the bottom end/midrange and get better mileage as well.
The bottom line- While this engine will beat Jim's, it's not the jump in and go anywhere, any time powerplant that I think you are looking for. The normal rpm range of an Engle W120 is about 6,000rpm, while the C45's range is 6500 or a little more. The difference in duration is 8 or 9'- the W120 has 253' dur @.050" while the C45 has (I believe) 262' @ .050".
A couple more thoughts-
I didn't catch the straight-cut gears part; some are noisier than others, and while initially the sound is really cool, a lot of guys find it gets old fast. If you want the wife to spend a lot of time with you, the extra noise may not go over so well (hey- another reason for splurging for aluminum pushrods!). As I mentioned before, I've run an engine like this on the street (1750, W125, ported 40x35 heads, 44IDF's and 1 1/2" exhaust) and it was a lot of fun, but it didn't really get on the powerband to 3,000 or 3500rpm. It was great for surprising the sh*t out of a lot of Camaro and Mustang owners (most didn't take well to being beaten by a VW). With close 3rd and 4th gears (needed with the narrower powerband and small displacement)it was surprisingly fast considering it's size, but if you're main interest is more cruising around the engine should be in it's most efficient phase a little lower in the powerband.
Don't get me wrong, this much power (140hp or thereabouts if everything is right) in a Speedster would be so much fun! That's more power than the original Carrera equipped cars. This is why I (and others) are always advocating stroker engines; the increase in displacement (and lower rod ratio with a longer stroke crankshaft) creates an engine with the same amount of power (or more![]() ), but at a lower rpm and with way more power "under the curve", or in the lower rpms where we do most of our driving. This negates the need for close gears (and resulting slower highway speeds) to make the best use of the powerband in the higher strung, smaller engine. The bigger, milder cammed engine will also get upwards of 30mpg on the highway and decent mileage around town when driven sanely; I know, so hard to do, but isn't it great to know it's possible?
), but at a lower rpm and with way more power "under the curve", or in the lower rpms where we do most of our driving. This negates the need for close gears (and resulting slower highway speeds) to make the best use of the powerband in the higher strung, smaller engine. The bigger, milder cammed engine will also get upwards of 30mpg on the highway and decent mileage around town when driven sanely; I know, so hard to do, but isn't it great to know it's possible?
I always thought the perfect street engine was that 1750, only bigger. It's really too bad I never got around to stroking it...
Hope this helps, Ted. I know it's not what you want to hear... Al
Well - I don't have to buy it.
After reading your notes (thank you) - I'm left to wonder, what purpose does a motor of this nature serve?
I tried adding this to the above post but timed out, so here it is-
Transaxle- Beefed up to handle the higher hp- super diff, hardened keys, welded 3rd and 4th hubs. If you really like ripping around on the street, don't care about highway speeds and aren't afraid of the local police, a 4.125 or 4.375 ring and pinion with close ratio 3rd and 4th gears are a lot of fun. If just driving and getting out on the highway are more your style, stock 1st-4th with 3.88 r&p will give the best results. If the main emphasis is on canyon carving- close gears with the 3.88 would (I think) work well; top speed on the highway will suffer though.
If there's someone local that really knows VW transaxles, great; always best to spend your money in your neighborhood. Other option is Rancho Transmissions. They have a good reputation, know what a VW transaxle needs and have the parts to do pretty well anything you want. When talking to whoever the builder of choice is, be honest; "I don't really drive it that hard" will not last as long as "I really like to wail on it occasionally". Don't be afraid of spending a little extra money so it lasts longer!
I haven't mentioned the ZF limited-slip and Quaife because either will add well over $1,000 to the bill, but either would be fun...
PS-
"what purpose does a motor of this nature serve?" you ask-
A stock stroke engine like that is a cheaper way to get into some fairly serious power. It will be a little peaky (it will feel like stock until it "comes on the cam" somewhere between 3 and 4,000rpm and then take off like gangbusters) and engines that rev that high take a little more to take care of. The same heads, carbs and exhaust in a 2 or 300 cc larger engine can be cammed to peak 1,000 rpm earlier and make the same hp with a way fatter torque curve, but costs more to build. As I said earlier, it would be fun, and if it's a real deal (the guy's just looking to get paid for the parts), just know what you're getting into.
Think of this engine as more of a boy racer thing; I built my similar engine when I was in my early 20's, and knowing what I know now, would build something bigger.
I'll sleep on it.
No sense in throwing money at something that I won't enjoy.
Thanks for the advice.
Ted
$1500 sounds like a very good price, Ted.
Dialog Anthony and he can put you in touch with Ken Porter for your tranny or may have the perfect one for you laying around.
Tony has more parts than Carter has pills...
Ted- If you're considering this engine, the thing to ask is if the intake ports are big enough that the engine will go to 6,000 or 6500 (depending on the cam) with power?
Ted-
You can't do better than $1500 for this engine. I know Al's got worries, but seriously-- $1500?
It'll be great.
Attachments
Stan and Terry are right; its sounds like a good deal, but it's only a long block. No carbs, exhaust and only Ted knows what sheetmetal will come with it. And no sense in buying something even though it's a good deal if he's not going to be happy with it or it doesn't suit his purpose. But Jim's deal is better.![]()
your going to need a big shoehorn to squeeze that 935 engine in the speedster,but i would love to ride in it when its done!
Oh... it's gonna be like that huh? ![]()
I'm pulling the motor and trans asap. Maybe this weekend? The trans needs to head up north for a rebuild. They are about 3-4 weeks back logged.I can't install a new motor with mo' powah if the trans isn't up to it.
Anyone know where I can get Swing Axle trans side plate stiffeners? Does Gene Berg make them? The trans builder asked me to source them. I haven't been able to find anything.
FWIW - I think I can see a snow ball forming on the horizion. First it's the trans. While the trans is out, might as well do a kaffer bar and rear disks. Oh, since that's all out, might as well clean up the underside/rear of the car. Now that that's all taken care of, need to install an external oil cooler. Now we can't put a bigger motor in there without a breather box set up... and it just keeps rolling.
Next thing you know, I'm that guy with a 'project speedster' in his garage that never gets done. Maybe I sell it now and get out while I'm still ahead? ![]()
Ted
Is this what you're looking for? They're called side cover savers- GB 668 or GB 668A
http://www.geneberg.com/cat.php?cPath=12_2810
Yes, it never ends! Let me be the first to truly Welcome you To The Madness, Ted![]()
Is this what you're looking for? They're called side cover savers- GB 668 or GB 668A
http://www.geneberg.com/cat.php?cPath=12_2810
Yes, it never ends! Let me be the first to truly Welcome you To The Madness, Ted![]()
Bingo! Those are the ones.
I'll order 'em up. Need to get them here before the trans gets shipped out.
Sad to be taking the speedster off the road for a while. ![]()
Ted
The time will go fast, Ted. Besides, you'll have a blast tinkering in the garage.
However, I question your timing. You should keep it on the road at least until Thanksgiving. For me, Autumn is the best driving season.
Ted - you're a WILD MAN!! I like it. Hope our paths soon cross again, my brutha! ![]()
Thanks to all the advice here, the BAFN came right off. Now I need to figure out how to get to the shift rod coupler. My CMC doesn't have the cut out under the rear seat. I guess I'm going to have to make a window.
Thanks gang! Your wealth of knowledge is amazing,
Ted
Think Soob ? Kennedy Engineered Products can't be far away.
Thanks to all the advice here, the BAFN came right off. Now I need to figure out how to get to the shift rod coupler. My CMC doesn't have the cut out under the rear seat. I guess I'm going to have to make a window.
Thanks gang! Your wealth of knowledge is amazing,
Ted
If pan based the window to the coupler should already be on the top of the pan just ahead of the rear seat (just behind where the chassis makes a bend down-you may be able to feel where it's at) . Sounds like you'll need to cut thru the carpet to find it.
I'm going to get up early tomorrow and see if I can get the motor and trans out. I'll give Anthony a call and then I'll arrange the hand off at the end of the week.
Shower time.
Ted
I just read through this thread because you appeared to be about as excited as I was when I gave Troy the deposit for my Speedster.
Now I'm scared to death. I want to drive my Speedster around and not work on it. I hope I don't have to do this much work to mine. If what I know about Troy so fr I doubt it. ![]()
Hello Koda,
Welcome aboard. Make not mistake, I didn't have to do any of the work on my car, except for adjusting the ride height. The rest of it was all of my own volition.
That was kind of the whole reason I purchased bare bones project car. The work I've done is pretty much what Troy would, or could do to any one of the cars he purchases.
If Troy's done the once over on the car, you'll be fine.
Ted
Hello Koda,
Purchasing a replica speedster is like buying a pair of shoes...
One shoe is stamped "Feed your ego and wear me every chance you get"
The other shoe says "Fiddle with me when required so you can feed your ego every chance you get"!!!!
Hello Koda,
Welcome aboard. Make not mistake, I didn't have to do any of the work on my car, except for adjusting the ride height. The rest of it was all of my own volition.
That was kind of the whole reason I purchased bare bones project car. The work I've done is pretty much what Troy would, or could do to any one of the cars he purchases.
If Troy's done the once over on the car, you'll be fine.
Ted
Thanks Ted, that's good to hear. I know I couldn't go wrong buying a Speedster from Troy but I couldn't help expressing my shock at all you did. Sounds like a beauty of a car.
And don't get me wrong, I'm a bit of an audiophile and I will have mine in the stereo shop for a little something in the sound department. Nothing crazy like my high school days which was 4 - 10", woofers, a half-dozen mids, and a half dozen tweeters with three amps. Just some real clean sounds while waiting for the traffic lights. ![]()
Hey Koda, I got my 10 yr old VS Speedster 4 wks ago from a SOC member, the car is cherry I'm loving it and will drive even on cold days at the Jersry Shore. But I can't even screw in a light bulb, so I found a great old air cooled VW guy who do the work needed, talk to Kirk as needed and ask Troy and the rest for help/advice as needed.
Embrace the maddness!
Koda.
I'm not an audiophile and I don't know what it is, but you might be happy to know that your car appears to have an amplifier tucked up under the dash.![]()
On the other hand, you're going to find that no matter how good the stereos in these cars are, they are pretty much drowned out by engine, wind and road noise.![]()
Thanks Troy, can't wait for my money to get here so I can give it to you and take that car out for a loooooong drive.
Day 15... No speedster. Having withdraws.
I expect symptoms to worsen over the next 3 weeks.
Future looks grim.
Ted
Ted - anytime you're down in SoCal, my raccoon-terrorizing brutha, you & Alexis are welcome to take our Speedster out for a cruise along Pacific Coast Highway! ![]()
Ted - anytime you're down in SoCal, my raccoon-terrorizing brutha, you & Alexis are welcome to take our Speedster out for a cruise along Pacific Coast Highway! ![]()
I appreciate that my friend. You know what they say, "Once you go black..."
Ted
I may call Ken next week, but I'm afraid he'll say something I don't want to hear.
Ted
Ted, I found that it worked better to have Tony call the Kens.
Ted, I found that it worked better to have Tony call the Kens.
Ahh, good to know. I just hate to hate add to Tony's plate. I know he's busy. When we first started talking about this, Tony said it would take 3-4 weeks. If I'm being honest, based on the way he said it, I understood that to mean... a good solid 4. With the extreme possibility that it would to extend into 5.
The Ken's got the Trans on the 12th. I called that week on the 16th and they were pretty busy, so they hadn't even unwrapped it yet. We just ended the 3rd week since they've had it. Tomorrow starts week 4. We are going talk once the trans gets torn down to figure out what 4th gear I had in there and then decide which 4th gear to go with. I'm sure what makes the most sense with the 1915 and the 3.88 R&P. Tony had some great suggestions. I have them written down at the office.
Without receiving a call, I assume that it's not taken apart yet. Maybe I'll call Thursday or Friday.
No big deal, I just hope they are working on it. ![]()
T
Ted I say the "Kens" because you have Ken Jansen, the engine guy and Ken Porter, the tranny guy.
It doesn't matter which one you're working with, it's best to have Tony place the call as he does business with them on a regular basis.
Tony understands their idiosyncrasies far better than us lowly hobbyists.
AH! I thought there were two Ken Porters, maybe a father and son. ![]()
I'll reach out to Tony today.
There aren't many of us who do all our own work. No matter how talented the owner is, sooner or later, something needs to be shipped to "the guy", who rebuilds whatever it is that went south.
Of course, "the guy" is much in demand, since there aren't many still offering his unique services. The market is shrinking, new mechanics want to learn the newer technology, etc. So, as a result, we must approach this magician with hat in hand, as it were.
To further complicate matters, most of us don't live close enough to the maestro's shop to just drop in and see how the job is progressing. Does that mean that we have a tougher time getting high enough on the list to actually warrant someone looking at the broken piece? Of course, the answer is a resounding YES!
No tradesman in this field has it all: competence, fair price, accountability, and great customer service. Most of the guys we deal with have been doing this for many decades, and they aren't searching for new business. They (reluctantly, mind you) accept our business with lots of caveats up front: you know, I'm really backed up here--I really don't take these kind of jobs anymore, but since old Jack died, I'll make an exception--I really want to retire, ya know, but that worthless kid of mine won't pick up a wrench, yada, yada. The first comment from the great one himself is usually something like: wallll, whoever built this damned thing in the first place did it all wrong. What you need to do is run a weld bead down this a way, then grind it a touch . . .
To those of us who have run up against the above, you are nodding in agreement as you read this. To those who haven't, I wish I could suggest a method of avoiding the looooooonnnnnngggg waits, e-mails not answered, phone messages not returned, etc. It is what it is, and we, myself particularly, need to learn to accept it. Sounds easy, eh?
Just to be clear - So far Ken's on schedule and always available when I call. I'm not unhappy with his service, so far. I only called once the first week to make sure he had the trans. Since then, I've been assuming he's doing what I asked him to.
I think we're unsure on the 4th gear because of we didn't know what was in there and we didn't know what kind of shape it would be in. Do I Leave the stock 4th gear or do I do the bus 4th? Not sure I want to go clear up to the Freeway Flyer.
I went into this rebuild with eyes wide open. I know I could have gone with any number of 'ready made' units out of LA. I trust Terry & Tony's judgement and went with Ken. I also assumed 3 to 4 weeks meant 4 to 5. We're just starting week 4. I'm not worried yet. I'm only afraid to call because I'm afraid he'll say "it's going to cost more than we'd thought' or 'oh, *that* one..." We're supposed to touch base today. I'll let you know what I find out.
The most recent decision I'm trying to make is rear disks? Or should stick with the drums? I already have a dual master cylinder, so it should be a straight swap. I already have the woven stainless steel rear lines to swap over. With the trans out and empty, right now would be the time to switch to disks if I'm going to do it. Kustom1warehouse is the only place I've found who actually lists the AC Industries, 0 offset wide 5, with e-break in stock. I'd go with that to match what's on the front. Another $380.00 is kind of steep, so I don't know.
These cars are so light, I'm not sure I really need the rear disks. Any thoughts?
Ted
Ted- Stay with the stock .89 4th gear, as making the 3-4 spread any bigger will just be awkward; you'll have a 4-5 mph spot between the 2 where the engine's really revving a little too high in 3rd and in 4th the fan speed will be just a little too low to be really comfortable at anything but a light cruise. It works with a bigger engine (over 2 liters usually has enough torque to cruise that low) but the 2 or 3 guys on here that have done it (Ron O and I don't remember who else) didn't like it, even with bigger engines. With the 3.88, .89 and 25" tires, 3500rpm will be 77-78mph and with 24 1/2" tires it'll still hit 75-76mph.
I think it's a good thing that you're farming the trans work out to someone close and not sending it off to one of the big trans companies; it's always great to spend your money as local as possible when there's someone competent to do the work. But, whether "it's going to cost more than we'd thought' or 'oh, *that* one...", you need to keep on top of it; there's nothing worse than them assuming you want this or that, and it lets them know that you don't want it sitting there forever, so call and check often enough that they know you want it soon.
If you were running substantially different tire sizes front and back and you'd upgraded to front discs then I'd say you definitely need to upgrade the rear brakes, but your car has the same tire and rim sizes front and back, correct? With the same tires all around, the front disc/beetle back drum combo is fairly balanced (VW did it on the Karmann Ghia and it worked great) and will work for most people almost all the time. Unless you really like to hot-foot it around on a regular basis it's not necessary, but if you can afford and justify the rear discs, you could do it. That $400 would put a stroker counterwighted crankshaft in your new engine though. A 78x94 would really kick ass; just sayin'...![]() . And then you could decide at a later date if you really need rear discs...
. And then you could decide at a later date if you really need rear discs...![]() . Hope this helps, Ted. Al
. Hope this helps, Ted. Al
Spoke with the Ken (Transmission) - he says that we're on track for the 14th. Which is about 5 weeks. Kind of like I had expected. He's also saying stick with the .89. That reaffirms what everyone has said (Tony, ALB, Terry, etc.). The 3.88 is going to be a big improvement. The beef-a-diff, ten tooth outer gears, welded 3rd and 4th, steel forks, etc will add some heft to the equation. I followed Gordon's lead and went with the Rhino mounts.
I went ahead and bit the bullet on the wide 5 rear disks (with 0 offset). I already have a dual circuit master cylinder, so I'm hoping it's a straight forward swap. I'll switch over to the SS lines at the same time. The trans is out, the gear oil is already drained, I'm putting in new seals anyway - might as well just do it once. Buy once. Cry once.
Maybe I'll get half of that Kaffer bar installed tonight? Maybe.
Weee!
Ted
That $400 would put a stroker counterwighted crankshaft in your new engine though. A 78x94 would really kick ass; just sayin'...![]() . And then you could decide at a later date if you really need rear discs...
. And then you could decide at a later date if you really need rear discs...![]() . Hope this helps, Ted. Al
. Hope this helps, Ted. Al
If I did anything like that, it'd be down the road. And I'd opt for a 76 x 94. ![]()
Keep is simple.
Ted
Not trying to beat anything to death here...just trying to learn. Alb, you wisely say above that with 25" tires and the 3:88 and .89 fourth gear a car will go 77.5 mph at 3,500 rpm.
Not trying to pick hairs here either, but does anyone take into account that the tire is not round? ...It really is flat on the bottom where it meets the road and a quick measurement with my setup shows that the radius is actually about 1/2" less than 1/2 the diameter just by the weight of the car and thus the "true" radius is reduced where it is most effective...the center of the hub down to the road. It only accounts for about 4.35% on a 25 inch tire if I'm right, but your rpm might go from 3,500 rpm to 3,652.
Not a big hill of beans for sure but how many times do we hear that lads say their
speedo is off compared to other peoples stated rpm.
So, my situation is this...I just measured the diameter of my tires and they are 24" diameter, yet flat by about 1/2" on the bottom yielding an effective radius of 11.5".
Now, going from Al's reference above with the 3:88 / 89 fourth doing 3,500 rpm hitting 77.5 mph with an effective 12" radius, I'd be doing about 3,652 rpm. But
for now I have the stock 4.125 which would give me 3,882.
Thinking about a new tranny upgrade soon, if I went from the 3:88 down to the
3:44, with the same tires I'd be doing 3,237. Now couple with that my real cruising speed is between 60 -65...call it 62.5, my actual rpm would be about 2,610 rpm.
Sounds like a good choice considering this torque graph or not ? Thanks..
Attachments
David, I've raised that point over the years with a good number of people, and nobody seems to think it matters, so I don't bother any more, but I do think you're right. Other people have told me that at highway speeds the tires "lose" that flat spot and the full diameter is accurate to use in gear ratio calculations. The problem is that with the inaccuracies of the equipment we're dealing with (cheap electronic tachometers aren't that accurate from day to day and a speedometer design that comes from just this side of the stone age) it's approximations at best. I guess the bottom line is whether it's 76 or 78 mph (or whatever the numbers may be), use it as a comparison tool.
From what I've read, I'm of the understanding that your thinking the Subaru engine can "pull taller gears" in these cars is correct. A large (2200cc's or larger) VW aircooled engine with a 5500 or 6,000rpm redline will have a very similar torque curve, but being watercooled, the subie isn't saddled with the minimum rpm cruising restrictions that our beloved aircooled engines have to live with. Ask around some more before committing, but I think you're on the right track. And if (for whatever reason) the 3.44 doesn't work out, I'll buy it off you. ![]()
And David- call me Al; ALB sounds so...you know....formal...![]() And come on; you know the tune....
And come on; you know the tune....
And Ted- Hey, no sweat. Remember, though, as you're driving that new 1915, that another 250cc's (and the increased stroke) will transform your car!![]() And whether it's 76 or 78mm it'll all be good!
And whether it's 76 or 78mm it'll all be good!
Day 30 - Things look hopeless. Decided to clean up the carcass a bit.
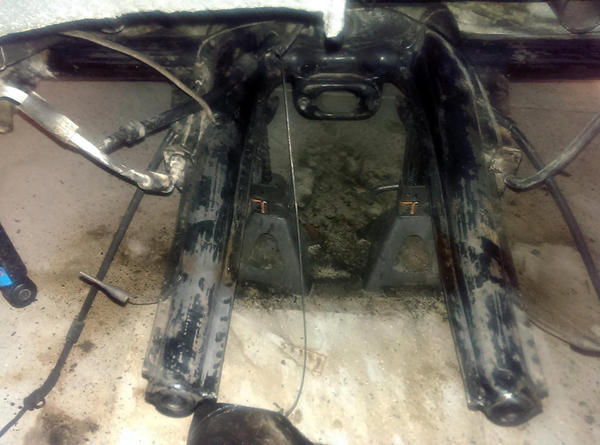
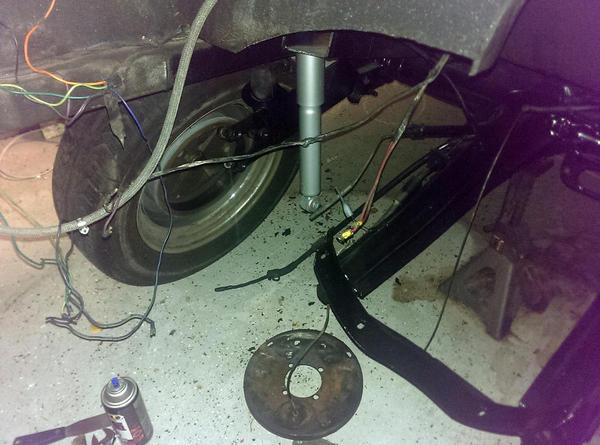
The first shot shows how the frame horns looked after I removed the engine and trans. The frame horns were CAKED with years of grime and grease. The surrounding area is littered with nuts, bolts, discarded tools and surgical gloves.
The second shot shows the same area after I a good cleaning.
The final shots are after cleaned everything with a good detergent and hit it with some high temp primer and paint. In hindsight I wish I had used Satin or Matte Black.
Sorry for the horrible image quality. Cellphone camera in low light.
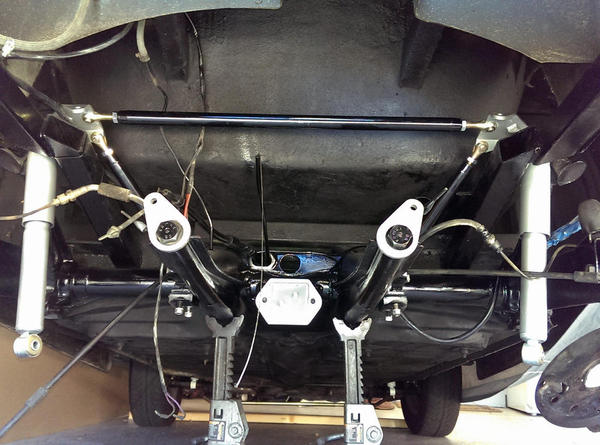
Today I will install the Kafer bar (most of it...) need to leave two bars off until the trans is back in place.
Then I need to clean up the wiring loom. Can't wait to get rid of the old drum set up. New e-brake cables and rear disks will really clean up the area.
Oh, some of you will notice that I still have the rather long and gangly full length fuel tube. Should shorten it down closer to the frame horns and run some fuel hose instead of that gnarly crooked tube? I saw Teby's set up and it looks a lot more sanitary.
Thanks for checking in,
Ted
Attachments
Ted- Looks good! The gloss is nice because it wipes up better, so don't sweat it. I use an ice cream bucket for loose stuff and find it helps immensely. I've never seen the fuel line left like that, but then I haven't seen that many other Speedsters. Cutting it shorter, using fuel hose and putting the fuel filter in that area is probably the better way to go. Next time you see Teby could you get a pic? It's always interesting to see how other people have done things. What's the status on the gearbox?
There aren't many of us who do all our own work. No matter how talented the owner is, sooner or later, something needs to be shipped to "the guy", who rebuilds whatever it is that went south.
Of course, "the guy" is much in demand, since there aren't many still offering his unique services. The market is shrinking, new mechanics want to learn the newer technology, etc. So, as a result, we must approach this magician with hat in hand, as it were.
To further complicate matters, most of us don't live close enough to the maestro's shop to just drop in and see how the job is progressing. Does that mean that we have a tougher time getting high enough on the list to actually warrant someone looking at the broken piece? Of course, the answer is a resounding YES!
-----------------------------------------------------------
Here is a link to an extensive "mental masterba...tion" ![]() about the need for disk brakes.
about the need for disk brakes.
I was on the fence when I asked the question, but now agree that rear disks are an improvement. I originally posted the question based on the thought that "if you can lock up your rear drum brakes, how will having disks stop you any quicker?" What convinced me was the fact that over heated rear brakes may not be able to lock up and would not help stop you at all if that was the case.
https://www.speedsterowners.com...-a-need-talk-it-over
Day 30 - Things look hopeless. Decided to clean up the carcass a bit.
The first shot shows how the frame horns looked after I removed the engine and trans. The frame horns were CAKED with years of grime and grease. The surrounding area is littered with nuts, bolts, discarded tools and surgical gloves.
The second shot shows the same area after I a good cleaning.
The final shots are after cleaned everything with a good detergent and hit it with some high temp primer and paint. In hindsight I wish I had used Satin or Matte Black.
Sorry for the horrible image quality. Cellphone camera in low light.
Today I will install the Kafer bar (most of it...) need to leave two bars off until the trans is back in place.
Then I need to clean up the wiring loom. Can't wait to get rid of the old drum set up. New e-brake cables and rear disks will really clean up the area.
Oh, some of you will notice that I still have the rather long and gangly full length fuel tube. Should shorten it down closer to the frame horns and run some fuel hose instead of that gnarly crooked tube? I saw Teby's set up and it looks a lot more sanitary.
Thanks for checking in,
Ted
Ted, is your left rear tire rubbing on something? Maybe just the optics of a phone camera or my aging eyes?
Thanks for looking out for me,
Ted
Kafer bar 2/3rds of the way installed. Need to wait until the trans is back in before I can wrap up the final install of the two rear bars. I also need to trim the rear trans mount to properly clear the clevis ends.
Maybe next I'll install the new calipers, stainless lines, and emergency brake cables.
Need to stay busy until Ken is done with the trans.
Is there any sort of market for nearly new rear 67 drums, backing plates and cyls?
Ted
Attachments
Ted- Sell them on the Samba. You won't get a lot for them, but they'll be out of your garage. I don't think the rear brakes are '67 only, but I could be wrong.
Ted, I'm in South San Jose, and I think one of my rear drums may be warped. If they are compatible it ay be easiest for me to drive out and get them for a few bucks and lunch in Morgan Hill. Mine is a 70 IRS pan. Looking at parts on-line I think 65-67 rears may not work on a 70.
Hello Ted:
Great project, and that last shot really shows the configuration of the fiberglass body especially as it relates to the engine firewall and the passanger compartment rear deck and rear seat area.
If you have not installed something like Dynamat underneath the carpet in the rear passanger compartment area, did you ever consider installing it underneath the car in these areas now that they are exposed and easily gotten to while the engine and trans is out ?
I only ask because I am thinking of doing this with my speedster, but the the major obsticle is engine removal.
Grant
Hello Grant:
With a little practice you'd be able to 'drop' your engine (like Gordon Nichols does) on your coffee break...
And I've seen video of two man teams in an 'Engine Drop Contest' that have it choreographed within a minute!!!
Ted...re: the Kafer bar....did you get a stiffy when you saw the Mendeola site?
Ted, I'm in South San Jose, and I think one of my rear drums may be warped. If they are compatible it ay be easiest for me to drive out and get them for a few bucks and lunch in Morgan Hill. Mine is a 70 IRS pan. Looking at parts on-line I think 65-67 rears may not work on a 70.
Ted's drums may be wide 5, while yours may be 4x130mm if they are both original to their respective pans, so make sure you know what you have.
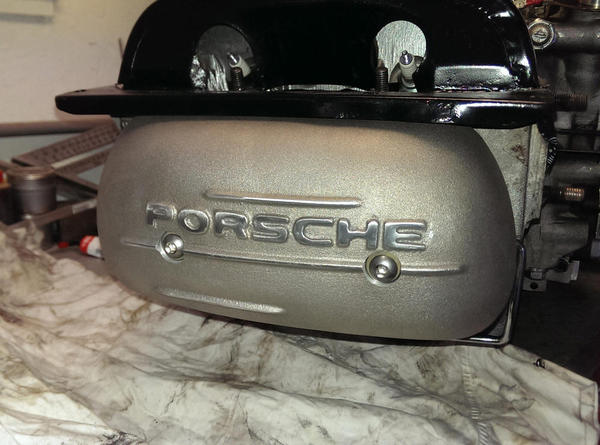
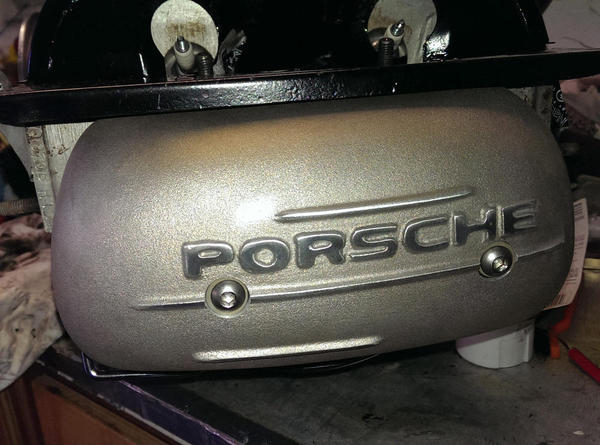
Yesterday I took the time to install a new fuel pump, distributor, the type 4 oil cooler, and the valve covers on the 1915. Maybe this week I'll get started on the rear disks.
I read Troy's thread on rear Disks. A common theme was that I needed to update my master cylinder to a 'big bore' unit. I have a second unit that came with the front disks. Does anyone know what part number I should be looking to install?
The Kafer bar is from Kevin at CoolRydes. It is a Mendeola unit. Super easy to install. Very high quality. Overkill for my motor, but that's why they call it madness.
I have considered adding dynamat to the rear seat area. My carpet isn't in the best shape. It's original CMC carpet from the early 90's. It's due to be replaced this winter. Once I pull the carpet I'll install the dynamat in the cabin area. I was talking with Anthony a little over a month ago about adding dynamat to the tin/fiberglass that engine surrounds the engine bay. The thinking would be to install a heat barrier to knock the engine bay temps down a bit. The A1 puts off a lot of heat and it rises straight into the engine bay. I look forward to seeing if I can correct some of that.
I'm going to call Ken Porter today and see if he's going to have the trans completed this week. I'm hoping that he didn't have any unexpected surprises.
Ted
Attachments
Ted- I've always thought that insulating the underside or the engine tin that goes over the exhaust would be beneficial; if you find a material that works let me know. I haven't taken the time to look yet.
As a cheaper alternative to dynamat (at least for interior radiant barrier) I found this useful. http://www.homedepot.com/p/USE...pe-8872AF6/202086180
I don't think that material will stand up, being so close to the exhaust. I assumed that I would need something more along the lines of being asbestos based for a heat barrier, being directly above the pipest.
Yeah, it's asphalt based so I would only use it on interior panels for radiant barrier/sound dampening. Maybe on a firewall. For the exhaust you can use an exhaust tape-wrap and/or an aluminum heat shield.
I just spoke with Ken Porter, in Eldorado Hills.
The trans is torn down and all of the machine work has been completed. Nothing too surprising inside the box. He's confident we'll be on track for me to pick it up on Friday. Sweeeet! I'm going to leave out of Morgan Hill early so I can get up there and back before traffic starts to suck.
Hard to imagine that it's possible that I may have the trans back in this coming weekend?!?
I guess I'd better figure out what I'm going to do about that Master Cylinder. ![]()
Ted
Excellent! Is the stock differential going back in it or are you putting in a Super-diff?


