DANG! That look pretty cool! Looking forward to hanging out with my knucklehead SOC friends in SLO, my brutha! ![]()
It's been a while since I posted an update.
I have been too busy driving! Since the SLO meet I've had nothing but smiles. I will say this, we had an odd moment with the tow bar on our trip home, but I'll save that story for another time.
I wanted to share my latest update!
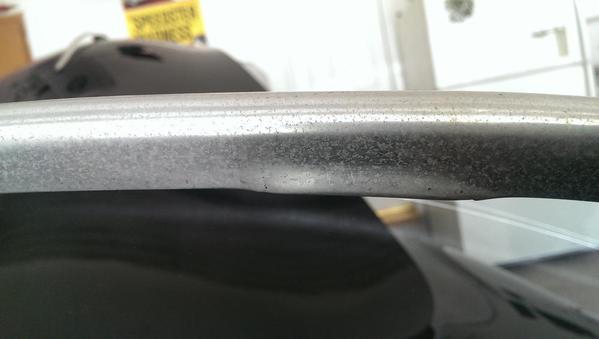
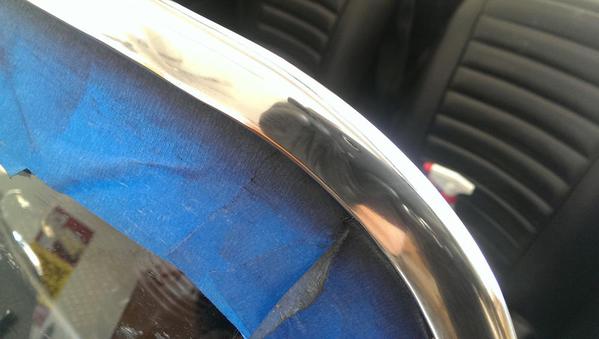
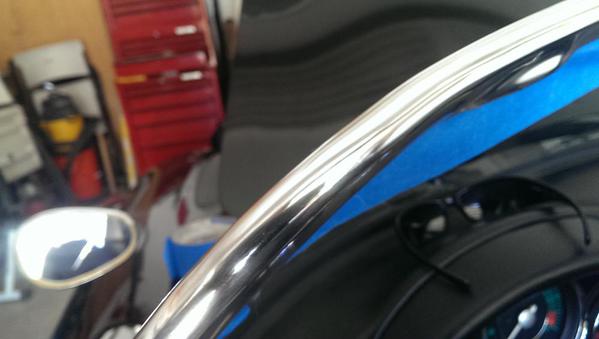
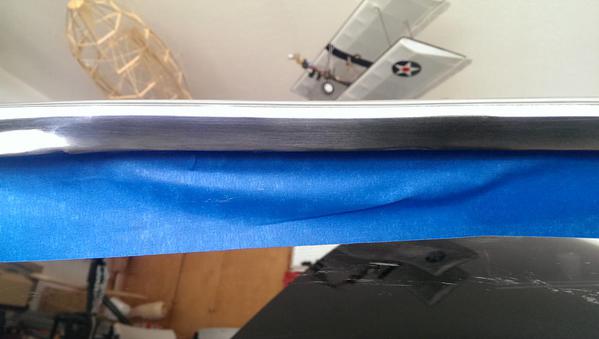
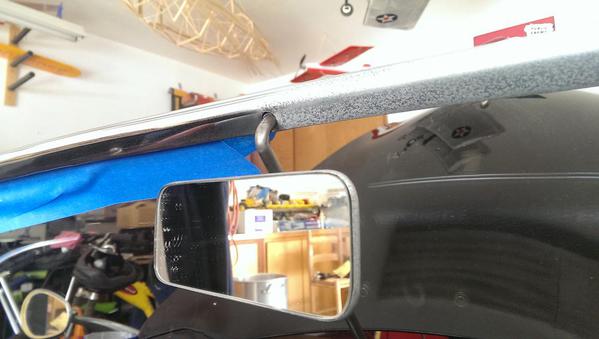
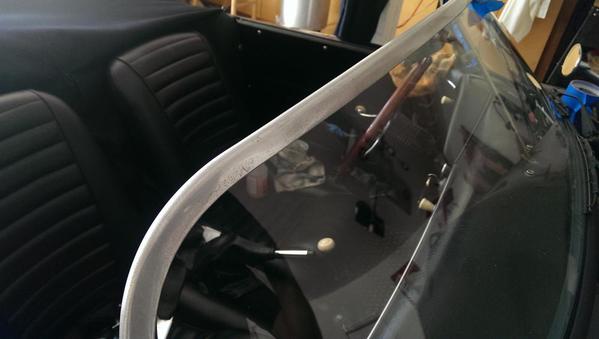
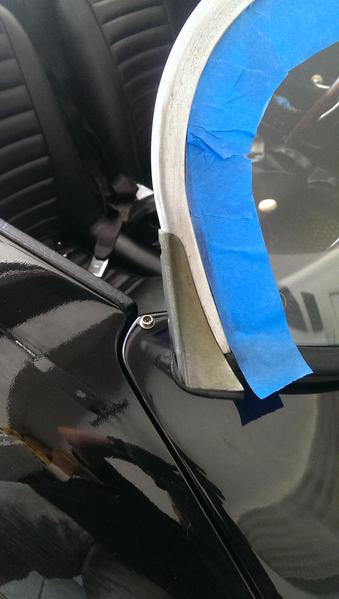
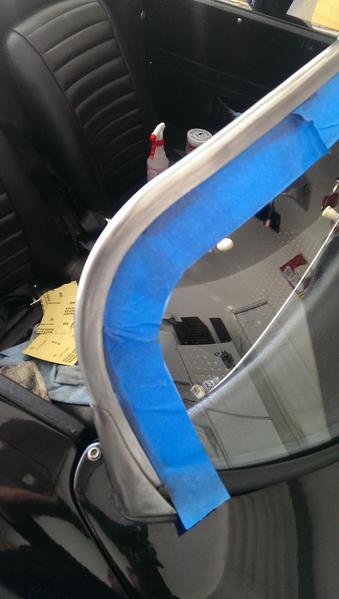
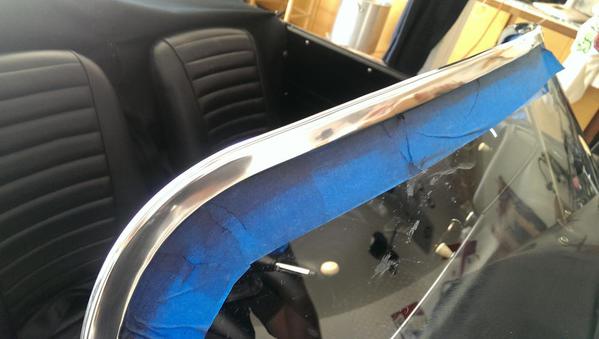
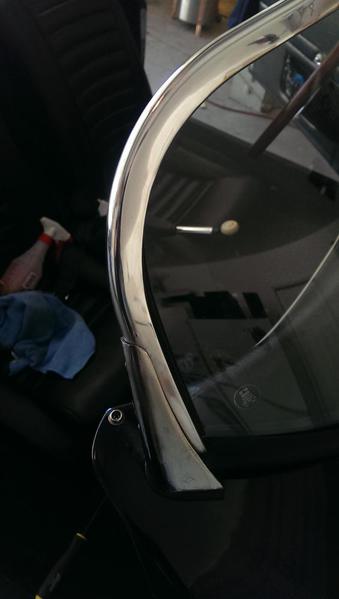
My Black lady, the Shwarz Frauline, spent from 1996 until 2014 in Seal Beach, CA. That's like... two blocks from the ocean. As such, she spent some time breathing in the salt air. Her bright work may not have fared so well. Lots of corrosion. Last weekend I decided I was tired of looking at the sad state of her aluminum bits and went to work with some Neverdul, 400&600 grit wet dry, and some mothers. DO NOT TRY THIS WITH CHROME. This process worked ONLY on the aluminum bits. The chrome posts were pretty far gone. They will need to be replaced. As such, I cleaned them a bit with steel wool. They bounced back, but you can still tell that they are roached.
Basic steps are:
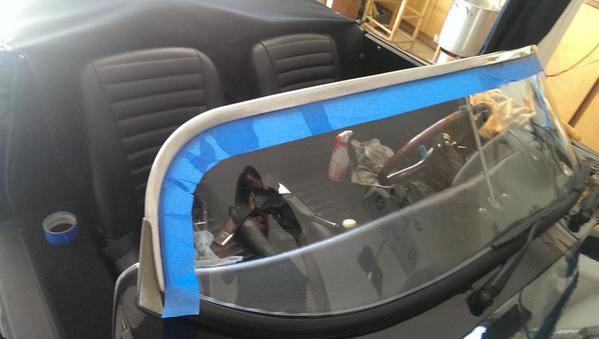
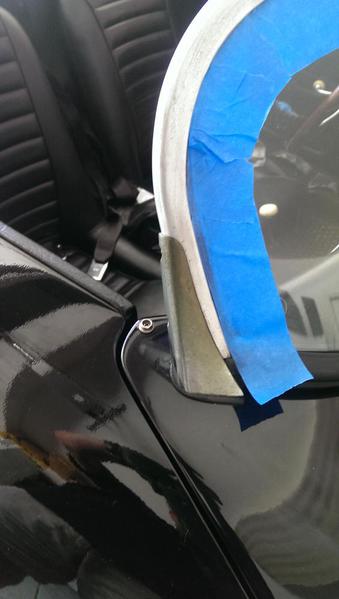
1) Tape off what you don't want to sand
2) Check that you really taped it well
3) By hand (no need for power tools here) Sand with 400 ( I hit the immediate area with a swipe of a wad of "Never dull") This lubricates the area. You could use water if you don't mind the mess. Using Never dull or some other product means you will use more sandpaper in the process.
4) After the 400, hit everything again with Never dull and 600. Sand with the grain. If you can't find the grain, sand the 'long direction' of the frame.
5) DO NOT get all crazy cranking on the windshield frame. Use only about as much pressure as if you were waxing the car by hand. Just sand the aluminum like you were sanding some soft pine. Nice and easy with the grain. Lots of lubrication.
6) Make sure your paper isn't all clogged up. After a little bit, you will no longer feel the roughness of the corrosion. Once you have a nice smooth and uniform surface, switch to the mothers.
7) Using mothers or another aluminum polish - polish the surface until it shines. the rag will quickly turn black. Keep using a clean part of the cloth. In no time you will have a black rag and a shiny chrome like surface!
8) Sit back and enjoy your refurbished apart~
Below are the before, during and after shots. This took me about an hour and a half from start to finish.
Attachments
Looking good, Ted!
Even in the dry climate where I live, I have to pull out the Simichrome at least once a year and polish the windshield frame, along with all the other aluminum bits.
Looks fantastic Ted!
Ted.
Are you sure you really needed to use the sand paper? I have never seen a case where Simichrome or Mothers and elbow grease or a buffing wheel didn't bring back a mirror like shine.
I would highly recommend that you stop using steel wool and go to bronze wool. There is a 100% chance that you will leave tiny bits of that steel wool in nooks and crannies. IT WILL RUST!! Bronze wool will not. It is available at marine stores i.e West Marine get fine grade.
Good idea on the bronze wool but I have done exactly this same treatment on my VS with sensational results. Where it really made a hugedifference was on the bumber gards which were a mess and the only popolish that ever had a chance to shine them up was Rusty's secret polish he sends me from time to time. Both my windshielsdframe and bumper guards look like new with a shine almost as bright as chrome plating.
It was scary to apply the sandpaper to the windshield frame but I had used this process before on my airplane's aluminum nose cone with great results.
Ted said to sit back and enjoy the refurbished parts and that's exactly right because it truly is completelt refurbished.
Ted.
Are you sure you really needed to use the sand paper? I have never seen a case where Simichrome or Mothers and elbow grease or a buffing wheel didn't bring back a mirror like shine.
The pitting was quite severe. The car spent 10 years two blocks from the coast sittin in an uncovered car port. The trim looked like the surface of the moon. I used to have a vintage travel trailer and the sandpaper treatment never failed me when I polished that sucker. I've never actually seen Simichrome. Is it more abrasive than mothers? I will say that now that I've knocked down the rough surface of the initial oxidation I'm sure I won't have to go that route again.
Good idea on the bronze wool. The bumpers / chrome seem to really come alive with once you cut the surface crud.
Ted
Speaking of oxidized parts! I just received a large box from Sierra Madre!!
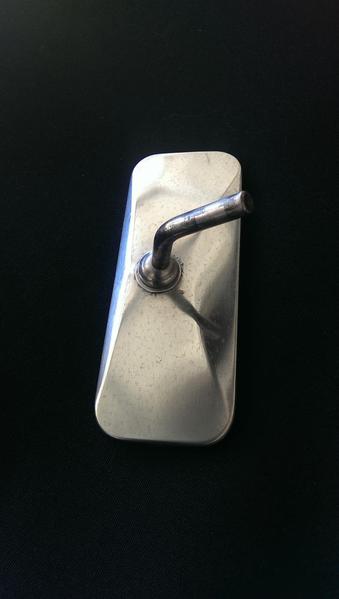
New fender mirror
New horn grills
New horn grill gaskets
New ignition switch (with the proper bezel and two keys)
4 new moon hubcaps
Back ordered:
4 drum skins. ![]()
I can't wait to get everything installed. All of the parts, with the patina intact, will be for sale - cheap!
Ted
Beautiful, Ted!
Ted, it looks like you learned quickly on the color sanding topic. Nice job!
Hey guys!
Thanks for the kind words. I appreciate it. I only did the one side and boy what a difference. Looking at it again, it could still use more sanding in some areas. I was just telling Carl that it was a multi step process that took a good part of the morning. I can't wait to do the hood and the rest of the car.
Highlight of the day yesterday was when a bunch of Harley riders pulled up next to me and said "That Black paint looks great. What do you use to get rid of the swirl marks!?..." ![]() Their bikes looks fantastic too!
Their bikes looks fantastic too!
I used a Cyclo Polisher and some Chemical guys Black wax as the final step. I don't know if it's better than any other wax, but it looks deep.
I highly recommend anyone to check out autogeek.net and watch a couple of videos. I learned a ton just from watching them.
I'm about to crawl under the car to change the gear oil and install new boots.
Wish me luck! Need to keep one eye on the car and the looking out for that damn raccoon / German Shepard from SLO.
He's still out there...
Ted
Wow, Ted! Great job.
What a great job on that color sanding, Ted! A world of difference. You are a MACHINE!
BTW - That raccoon and his buddies are getting some serious mileage outta that hotel parking lot story!! ![]()
This made a cold shiver go down my spine... I realized I had better go at least look at it. An hour later I had it completely apart and was removing a piece of bone or rock out of the internal garbage disposal / chopper assembly. Naturally the hard material deformed a blade and the chopper screen. Out to the garage to sharpen and straighten the assembly. While in there, I figured I had better de-scale and clean all the crud. All on all, I had it back together and running in a couple of hours. But the speedster is still apart.
She who shall be obeyed... Always wins.
The upside is that the dishwasher looks and runs like a top! Funny side note is that my brother in law came over. He saw what I was up to and said when their dishwasher died, it took two weeks for somebody to come look at it. Alexis said... "Two weeks?...". All I was thinking was "you hired someone to come look at it?!"
I'm so glad I'm handy...
Ted
My hat's off to you, Ted. I work on commercial refrigeration equipment for a living. I HATE appliances.
I went back out to install the new boots. Couldn't get them to seal correctly. I would squeze one like a bellows and I could hear air rushing out. The silly Mexican hose clamps exploded under any sort of load. Need to go back to the store and get better ones. Should I expect air to escape out of the boots? I'm using oem split boots.
When I was cleaning out the oil drain pan I found a sliver of metal about the size of a pinkie finger nail. The drain plug was packed with a mud like sludge. Such a bummer. I'm guessing a new trans is in my future. I'll run this one till it scatters itself beneath me.
How the he'll do I seal these boots?!
Ted
Here is a little trick to use on chrome that is hazy or spotty like this... instead of sanding or wet sanding.... take Coca-Cola and aluminum foil. Poor the soda onto the aluminum foil and use it as if you were clay-baring your car. Rub with the grain. Takes off the spots, rust, etc without dulling the chrome or removing a layer of finish. Then buff or hand polish with chrome polish.
Ted - You could have said "You wanted to finish your axle boot project, and Alexis (SWSBO) wanted the dishwasher fixed. So you compromised….and fixed the dishwasher"! ![]()
Ted- If the trans is a high mileage unit that hasn't had an oil change in too long there's going to be some sludge around the drain plug. The sliver? Who knows; is it aluminum, steel or brass? Doesn't matter- as long as the thing runs, doesn't clunk or do anything weird, then run it until you're ready to replace it. IIrc, guys used to use silicone around the axle tubes and in the joints to make sure they didn't leak.
And smart man, listening to SWSBO! Makes life easier in the long run...
You said it.
Remember back in the day, when everything had an electro-mechanical timer, which had 42 micro-switches, a timer motor, and more gears than the average Breitling? I thought solid-state controls would be the do all and end all for 95% of what ailed appliances, but no... now it requires a computer interface module to get the failure codes cleared from the freaking clothes dryer. GE. No joke.
Appliances are built to be sold at a price-point, with some profit at every stop along the way. They are now built to last as long as the warranty, plus one day or so before the control module, drive motor, or other really expensive, really buried part dies.
They are wicked little pieces of junk, and I'd rather toss them and start over than spend even a few hours of my life fighting them. I need that time for more useful pursuits like burning time on the internet, or twin-plugging a glorified lawn-mower engine.
You might have noticed: I really don't like working on appliances.
Notice we don't fix things anymore. They are either too expensive or too complicated to repair. Our cars are trouble prone, but fairly easy to repair...sort of.
Can you imagine trying to repair a 2014 Mercedes, Porsche, or BMW (or any new car) when it's 10 or 15 years old?
Probably not.
By 10 years old any failure of the many computer controlled system will cost more than the car is worth.
Today we'll throw away old TVs, receivers, microwaves, etc.
Tomorrow we'll throw away (recycle) older cars.
I don't mind taking things apart to fix them. It's the putting-them-back-together part that I find hard. ![]()
Ted - now that you buffed your paint to a mirror finish, we can see in the reflection that you're still sporting those Dolphin shorts when you're working on your car! ![]()
While the dolphin shorts were in the wash, I replaced the old generic CMC ignition with a genuine Bosch unit with period correct Porsche style keys.
I posted the updates to the blog, but I'm not sure if I'm going to continue to go that route.
Today I decided to replace the original cmc ignition switch for a quality Bosch unit. Very straight forward update. Had to enlarge the existing hole by 3/32nds all the way around. Once it was enlarged I just dropped the new unit in. Once it fit, I swapped the wires over. Very straight forward.
The back of the original unit:
The back of the new unit:
Beautiful Chrome Speedster bezel and correct shaped keys:
Terry Knuckles captured the SLO Raccoon and brought me a souvenir. An authentic raccoon tail key chain.
Next up? replace the headlight and wiper switch bezels.
Thanks for checking in,
Ted
Been too busy working and driving to check in much here on the site.
Oh, yeah... I also settled on a motor.
1915 CC
- New Heavy duty aluminum engine case with case savers and reinforcements around #3, full flow, etc.
- New Counter weighted balanced 69mm Crank
- New I-Beam rods (balanced)
- New Bearings and all of that good stuff
- High pressure oil relief valves and springs
- New Scat 120 Cam
- Cam oiler lifters
- New Lightened Flywheel
- New Heavy duty Oil Pump & Cover
- New 94mm Mahle Pistons Cyls
- New Cool Tins
- New double o-ring aluminum push rod tubes
- CB Perf 044 heads, 40 x 35.5 (Stainless Steel Valves, Dual Hi-Rev Springs, Chromeoly Retainers, etc)
- New Chromeoly Push Rods
- Heavy Duty Rockers
- Thin Line Oil Sump - 1 1/2 qt.
- 1.5" A1 Sidewinder
- Dual Kadrons (Proper Jet's & Venturi's)
- SVDA Distributor with electronic ignition
- 8.5:1 compression
Now I need to figure out what trans to get!
This engine will be fun! A couple of things-
Unless there's something about the aluminum cases I don't know about, stock oil control and oil relief springs are fine; as a matter of fact, a stronger spring at the flywheel end will blow up the cooler.
Are you going to be using Scat lifters as well? They have a reputation of not lasting very long. Send them to Steve Long for his treatment (I don't know what it is).
What length gears are in the oil pump? Any thing bigger than 26mm and you're wasting power by continuously pumping the extra oil back into the sump. I've never liked the Melling pumps- the cast iron bodies don't expand with the case as the engine heats up and sometimes they are the source of lower oil pressures at idle when hot.
I would use the type 1 sled tins, bottom diverters and industial tins; they were made for the upright cooling configuration. The sled tins also protect the cylinder bottoms and the thermostat from colder air (and water) while the car is moving.
Do you mean C35? C25? C45? Engle W120?
I know they are more money, but Aircooled.net's aluminum pushrods are easier on the valve train (because they are lighter), their expansion characteristics match the engine better, and you may find the chromoly ones are noisier when the engine is up to operating temps.
If you're buying rockers, buy 1.25's; they'll give close to 1/2" lift with the cam you're looking at, which is perfect for those heads. Anything less is leaving power on the table.
You could bump up the compression a 1/4 or 1/2 point (depending on the cam).
PS- A magnesium case would be perfectly adequate for this build.
PPSS- Consider modifying the engine case, followers and rockers for better oiling-
http://bobhooversblog.blogspot...007/05/hvx-mods.html
Good Info! Thanks. The motor is supposed to spool up pretty high in the RPM range. With everything being balanced and lightened it should be fun. The cam kind of eats up the low end torque. Not sure exactly how the power band will look. I may even bump up a few extra $$ and go with some ported heads and webers. (I can't have that ole dirty SOB Musbjim taking me in SLO next year. ![]() )
)
I'm headed to look at the motor tomorrow. I'll let you know what's up with the oil pump size, the cam and the relief springs. The builder said "Scat 120 cam with straight cut gears". I'm guessing a C45 as thats as close to an Engle 120 as you're going to get. Not super excited about the straight cut gear noise, but I'll learn to live with it. I'm on the fence between just the dog house oil cooler or running an external cooler (plus fan) and the stock dog house cooler.
This motor won't go in until the winter when the new trans is ordered and installed. I guess at that point I should upgrade to rear disks as well.
Tomorrow will tell the tale.
Giddy up!
Ted
Is the engine already built?
Do you have concerns?
Ted
"Yes. Shop built it for a customer. Customer's wife said no fn way. Shop is selling motor to cover losses." -TRP
I see he is also married to She-Who-Must-Be-Obeyed! ![]()
Concerns- An engine that revs to 6500 with power isn't exactly what I call a reliable cruiser. It will need a little more messing with than normal and the bottom end/midrange (where we do most of our driving) will be a little "soft" to 3,000rpm (or so). I've run an engine like this on the street, and while it's a lot of fun off the stoplight, if I was building an engine that size for someone that wants more power but is looking for reliability as well I'd use a C35 or W110 (with 1.25 rockers) so it would only go to 5800 or 6,000rpm with power. This would provide more power through the bottom end/midrange and get better mileage as well.
The bottom line- While this engine will beat Jim's, it's not the jump in and go anywhere, any time powerplant that I think you are looking for. The normal rpm range of an Engle W120 is about 6,000rpm, while the C45's range is 6500 or a little more. The difference in duration is 8 or 9'- the W120 has 253' dur @.050" while the C45 has (I believe) 262' @ .050".
A couple more thoughts-
I didn't catch the straight-cut gears part; some are noisier than others, and while initially the sound is really cool, a lot of guys find it gets old fast. If you want the wife to spend a lot of time with you, the extra noise may not go over so well (hey- another reason for splurging for aluminum pushrods!). As I mentioned before, I've run an engine like this on the street (1750, W125, ported 40x35 heads, 44IDF's and 1 1/2" exhaust) and it was a lot of fun, but it didn't really get on the powerband to 3,000 or 3500rpm. It was great for surprising the sh*t out of a lot of Camaro and Mustang owners (most didn't take well to being beaten by a VW). With close 3rd and 4th gears (needed with the narrower powerband and small displacement)it was surprisingly fast considering it's size, but if you're main interest is more cruising around the engine should be in it's most efficient phase a little lower in the powerband.
Don't get me wrong, this much power (140hp or thereabouts if everything is right) in a Speedster would be so much fun! That's more power than the original Carrera equipped cars. This is why I (and others) are always advocating stroker engines; the increase in displacement (and lower rod ratio with a longer stroke crankshaft) creates an engine with the same amount of power (or more![]() ), but at a lower rpm and with way more power "under the curve", or in the lower rpms where we do most of our driving. This negates the need for close gears (and resulting slower highway speeds) to make the best use of the powerband in the higher strung, smaller engine. The bigger, milder cammed engine will also get upwards of 30mpg on the highway and decent mileage around town when driven sanely; I know, so hard to do, but isn't it great to know it's possible?
), but at a lower rpm and with way more power "under the curve", or in the lower rpms where we do most of our driving. This negates the need for close gears (and resulting slower highway speeds) to make the best use of the powerband in the higher strung, smaller engine. The bigger, milder cammed engine will also get upwards of 30mpg on the highway and decent mileage around town when driven sanely; I know, so hard to do, but isn't it great to know it's possible?
I always thought the perfect street engine was that 1750, only bigger. It's really too bad I never got around to stroking it...
Hope this helps, Ted. I know it's not what you want to hear... Al
Well - I don't have to buy it.
After reading your notes (thank you) - I'm left to wonder, what purpose does a motor of this nature serve?
I tried adding this to the above post but timed out, so here it is-
Transaxle- Beefed up to handle the higher hp- super diff, hardened keys, welded 3rd and 4th hubs. If you really like ripping around on the street, don't care about highway speeds and aren't afraid of the local police, a 4.125 or 4.375 ring and pinion with close ratio 3rd and 4th gears are a lot of fun. If just driving and getting out on the highway are more your style, stock 1st-4th with 3.88 r&p will give the best results. If the main emphasis is on canyon carving- close gears with the 3.88 would (I think) work well; top speed on the highway will suffer though.
If there's someone local that really knows VW transaxles, great; always best to spend your money in your neighborhood. Other option is Rancho Transmissions. They have a good reputation, know what a VW transaxle needs and have the parts to do pretty well anything you want. When talking to whoever the builder of choice is, be honest; "I don't really drive it that hard" will not last as long as "I really like to wail on it occasionally". Don't be afraid of spending a little extra money so it lasts longer!
I haven't mentioned the ZF limited-slip and Quaife because either will add well over $1,000 to the bill, but either would be fun...
PS-
"what purpose does a motor of this nature serve?" you ask-
A stock stroke engine like that is a cheaper way to get into some fairly serious power. It will be a little peaky (it will feel like stock until it "comes on the cam" somewhere between 3 and 4,000rpm and then take off like gangbusters) and engines that rev that high take a little more to take care of. The same heads, carbs and exhaust in a 2 or 300 cc larger engine can be cammed to peak 1,000 rpm earlier and make the same hp with a way fatter torque curve, but costs more to build. As I said earlier, it would be fun, and if it's a real deal (the guy's just looking to get paid for the parts), just know what you're getting into.
Think of this engine as more of a boy racer thing; I built my similar engine when I was in my early 20's, and knowing what I know now, would build something bigger.
I'll sleep on it.
No sense in throwing money at something that I won't enjoy.
Thanks for the advice.
Ted


