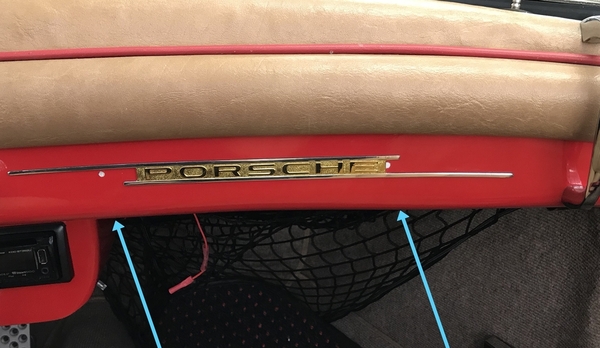
Take my word for it- these holes in the dash look much worse in person!!  In part because this photo shows it with spackle that I was playing with, so they look more flush and not as dark.  But also the photo just makes them seem smaller.  They wouldn't bother me as much except that every passenger immediately says "what's up with these?" or "you should fix this" 😩😠.  The holes are right in front of them, after all.

Any clever ideas on how to treat these holes?  I do have the touch up paint in the correct color, but it seems the body work skill level is pretty high and involved to make those surfaces perfect (but any advice for this route would be very welcome nonetheless).

So I'm thinking a trick like covering with a sticker (probably kinda tacky?), a clock or timer in the form of a pocket watch (like the ones seen here), mounting a Porsche emblem the size of those typically on the steering wheel horn or key chain leather patch (but I'm trying not to scream Porsche everywhere), a small leather cord looped so that it's supposed to be somewhere the passenger can hang sunglasses from...  I'm reaching here.  Help!

IMG_4172_edited

Attachments

Images (1)
  • Dash holes
Original Post

Replies sorted oldest to newest

Seems like a small dab of bondo ( in lieu of sparkle), and touch up over the bondo ( since you mention you have the color matched paint) would be the easiest way to go. Almost like touching up a rock chip... most wont see it from 3 feet away.

if you want to make a project of it - a body shop - detail shop (that works on fiberglass)  that does rock chip / door ding repair could fill it and airbrush/ touch it up.  It could cost a couple hundred,  but it would make it disappear.  Maybe a local corvette or RV shop can point you in the right direction.    

I had all the rock chips on my black Q7 touched up before the clear braw/wrap was installed and the guys made all the chips disappear.  It was like magic!!

Last edited by Lfepardo

Spackle.  I never would have thought of that, but what the heck!

If you can get the spackle to fill to the same surface as the dash (no indentations) and if you have the correct touch-up color, you could try using a Q-Tip dipped in the paint just on the end of the tip and dab it onto the spackle.  It won't be perfect, but it should keep people from spotting them right away because of the white on red you have now.

If you apply the spackle just a little over-full, then let it dry for an hour or two, then use a lightly damp, closed-cell sponge to gently wipe back and forth, the spackle should loosen on the surface and wear down to level (an old painter's trick).  This should beat using body filler and then having to sand the area around the holes and then spray paint to fill back in.

Let us know what you eventually do.  

Last edited by Gordon Nichols

@IaM-Ray Re the power plug, argh I just finished installing a cig lighter / charger plug under the stereo!  But thanks for the idea, it's a good one because it actually has business being there.  Re the eject button, yeah "don't press that button, trust me".  But that's clever, it'd fit, I'll have to think of a rule use...

@Lfepardo Thanks, but my understanding is that bondo requires a fair amount of sanding of the surrounding area, which I'm not sure I'm mentally prepared for risking 😬.  At least based on YouTube.  But that's probably the correct way to do it.

@Gordon Nichols Good call, that was non-shrinking spackle.  I should try it again in excess and wipe away the concave portion as you suggest.  I'm just a little worried that the surface of it won't be quite smooth.  I guess this is a low risk exercise in that I can just remove it if it looks bad.  

Here's what I would do.

1. Remove the "Porsche" script and set it aside.

2. lightly scuff the inside edges of the offending holes with a drill bit or Dremel.

3. sand behind the holes with 40 grit paper. Scuff it for 10 minutes each one in a 2-inch radius.

4. dip a clean rag in acetone and wipe the scuffed areas 3x.

5. Apply masking tape to the front of the holes

6. Open a can or Upol Fibral, remove a pingpong ball sized glop with a soft plastic spreader/spatula, and mix it with supplied hardener at 10-1 on a flat piece of non-absorbent, shiny cardboard.

7. dab half the Fibral on a small spatula, reach up behind the dashboard and push the stuff in the hole, reducing pressure as you smear it into the sanded area.

8. other half, other hole.

9. Take 10.

10. peel the tape off the holes. Press gently on the convex dimple with a clean spatula. It'll be close to flush with the dash.

11. go away and leave it alone for 24 hours

12. examine the spot. Dab it with acetone. If it's not smooth enough, mask all around it and get out your spatula and some spot putty. It'll probably be smooth enough though.

13. touch-up paint.

14. Reattach Porsche script.

I know it is extremely difficult to fill very small holes such as these.  When I was buying a used speedster from IM, I asked if the side chrome strips could be removed.  I wanted bare sides on the car.

Henry was not willing to do that, as he stated the small holes that were left could never be filled properly - at least to his satisfaction.  So we kept the chrome strips on the car.

@Bob: IM S6 posted:

I know it is extremely difficult to fill very small holes such as these.  When I was buying a used speedster from IM, I asked if the side chrome strips could be removed.  I wanted bare sides on the car.

Henry was not willing to do that, as he stated the small holes that were left could never be filled properly - at least to his satisfaction.  So we kept the chrome strips on the car.

The way to do it properly involves major body/paint work. Probably all the process Ed describes, only rather that taping the front to keep it flush, putting a slight divit in the outside so that pushing from the back leaves a mushroom shape head in the outside, which is then flattened. 

Then, you sand and skim coat on the outside and repaint. A whole lot of work.

I did all this when I removed the trim from my 2002 and I wasn't even half-way through before I decided it wasn't worth it.  

Script pin hole repair.  Tape the back side then fill in the hole with most any body filler it is important that you leave a very small indentation of the hole, ( for paint to fill in ) use a tooth pick dab a drop of touch up paint into the divot, it may appear to be above the surface but will shrink as it dries.  The first time it dries you may still have a slight divot if so, dab another drop of paint on it letting it dry. The only person that will see the repair will be you as it will for the most part be barely visible.


...The only person that will see the repair will be you as it will for the most part be barely visible...


^^^This.

FWIW, I have about a dozen rock chips on the front of the car, some half the size of a dime. I've never attempted any real 'repair'.

I just dab on some touchup paint with a toothpick, smear the dab with a finger (wearing a rubber glove), and clean off the excess with a q-tip dabbed in paint thinner.

If you stare at it, you can see the divot, but you have to know where to stare. The main thing is covering up the contrasting primer underneath with paint.

I do like the idea of the red LED lights, though.

Just make a label for each one with a Dymo label maker:

FLUX CAPACITOR


Just those two little white holes?

How good is your paint on the dash? Is it clear coated?

Per Ed's post, as long as the hole is filled/supported well from the back side and the filler on the front side is a just a tad below the surface, you can fix that with touch up. It's just a patience game that will (should) take several days.

Once the hole is filled to just below the surface, start layering touch up with an appropriately small brush or toothpick/q-tip/etc. Do one layer at a time, wipe off any paint that gets on the surrounding paint, then let it dry - all the way. Continue this process until the touch up paint is just slightly higher than the dash face. Once it is fully dry, hit the dash with a light polishing compound. Touch up paint is soft. This process will knock it down pretty quick. Wax the dash and call it done. You will have to point out the repair to you passenger if the touch up paint is a good match. it should nearly disappear.

I have done this a hundred times. Heck, I dropped a phillips head screw driver point down on the hood of my red 911. It took me a week, but I got it to "go away". They key is multiple thin dabs and having the patience to let each one fully dry.   


Wow I continue to be “bezeldazzled” by the range of creativity/resourcefulness of the SOC brain trust.  I got no where to this level no matter how much I tried brainstorming myself and asking those around me.  Thank you all.  And apologies for the verbose response:
 

@WOLFGANG hmm I feel stupid for not realizing that, I was thinking there was some other Porsche badge but you’re probably right.  So “PORSCHE” is the more proper?  If so, I think I’d prefer to keep it, not to mention whatever new headaches come with changing the badge.  And that’s assuming the holes currently being used wouldn’t then show…  I’m going to try filling/painting it first like a big boy, in part because I want to get “reps” in on doing that, but because I can always fall back on a plan like this if that fails.

@edsnova thanks for the detailed breakdown, I think that’s the professional/right way to do it.  But it seems like not only a ton of work, but may require more skill than I possess.  That said, I’m literally saving that in my notes for future big jobs.  One day, in an inconspicuous area, on a car that isn’t my baby
 
@Alan Merklin thanks for that, I think I’ll try this especially because I’m sort of halfway there.  Well, more accurately I have the non-shrinking spackle in there currently, should I skip that?  If so, by body filler you basically mean Bondo or the like right?  
And either way, I think you’re saying that I should leave a crater / concave contour which I’ll slowly fill with progressive layers of touch-up paint?  As opposed to a convex bulge of filler that would then require sanding thereby scratching the surrounding paint.
Lastly, does dabbing with a toothpick result in a smooth surface of paint?  Eg, the layers of paint act to level out?  Are larger “drops” of paint advisable so that they dry with a uniform surface (a smooth droplet that will shrink).  Sorry for all the questions.
 
@Sacto Mitch perhaps your suggestion of “smear the dab with a finger (wearing a rubber glove), and clean off the excess with a q-tip dabbed in paint thinner” addresses my smoothness question to Alan above?
 
@Scott S thanks for that detailed breakdown.  Perhaps the rubbing compound then wax method you suggest addresses my smoothness question to Alan above?

Again, I’m going to try filling/painting it first like a big boy, in part because I want to get “reps” in on doing that, but because I can always fall back on a plan like this if that fails.

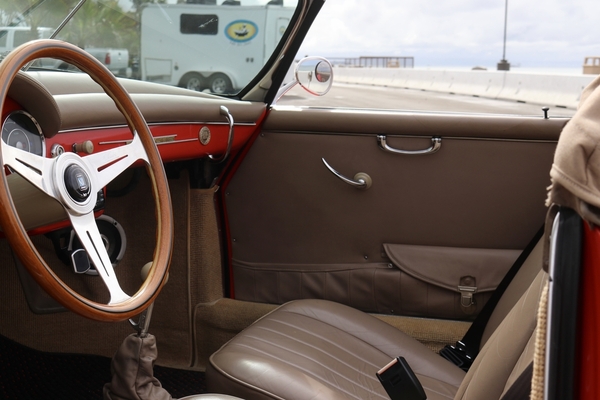
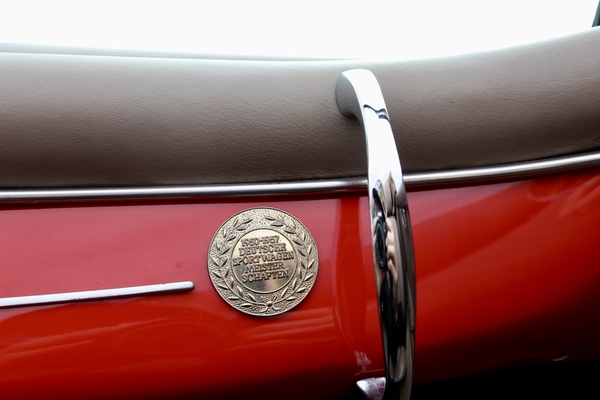
But, I noticed the mini badge on the dash of this car posted in the classifieds.  I'm thinking about it in parallel as a plan B.  The placement of mine isn't as ideal but perhaps could swing it with the right badge.  Which brings me to my question, are there well-known / popular / proper badges?  I'm really only familiar with the grille badges.

0C199CE0-D68F-4B63-BF7E-3613B62082A7_1_201_aEE8E1598-EA43-4206-AC6A-4564AA893EA3_1_201_a


Attachments

Images (2)
  • 0C199CE0-D68F-4B63-BF7E-3613B62082A7_1_201_a
  • EE8E1598-EA43-4206-AC6A-4564AA893EA3_1_201_a
@Sean Seena I think I’ll try this especially because I’m sort of halfway there.  Well, more accurately I have the non-shrinking spackle in there currently, should I skip that?
 If so, by body filler you basically mean Bondo  Basic Bondo
And either way, I think you’re saying that I should leave a crater / concave contour which I’ll slowly fill with progressive layers of touch-up paint? Yes
As opposed to a convex bulge of filler that would then require sanding thereby scratching the surrounding paint.
Lastly, does dabbing with a toothpick result in a smooth surface of paint?  Yes Eg, the layers of paint act to level out?  Are larger “drops” of paint advisable so that they dry with a uniform surface (a smooth droplet that will shrink).  Sorry for all the questions
This layers allowing time for each to  fully cure
@Sean Seena posted:

Again, I’m going to try filling/painting it first like a big boy, in part because I want to get “reps” in on doing that, but because I can always fall back on a plan like this if that fails.

But, I noticed the mini badge on the dash of this car posted in the classifieds.  I'm thinking about it in parallel as a plan B.  The placement of mine isn't as ideal but perhaps could swing it with the right badge.  Which brings me to my question, are there well-known / popular / proper badges?  I'm really only familiar with the grille badges.

0C199CE0-D68F-4B63-BF7E-3613B62082A7_1_201_aEE8E1598-EA43-4206-AC6A-4564AA893EA3_1_201_a


Man, I'm really bummed out. Last year I was looking for a grill badge and I found a website that had German, French, British, grill badges, dash plaques and all kinds of stuff, by year, all the way back to the late 40's. Some really cool stuff. Auto club badges, rally plaques, races. Damned if I bookmarked it, or could find it again via Google. 

In in the meantime, Sierra Madre has those Meister Schaften badges. 

https://sierramadrecollection....Emblems-Decals-c679/

Last edited by dlearl476

@WOLFGANG & @dlearl476 thank you both for those links, I should've at least perused Sierra Madre and Stoddard before asking, doh.  I think I'd come across klasse356 because it rings familiar but it's not in my vendor list, thanks for that one.  Shucks, the Meister is the best one but probably too big for where my main hole is located, too close to the left wing of the PORSCHE emblem.  *starts googling for German coins circa 50's* 😂

@Alan Merklin thank you, I'll give it a try and post pictures so that you all can pat me on the back or have a few chuckles

@Sean Seena posted:

@dlearl476 maybe I can finally help somehow, any of these three?:

  • germancarbadge.com
  • arteauto.com/collections/automobile-badges-pins-medallions-and-plaques
  • ebay.com/sch/michael_keil/m.html?_ipg&_from&_nkw&_armrs=1&_sop=10

Bingo! Thanks Sean. germancarbadge.com. Now why didn't I think of that?

atreauto has a few good ones, too  but mostly grill badges. This one is really beautiful, but it's huge.

image

How about something like this?

image


Attachments

Images (2)
  • image
  • image
Last edited by dlearl476

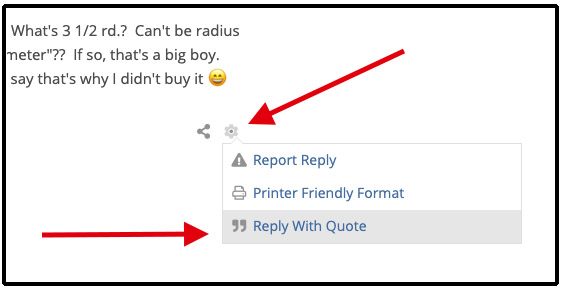
@dlearl476 "Now why didn't I think of that?" -Because the name's so darn generic that there's no way to remember it.  Although after all this discussion about it, we'll probably remember how.  Ps, I'm blowing my question credits on a "dumb question" here but for the life of me I can't figure out how to properly quote a previous post?  Like how you have a quote block of my post...

Re that badge, that would be charming and go well.  What's 3 1/2 rd.?  Can't be radius because it wouldn't fit in the box size, so "round diameter"??  If so, that's a big boy.  It's also $229.95!!  Too bad it seems to be sold, we'll say that's why I didn't buy it 😄

@Sacto Mitch posted:

 Find the little 'gear' icon at the bottom right of a post and do this:

ReplyWithQuote 

Arghhhhh I swear I hovered over / right-clicked every user interface element on the screen!!  I even google searched "site:crowdstack.com reply quote" thinking I was smart.  Operator error.  Thanks for the IT help.  

Also served as good confirmation that regular emojis in my posts are in fact supported by the forum engine 👍

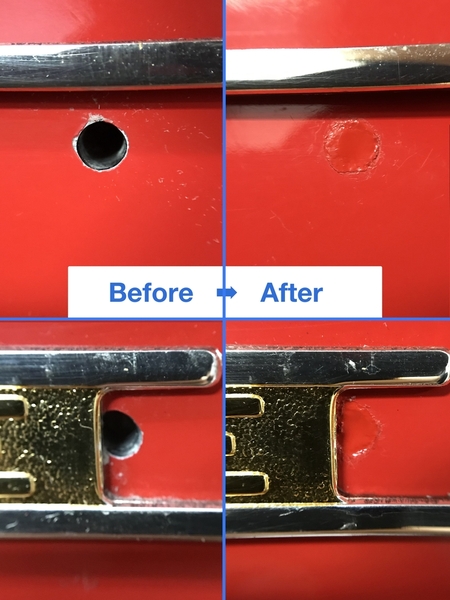
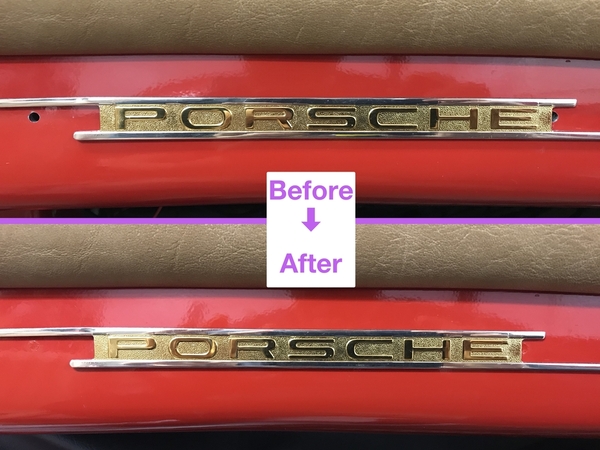
Alright, circling back here because I know everyone's been chomping at the bits to know how it turned out (that's sarcasm if you aren't picking up on it 😆).  I monkeyed around and tried different things, eventually it wore me down because each approach would end up +/- 10% the same, so I settled on this result.  

Which I'm happy with.  What I learned is that the 80/20 rule definitely applies here- no matter how well or bad I did, it generally looked ok.  You kind of can't screw this up.  That said, my inference is that if poor workmanship leads to this, then someone skillful could probably get superb results (I don't mean someone in a body shop, I mean someone with the touch up vial paint brush + toothpicks + Qtips + masking tape + Bondo).

Re Bondo, I was surprised at how quickly that stuff hardens even though I was on notice about it from watching videos.  You really have to be on your game, to any newbie reading this trying to do something similar, I highly highly suggest practicing on some scrap metal first, you'll learn things...

I'm attaching super zoomed in photos that make it seem way worse than it is in person.  But in person, even I have to sometimes scan the surface with my eyes to find the spot, and I'm the highly-sensitive beholder at the moment which will subside as time goes on.  So it's how you all said- no one will notice.  Especially when you realize there are a million other little blemish across a car that you simply weren't hyper focused on.

That all said, I'm hoping to one day learn how to patch holes like these near perfectly.  I wish I could've figured out how to get the outside edge of the circles to be more flush and smooth, the paint just didn't seem to want to fill in those edges.

IMG_4432 - Before AfterIMG_4436 - Before After

Attachments

Images (2)
  • Before After
  • Before After
@Sean Seena posted:


That all said, I'm hoping to one day learn how to patch holes like these near perfectly.  I wish I could've figured out how to get the outside edge of the circles to be more flush and smooth, the paint just didn't seem to want to fill in those edges.

Sean, I feel awful about not mentioning this before.  It only occured to me when I saw your finished project.

In plastic repair, you use aluminum tape to back the repair area so the molten plastic doesn't budge on the finished side. In your case, applied to the dash and bondo pushed through from the back. It wil slightly mushroom out, but then you flatten it before the bondo completely cures.

I don't know exactly how you did your repair, but forgive me fir not thinking of this when you were seeking advice.

As for your edges, just keep painting. Paint will initially absorb into the bondo (that's what makes it stick.) Once you're applying paint to paint, it will fill those cracks.

But, like you say, no one who hasn't read this thread will ever notice! Good job.  

Sean:

I pulled virtually all the trim of my metallic silver speedster and have made an attempt at filling the holes and touching them up with matching silver paint.  Very amateurish looking result, but I going to have it painted and they will fix my screw ups.

I used the combo fiberglass bondo stuff and you are correct, it dries fast. Tape behind every hole  before you pack them is absolutely necessary.

I don't think the metallic silver paint helps. Tough to get right.

Good job.

Post Content
×
×
×
×
Link copied to your clipboard.
×
×