Jimmy V. posted:

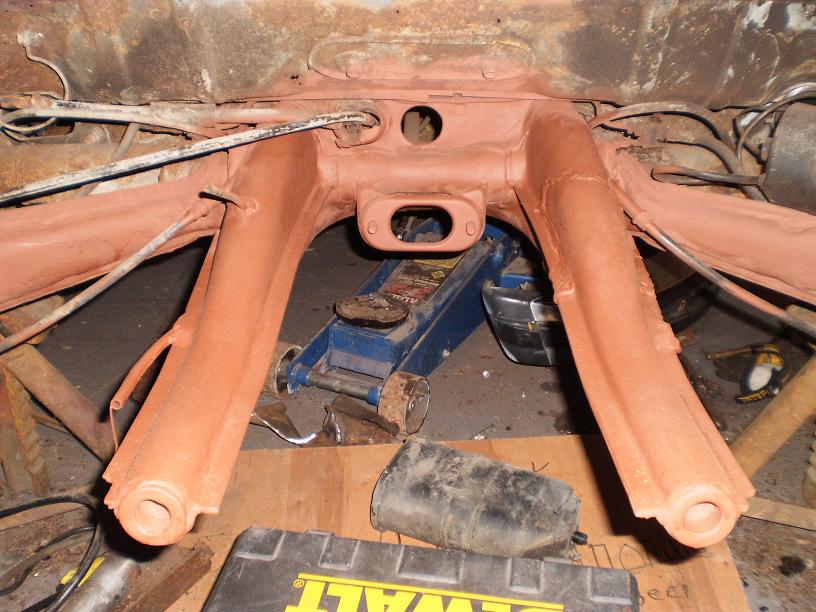
My engine does not have a real mount bar. It is totally supported by the frame horns and the kafer bar setup that triangulates the engine cradle, frame horns and the upper shock mounts. I have a special solid front transaxle mount that Rancho sells. I have a rhino transaxle case that is much stronger than a stock type 1 transaxle. The setup is as solid as a rock. Not wheel hop no engine shimmy no torque twist.

speedster conversion 97 Rancho Pro-Suby Transaxle

Jimmy's setup from Beck is excellent. I just did mine the way I did because I didn't know any better. It works fine though. 

David Stroud Ottawa Canada IM Roadster posted:
Todd M posted:

@David Stroud IM Roadster D - I am sure it is great, ... if you have frame horns.

@Todd M   You don't need frame horns but you do need a Type 1 VW transaxle.....

Unless I am completely confused, and that happens a lot, Jimmy V's mounting system consists of a transaxle support and an engine/transaxle support that bolts to the frame horns.  His set-up negates the necessity of the Subaru mounts.

Looking around, I found this crossmember that uses the Subaru mounts.  It is made for a VW Type 2, but with some narrowing, I think I can use it.  Anybody familiar with this mounting system from Busaru?

img_1506

Attachments

Images (1)
  • img_1506
WOLFGANG posted:

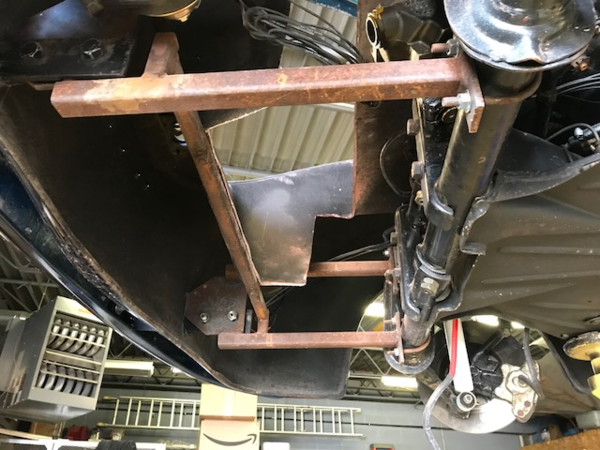
But if you don't have the frame horns - then there are no mounting points for the rear of any T1 transaxle -  so the cradle for the Subaru engine will also have to support the rear of the transaxle.  Since yours is a custom frame - you will also need the front trans mount welded in (see center of picture).  

Related image

Absolutely correct.  The mount for the transaxle nose is already installed, but as of yet, there is no support for the rear of the transaxle, where it bolts to the adapter/flywheel.  If the nose of the transaxle is supported and the Subaru engine is supported at it's mounts, will it be necessary/advisable to support the rear of the transaxle also?  IIRC, the entire weight of a Type 1 engine, and the 356 engine, hangs on the 4 bolts to the transaxle bell housing, so it would seem that supporting the engine and transaxle may be a bit more balanced and stable using the Subaru mounts rather that rear transaxle mount and frame horns?  Any opinions?

Last edited by Todd M

Todd, you're doing just fine.  Just keep on doin what'cher doin - You don't need that other stuff.  

Using a nosecone mount for the VW transaxle (to keep the nose in place under acceleration/deceleration) and then the normal Subaru engine mount points will provide, essentially, a multi-point cradle system that'll be better than the original VW system which had only the four engine-to-transaxle bolts with the entire engine weight hanging off the back.

You'll be supporting the engine which, in turn supports the rear of the transaxle, too and provides a lot better mechanical balance.    This is the opposite of the VW system that supported the transaxle exclusively (except for some buses) and should provide better support.

gn

I am sick and tired of paying Volvo a thousand bucks, for something I can do for $150, if I knew what was wrong.  So, I am going to throw away my stubbornness and obstinance and get an OBD2 scanner or reader or whatever they are called.  All I know about them is that you plug them in somewhere in the car.

Which one do I get?  I don't want to get the cheapest, because I don't have the best experience with the cheapest of anything.  I don't want to buy the most expensive, because my guess is that I don't need whatever the most expensive one does.  Specifically, which OBD2 scanner is a good value for the money.  I would prefer getting one that does not need my phone to display, because my phone is an iPhone4 and it would appear to be out of date for any recent tech uses.

images

Attachments

Images (1)
  • images

I got one from Advance Auto about 10 years ago for maybe $30 and it works fine. There is a port up under the dashboard, usually. Buy one and use it; even if you never turn a wrench on your car it'll give you info you can use.

The OBD reader + a Google search has got me very close to a fix for my truck every time except last time, when a "P302" (misfire on cylinder 2) code lit and could not be remedied by any combination of changes to spark or fuel. 

Also, the truck is not missing on any cylinders.

But it is 18 years and 225,000 miles old, so at this late date I'm (it's?) taking a mulligan. 

@edsnova - Your truck is 18 years old and it has an OBD port?  I don't think I even knew that OBD2 existed back then.

@MikeB - Until your post, I did not know there were transmission codes as well.  It turns out there are ABS codes, SRS codes, (I had to look that one up), and FixAssist.  So after extensive research, (about 2 minutes because it is one of those information bombardment things), I have decided on either the Harbor Freight, https://www.harborfreight.com/...fixassist-63806.html , or Innova, https://www.amazon.com/INNOVA-...hicles/dp/B008RHBJ8K .  The FixAssist looks to be right up my alley so that I do not have to learn any new technology.

BTW, Harbor Freight is selling grinders for $11.99.

Last edited by Todd M

One of the nice things about modern replicas!   Go with a modern drive train and get the on-board diagnostics!


A few years ago, I bought a wireless OBDLink gadet from ScanTool that links up to your smart phone.  I think I paid $80 for it, but you can get ones now for $20 - $50 that may even be better. Gotta love the exponential growth of technology!

Todd:  If I caught you before you head to Harbor Freight, my motorhead son recently bought one of these and loves it.  He's been raving about it to all his motorhead friends:

https://www.amazon.com/dp/B07J...j5BIJLowW91KoZ2eXzkc

Now, If only my Speedster had an OBD II port......   

BTW, OBD ports have been around since the later 1980's or so, and everyone pretty much went 100% on them in the mid-1990's.  When I was going through my RMV stuff I found that all of that fancy stuff, like trans codes, airbag codes and such, all came about after about 2010 and they're adding more from time to time.  If an internal device (transmission, say) can communicate with the on-board CAN bus you can report pretty much anything you want to the OBD port - all you need is something to read it with or communicate with it.

Last edited by Gordon Nichols
Todd M posted:

@edsnova - Your truck is 18 years old and it has an OBD port?  I don't think I even knew that OBD2 existed back then.

@MikeB - Until your post, I did not know there were transmission codes as well.  It turns out there are ABS codes, SRS codes, (I had to look that one up), and FixAssist.  So after extensive research, (about 2 minutes because it is one of those information bombardment things), I have decided on either the Harbor Freight, https://www.harborfreight.com/...fixassist-63806.html , or Innova, https://www.amazon.com/INNOVA-...hicles/dp/B008RHBJ8K .  The FixAssist looks to be right up my alley so that I do not have to learn any new technology.

BTW, Harbor Freight is selling grinders for $11.99.

Gordon!!

Last edited by Robert M

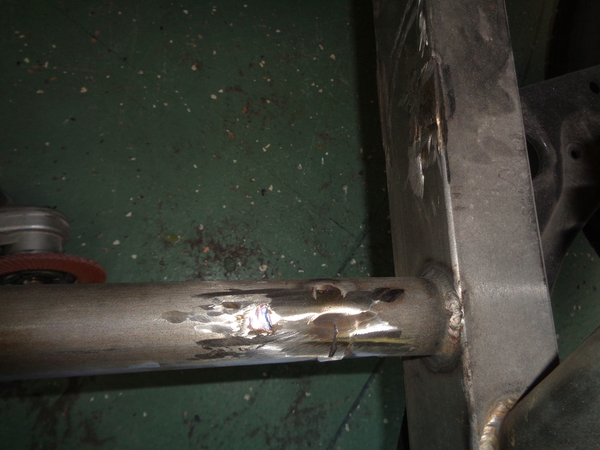
Before this project, I had never worked with metal in terms of modifying it.  I had maybe drilled a couple holes in sheet metal, but all metal working looked kinda like wizardry to me.  Now, I am cutting a grinding.  I am cutting off brackets that would be in the way of my radiator, and grinding down the remnants of the brackets.  So far I have discovered three type of wheels for my grinder; cut-off wheels, grinding wheel, and flap disc.  The cut-off wheel and the flap disc always make sparks and always make an obvious cut.  The grinding wheel sometimes makes sparks and I know it is cutting, but sometimes it doesn't make sparks, and I don't know if it is cutting.  Is the grinding wheel alway suppose to make sparks like the other two wheels?

grinding-bracketsgrinding

And when I grind on stainless steel, do I need to primer it?

Attachments

Images (2)
  • grinding-brackets
  • grinding

Pictured below is a radiator for a 2001 Subaru Legacy, which gave up it's engine for my car.  The stock radiator is 27" x 13", or 366 sq. In. and 5/8" thick which leads me to conclude that it is only one row.  I am limited in width to 24", and if I kept at least the same sq. in., the height would have be at least 15".  Just about any aftermarket aluminum radiator I use will be two rows, so does having a 2nd row double the amount of cooling area?  REP2331

Why so many questions today?  Because I am making the 2nd half of the handrail for the stair project, and there is a lot of time letting the slats cool and dry in their form, and I can only do one slat at a time, which leaves a lot of time to work on the car.  And every time I start working on the car, I have questions.

Attachments

Images (1)
  • REP2331

The cut-off wheel and the flap disc always make sparks and always make an obvious cut.  The grinding wheel sometimes makes sparks and I know it is cutting, but sometimes it doesn't make sparks, and I don't know if it is cutting.  Is the grinding wheel alway suppose to make sparks like the other two wheels?”

The other two wheels are probably less aggressive abrasive, meaning that they take off less material in smaller particles.  Because the particles are smaller, they heat up faster and become incandescent - they light up - as sparks.

If the grinding wheel is more aggressive it will remove larger particles that heat up slower and may not  reach incandescent temperature, so they don’t light up.

OTOH, if you’re trying to grind on the side of the wheel, sometimes it doesn’t take off much material so.......No sparks.

That’s my story and I’m stickin’ to it.

Stainless steel is rarely painted, but the purpose of a paint primer is to provide adhesion between the metal and the color paint, so, yes - roughing stainless steel with rough sandpaper and using a primer before color painting will make the paint stick better.

On the radiator.......  I am an aircooled kinda guy.  Maybe you could put that to someone much more experienced in it, like Carey Hines?  @chines1

Last edited by Gordon Nichols

Radiators for our replicas are like many automotive subjects that sound simple, but can be very detailed on many levels.  Anyone really interested needs to do lots of research online, as materials and technology have advanced in the last few years.

Some generalities apply: 1) Measure the space available (length x width) and fill it completely.  Many rad sites allow you to shop by size, as well as car model.  Modern aluminum rads are built with a thinner profile to allow of easier air flow through the tubes, a critical facet of heat dissipation.  Dual pass rads are becoming standard, and should work well with any of our applications; 2) 1.5" inlet and outlet rad tubes help with increasing flow, another critical aspect of heat dissipation; 3) electric fans are essential, along with a properly-fitted shroud that insures that all air is forced through the rad,  4) ideally, you place the rad where the pressure is high on the front side, low on the back side, 5) puller fans, mounted on the back side of the rad, generally move more air since they don't block the incoming air flow, and 6) data provided by fan companies regarding air volume moved is mostly nonsense, with Spal being an exception.  Higher amperage draw of the fan motor means more air moved.  Pay extra to get a weatherproof, high flow fan motor.

Be aware that Subaru engineers computed the radiator profile (l x w), based on full air flow through a non-restrictive grill at a perpendicular angle to the rad fins, the common placement for stock Subis.  No way can we achieve that ideal setup in our replicas.  The Vanagon guys estimate that you need 50% more square inches in a VW van/Subi swap, due solely to rad placement, i.e., air flow is restricted and not perpendicular.

The Aussies and Brits have more online research than Americans for some reason.  Remote rads are also popular with some of the 4x4 guys, who have posted real world test results.  Best of luck in your research.

Last edited by Jim Kelly
Todd M posted:

@edsnova - Your truck is 18 years old and it has an OBD port?  I don't think I even knew that OBD2 existed back then.

@MikeB - Until your post, I did not know there were transmission codes as well.  It turns out there are ABS codes, SRS codes, (I had to look that one up), and FixAssist.  So after extensive research, (about 2 minutes because it is one of those information bombardment things), I have decided on either the Harbor Freight, https://www.harborfreight.com/...fixassist-63806.html , or Innova, https://www.amazon.com/INNOVA-...hicles/dp/B008RHBJ8K .  The FixAssist looks to be right up my alley so that I do not have to learn any new technology.

BTW, Harbor Freight is selling grinders for $11.99.

Todd: Not only does my 2002 truck have an OBD port, so does my MG TD.

In fact, I bought the tool to diagnose the 1995 Subaru Legacy engine I was dropping into it. Works a treat!

Now, on radiators: More square inches is better, and there is an old hotrodder's formula for determining the needed area of a radiator for a given sized engine with X horsepower: one square inch per horsepower. It's too rough an estimate to work for us but engineers have stepped in to make it too complex...(links to pdf).

Bottom line: you don't need that huge Suby rad to work in your Speedster. I know this because, in my MG, I used an aftermarket two-core Honda Civic radiator I picked up on Ebay for like $50. It fits neatly behind the TD's grill and cools the 140 hp 2.2 Suby fine. The whole key is using a good fan (the larger of the stock Legacy fans fits over it perfectly) and getting the hot air out from under the car (I made a stainless shroud to duct it all down and out the wheel wells). 

So a 14.5 x 16.5-inch radiator made to cool a 1.5 liter engine is happily cooling an engine nearly one-third larger. AND YOU CAN TOO!

Rule of thumb #2: A two-row rad will not cool twice as well as a one-row. It's maybe 30-40 percent better. A three-row rad is maybe 10-20 percent better than a two-row. At four rows you're kinda spinning your wheels, since the first three passes heated the air going through the rad enough that the forth pass isn't getting much more help. 

So use a two-row. The Civic rad is the wrong shape but there are older Saab rads that give more area in a wide/short configuration. I believe David Stroud used one like this.

It's about 14 x 20 inches, as I recall.

Find a place under the nose to mount one, canted down about 50-60 degrees and CAD-out a simple ductworks to get air out from behind it. 


Last edited by edsnova
Gordon Nichols posted:

Todd,  I had to go to a really small battery after I put my gas heater in the front well of the Frunk and took half of the available room for that.  I went with an Odyssey PC680 (same battery that Beck uses, I believe) which is about 1/2 the size of what I had before.  Been cranking great for 3 years, now.

Thanks.  7.2 x 3.1 x 7.5 inches is looking good.

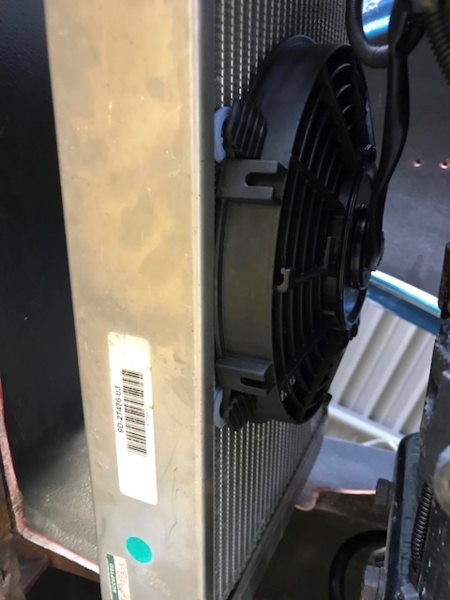
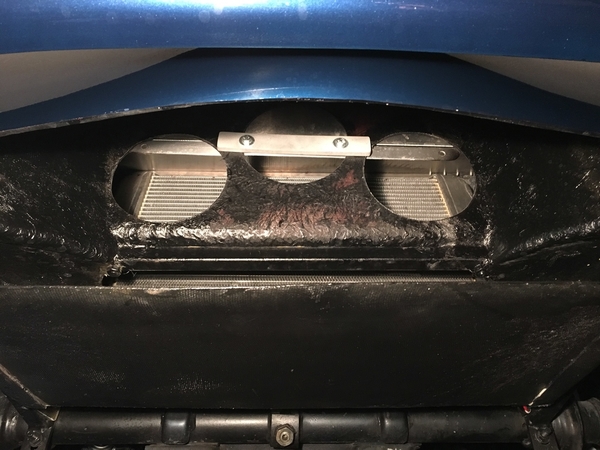
When Special Edition converted my Fiberfab Speedster Carey used the same radiator they have custom made for their Suby Spyder builds. My 2.5 L engine runs cool in 100 deg. temps driving in stop and go traffic. They mounted the radiator in my frunk in the original battery area. The radiator sits perpendicular to the ground and is ducted with a small scoop under the front bumper. They have a puller fan that comes on at 180 deg. coolant temps. It comes on only when sitting in hot temps. never when the car is moving. Not exactly sure of the radiator measurements but is a tad smaller than the one they use in they Beck speedster builds because they have more room. They relocated my battery to the drivers side rear wheel well. They built a neat little box for a small size high amp ATV battery to sit. It cranks fine and hasn't been any trouble. They have lots of experience from many years of finding what works best with real world feedback.Speedster Conversion 24Speedster Conversion 17Speedster Conversion 51Speedster Conversion 32Speedster Conversion 147

Speedster Conversion 145Speedster Conversion 146

Attachments

Images (7)
  • Speedster Conversion 145
  • Speedster Conversion 147
  • Speedster Conversion 51
  • Speedster Conversion 32
  • Speedster Conversion 24
  • Speedster Conversion 17
  • Speedster Conversion 146
Last edited by Jimmy V.

I have decided to cut out an "obstruction" in the frame of my frunk.  I have never cut on or modified a frame before.  I have never even repaired a frame before, and it makes me nervous as heck to be cutting into steel based only on my logic; without any engineering expertise.  So I am asking, is there any reason I should not cut out the "obstruction"?

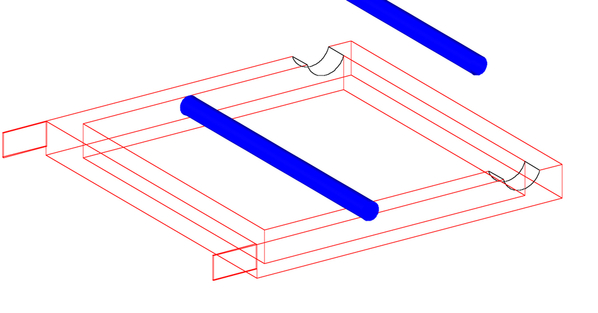
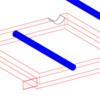
Below is a drawing of part of the frame of my frunk.  The red is 2" x 2.75" rectangular steel tube.  The blue is a 1 1/2" diameter round steel tube.  The tube had some brackets on it, which I assume were for mounting some portion of the electric power system the car was designed to have.  The blue tube is in the way of my radiator placement and in my mind, the blue tube is unnecessary , and I am going to cut it out.  Anyone think that is a mistake?

Not the blue tube in the upper right of the drawing, but rather the blue tube in the middle of the drawing.  Yeah, I know that last sentence is not a grammatically correct sentence, but I think Sister Maria Joseph would give me a pass, since it gets the point across.

The inside of the red rectangular frame is approx. 23" x 24".

Frame Obstruction

Attachments

Images (1)
  • Frame Obstruction
Last edited by Todd M

What fits into those neat little semi-circular depressions on the right?

I'm having trouble visualizing where that box frame portion goes so help me out, here before I commit to whacking out the blue tube, which I would also be inclined to do, but not until I understand what else is going on around that frame piece.  I don't have anything like that on a CMC.  What we have is a hokey-A$$ed bracket bolted to the top of the front beam and holding up the entire front third of the car.  That bracket sits in front of the gas tank and is never in the way of nuthin'.  

While the corner gussets are always a good, rigid idea, you would have to be careful about interference with the gas tank.  Apart from that, get out your angle grinder and start cutting!

full frunk

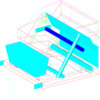
Those semi-circular depressions are where the frame was cut and rewelded to make room for the rack and pinion, which is the cyan cylinder in the drawing.  For perspective, the wheels centerline is about 6 inches in front of the rack and pinion, and a few inches higher.  

full frunk 2

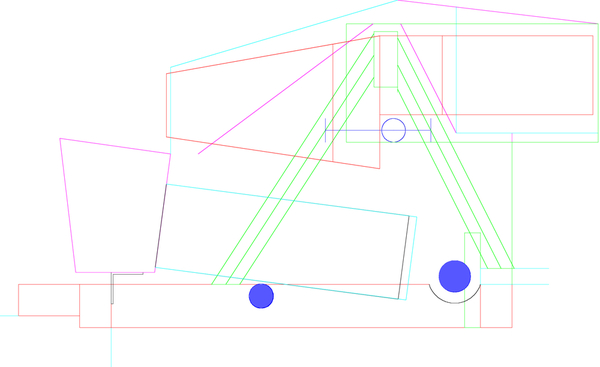
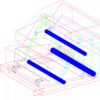
The lavender lines are the fiberglass frunk.  The big cyan trapezoid in front, outlined in lavender is part of the fiberglass frunk, most likely where the battery will be located.   The black rectangle towards the bottom center is the radiator, shroud, and fan.  The irregular shaped red lined thing on the top is the gas tank.  The upper right rectangle outline in faint green is the space with the brake and clutch master cylinders and the apportioning valve.  The uppermost blue cylinder is another obstruction, which I am thinking of replacing with two similar sized steel tubes, one below the present tube, and one between the front A-pillars, and a removable strut bar on the top of the A-pillars.  I am calling the present blue steel tube an obstruction, because if I move it, the gas tank can be enlarged.  The A-pillar on driver's left is unfinished, because I am not sure if I need to draw it, and may even delete its from the drawing, cuz it gets in the way.

full frunk3

@Gordon Nichols - Thanks for asking.  Having to explain it and write it out makes it more clear to me.

Attachments

Images (3)
  • full frunk
  • full frunk 2
  • full frunk3
Last edited by Todd M
WOLFGANG posted:

So is the radiator laying flat or is it at some angle?  I'd think you'd want the gas tank to be mounted as low as feasible to improve handling by lowering center of gravity )gas weighs about 8 # per gallon so about 100 #.

Yes, in the side view the radiator assembly is that cyan colored rectangle lying on top of the blue circle.  If I cut out the blue circle, (obstruction), I can lower the radiator a couple more inches, getting it closer to the direct airflow.  Right now, the future radiator is angled up about 15 degrees.

I could move the radiator to the space just above the transaxle.  I don't have a rear seat there like most 356s, but if I don't put the radiator there, I will probably be doing some cutting and welding and fiberglass work to enlarge the space behind the front seats for luggage.  Or, I could put the gas tank back there, but I kinda like the idea of putting the weight up front since so much of the weight in a 356 is out back.

As currently drawn, the gas tank is 15 gallons.  If I cut out the uppermost blue circle, (obstruction), I can enlarge the lower portion of the gas tank and lower the top.  I doubt that I need more than 15 gallons.

So many options, it is kind of overwhelming.

Just writing that helped me to make the decision to cut out the offending steel tube and enlarge the lower portion of the gas tank.  Plus I like my potential relocation of the offending frame member.

Last edited by Todd M
Post Content
×
×
×
×
Link copied to your clipboard.
×
×