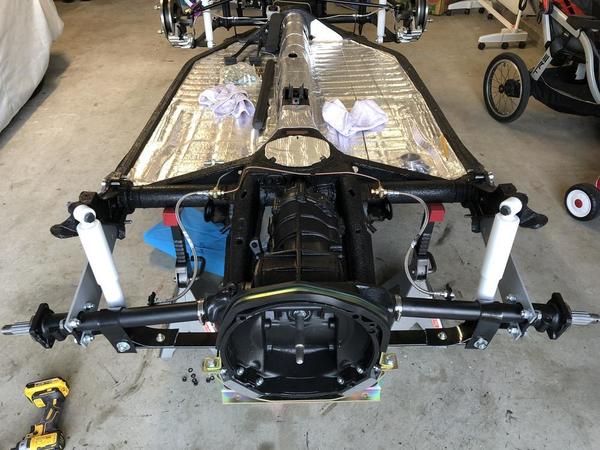
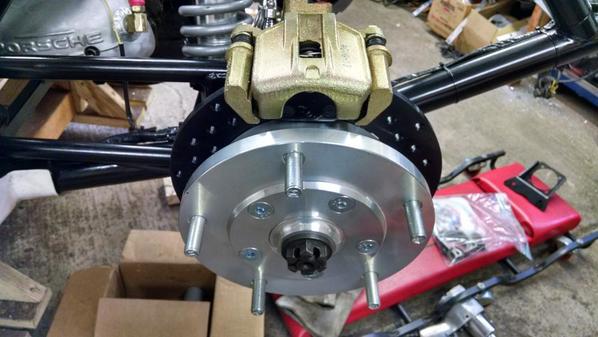
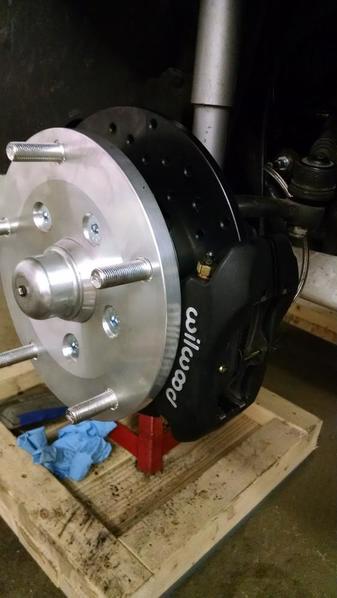
I am considering installing CB's Race Strength Rear Disc Brake Kit, 4 Lug, IRS, With Emergency Brake.

I have questions.

Is it really 0 offset? I have really tight clearance on the outside between tire and fender and on the inside between tire and oil cooler.

Is there any problem with my A-1 exhaust? I have the version with the center outlet and muffler rotated long way vertical in front of the valve cover. I noticed aircooled.net sells A-1 mufflers for those with disc brakes but it looks like they are for the other muffler configuration.

1957 CMC (Speedster) in Ann Arbor, MI

Original Post

Replies sorted oldest to newest

Michael--so a search on here about the CB rear disc brakes.  As you will read, mine as well as other SOC members' came apart because the rotor is made with two parts , a larger aluminum part ---the outer part-- fused to a smaller steel part that fits onto the axle . I was warned about this and was told that if they are are torqued right when installing, this wouldn't happen.  They were and it did. So I had the inner steel part firmly onto the axle while the outer aluminum part could spin around the steel part.  It was a pretty good jolt when the slack was taken up! This happened in Richmond VA and it was an unpleasant long drive back home to Arkansas.  I was worried that the slack wouldn't take up and the outer part would freely spin around the inner part.

For me the cure was to get two new rotors to replace the faulty ones and I found solid steel rotors from SoCal Imports, p/n 113615601DNS at $ 84.95 each.

This was three years and the replacements have worked perfectly---and why not, they are solid steel!   The new steel rotors were plug and play and fit good onto the rear of the CB Performance disc brake kit.   You might look into the whole kit that So Cal Imports offers because the whole affair is designed to work together.  Call 'em and see what measurements you should provide to swap with the drums on your CMC. The number is 562/633-4979.

I read here that we don't "need" rear discs but a panic stop once out on I-40 with rear drums told me the truth---and we need all the safety we can get with these cars.

Good luck with it!  You are damned sure doing the right thing.

ps--My C.B. Ones were called "race strength" too. Disclamer--this was my experience and maybe CB Perf. has changed the way the two part rotors are made.  Call and find out.


Attachments

Last edited by Jack Crosby

I was speaking with one of my customers who owns a high tech machine shop. He and his adult son race formula bee at Watkins Glenand he has quite a collection of VW performance goodies around his shop. I mentioned that I was considering a rear brake upgrade to discs

 He showed me his rear drum pads. They are made for the form v cars and have carbon steel as part of the pad material. He is not cheap but he loves these as they are tested and proven to stop better than the disc conversions! I trust him. He is an aerospace engineer.  Just one of my odd experiences.


Michael McKelvey posted:

The current "race strength" rear disc brakes use 914 rotors. They use studs pressed into a steel (I think) hub under the big nut and the studs pass through the rotors. The brackets for the calipers are aluminum. 

I would like to be sure they will fit before ordering them.

Thanks for your replies.

Yes, "pressed".  That's the problem.  Pressed doesn't hold together.


Jack Crosby posted:
Michael McKelvey posted:

The current "race strength" rear disc brakes use 914 rotors. They use studs pressed into a steel (I think) hub under the big nut and the studs pass through the rotors. The brackets for the calipers are aluminum. 

I would like to be sure they will fit before ordering them.

Thanks for your replies.

Yes, "pressed".  That's the problem.  Pressed doesn't hold together.


Jack,

You had a problem with the CB wide 5 kit, Michael is talking about the 4-lug kit. Totally different animal. The "pressed" part he was talking about is the lugs, which are a world better than the screwed in studs. Regardless, I believe the steel hub centers on the wide-5 kit are friction welded, not pressed into the AL hub body. The hub separation you got with your wide-5 kit can't happen on the 4-lug kit because the entire hub on those is steel.

Michael,

I'm pretty sure they aren't truly "zero-offset", although I could be wrong. I just checked-- there are no competition 4-lug kits with E-brakes, only the heavier iron rot-hub kits are available that way.

Last edited by Stan Galat
Michael McKelvey posted:

The current "race strength" rear disc brakes use 914 rotors. They use studs pressed into a steel (I think) hub under the big nut and the studs pass through the rotors. The brackets for the calipers are aluminum. 

I would like to be sure they will fit before ordering them.

Thanks for your replies.

The most common way of adding 914 rear rotors is with type 3 hubs which add about 5/8" track per side, so I would double check with CB (or whoever you end up buying from) to see how they do it. I forget, Michael- is your car swingaxle (long or short axles and tubes) or irs?

Last edited by ALB
Terry Nuckels posted:
Michael McKelvey posted:

I am considering installing CB's Race Strength Rear Disc Brake Kit, 4 Lug, IRS, With Emergency Brake.


@ALB, IRS

Of course! Thanks Terry.

IaM-Ray posted:

@ALB  are there any pictures of this type of install on an IRS rear end with the parking brake cables?

I'm sure if you checked the Samba, Ray, you could find pics (I'm going to bed). Hot VW's magazine (Dec. '94) did an article titled "Adapting 914 Rear Disc Brakes To An IRS VW" and give plans for home fabricated caliper and emergency brake cable brackets. I could scan and send it to you if you like (it'll give me a reason to learn how to use the scanner function on the printer).

That's a nicely detailed writeup you linked, Michael. I have the Airkewld rear kit for short axle swing, and it doesn't add any width at all. Not that that matters to you. But it does use the same caliper as the CB kit. Pretty much every single rear VW kit uses the Varga caliper.

The install went exactly as your link, the only exception in the Airkewld case is aluminum hub and powdercoat steel caliper bracket. It's not that big a deal to do the install.

Loosening and tightening axle nuts are always best done on the ground. If you don't have anyone to help, make a wheel chock with a 45 degree cut on a 2x4. 

Stan Galat posted:
Jack Crosby posted:
Michael McKelvey posted:

The current "race strength" rear disc brakes use 914 rotors. They use studs pressed into a steel (I think) hub under the big nut and the studs pass through the rotors. The brackets for the calipers are aluminum. 

I would like to be sure they will fit before ordering them.

Thanks for your replies.

Yes, "pressed".  That's the problem.  Pressed doesn't hold together.


Jack,

You had a problem with the CB wide 5 kit, Michael is talking about the 4-lug kit. Totally different animal. The "pressed" part he was talking about is the lugs, which are a world better than the screwed in studs. Regardless, I believe the steel hub centers on the wide-5 kit are friction welded, not pressed into the AL hub body. The hub separation you got with your wide-5 kit can't happen on the 4-lug kit because the entire hub on those is steel.

Michael,

I'm pretty sure they aren't truly "zero-offset", although I could be wrong. I just checked-- there are no competition 4-lug kits with E-brakes, only the heavier iron rot-hub kits are available that way.

My mistake-I was unaware he was talking about a 4 lug wheel.  

DannyP posted:


Loosening and tightening axle nuts are always best done on the ground. If you don't have anyone to help, make a wheel chock with a 45 degree cut on a 2x4. 

If you go this route be very careful. I've had one of those 45 degree cut 4x4's pop loose under pressure. It flew up crack me in the shin.  I had to carefully take the pry bar/socket off the wheel nut before I could hop around on one foot and let loose with a string of profanities.

Michael McKelvey posted:

Torque Meister makes loosening and tightening the big nut very easy.

That is a very nice tool and I wish I had one / might still get one.

I learned a lesson a few years back while on a trip to Fla and found a nice garage near Bunnell where an older,  former racing guy had  shop that would work on anything foreign. He liked the speedster and I ordered a set of tires from him. Next day while supervising the workers do the install he gave the car a bit of an inspection at no charge. I was impressed and he found one front wheel bearing needed tightening and also the big axle nut right rear needed tightening. 

He went at it with the air gun to the point I got concerned but he just grinned at me and said in a heavy German accent..." dey gotta be tight". 

A year or two later I needed to get that nut off and it took about 800 ft.lbs of me on the far end of a long bar to get it off. The axle threads and the nut were toast. I think the recommended torque spec is either 212 or 216 ft.lbs. Lesson learned. 

Billet will be stronger than some castings but not quite as strong as a real forged aluminum bracket. The disadvantage of billet- you start with a honkin' big block of material and carve it down to shape. If you're paying someone to make the part (from billet or forging) it can be expensive. An aluminum casting, if done properly, should be strong enough, although a billet or forging will have the advantage of slightly less material (and weight) for the same strength. Steel will, of course, be stronger, probably cheaper, and for most people easier to work with, but at 2 1/2 times the weight of aluminum, there is a penalty.

Robert M posted:
edsnova posted:

The torque spec on the axle nut is 270 ft-lbs plus the next available slot on the castle nut for the cotter pin.

Because Murphy's Law says 270 ft-lbs will never be where the slot and the hole line up. 

I said 212 or 216 ft.lbs above and that was wrong. My apologies. My Muir book on page 342 says 220 ft.lbs. on type 1 and  3 and 253 ft.lbs. on type 2. Anyone know for sure ? 

My orange (late model Beetle and K.G 1970 and newer) Bentley manual says 217 ft. lbs (important- and then tighten 'till you can get the cotter pin in; never leave it out, and never back it off just a wee bit to fit the cotter pin!). Always used that figure for whatever year Beetle I had (and I had a few in the first 15 or so years of my driving career) and stock or hotrodded, street or offroad, never lost a rear wheel.

I'm sure the blue Bentley manual (earlier beetle and k.g.) has the same spec.

I'll have to check calculations I did awhile back.  The 914 alloy wheels all have ET45 off set so that ends up being about 4.42" backspacing.  If the advertised 5" is correct I'd gain 1/2" clearance from the outer fender edge.  (I realize that isn't real accurate since there is still the outer tire rim and the width of the tire to consider too - but even 1/4" would be beneficial.  My concern is some of the Fuchs replicas say 4.5" which is same as the 2L wheels so no gain). 

Wish I had 1 CIP fake Fuchs on hand! Might be worth the $100 plus return shipping - but would really like to mount a tire which means they most likely wouldn't be returnable.

Michael McKelvey posted:

To get back to my original question, I called CB and was told this kit is 1/4" offset, although I am not 100% confident the women actually knew with certainty.

That would use up all the space I have on the driver's side between the tire and fender.

You can remove approximately 1/8-1/4" off of the rotor face to gain some clearance. I have about 45,000 miles on mine with no issues.

Last edited by Terry Nuckels
WOLFGANG posted:

I'll have to check calculations I did awhile back.  The 914 alloy wheels all have ET45 off set so that ends up being about 4.42" backspacing.  If the advertised 5" is correct I'd gain 1/2" clearance from the outer fender edge.  (I realize that isn't real accurate since there is still the outer tire rim and the width of the tire to consider too - but even 1/4" would be beneficial.  My concern is some of the Fuchs replicas say 4.5" which is same as the 2L wheels so no gain). 

Wish I had 1 CIP fake Fuchs on hand! Might be worth the $100 plus return shipping - but would really like to mount a tire which means they most likely wouldn't be returnable.

You could call their management and see if someone in warehouse could take exact measurements with pictures... They do respond to my calls.

WOLFGANG posted:

I'll have to check calculations I did awhile back.  The 914 alloy wheels all have ET45 off set so that ends up being about 4.42" backspacing.  If the advertised 5" is correct I'd gain 1/2" clearance from the outer fender edge.  (I realize that isn't real accurate since there is still the outer tire rim and the width of the tire to consider too - but even 1/4" would be beneficial.  My concern is some of the Fuchs replicas say 4.5" which is same as the 2L wheels so no gain). 

Wish I had 1 CIP fake Fuchs on hand! Might be worth the $100 plus return shipping - but would really like to mount a tire which means they most likely wouldn't be returnable.

Define "awhile back"...

Yesterday I ordered the AC Industries zero offset kit from SoCal. I ordered their master cylinder for 4-wheel discs too. They told me I don't need residual pressure valves for their brakes and said they are only needed for inferior copies.

I am having them install studs in the rotors for $20 each side for the installation.

The man in the link I posted above suggested painting the whole rotor and letting the pads wear off the paint where they make contact. I wonder if that would work with powder coating. I am planning on having the rotors and caliper brackets powder coated. I assume I can't do that with the master cylinder and calipers because of the heat.

Last edited by Michael McKelvey

Mike wrote: "The man in the link I posted above suggested painting the whole rotor and letting the pads wear off the paint where they make contact. I wonder if that would work with powder coating. I am planning on having the rotors and caliper brackets powder coated. I assume I can't do that with the master cylinder and calipers because of the heat."

hmmmmmmmmm.........   Veeery Interesting.

I put new rotors on our Outback and Rogue and the NAPA guys convinced me to go all-in with their Polymer coated rotors:

http://www.napabrakes.com/magn...s/ultra-premium.html

I do not know what the coating consists of, but they coated everything including the rotor faces.  The stuff wore off within a mile or so (lots of brake stomping involved, there).  

I do not know if this was a powder coating.  It seems to me that a number of heat-flowing powder coats are pretty hard once cured so I'm not sure if it is a good thing for a rotor face or not.  Paint or chromate?  Sure, but I can't speak to what's in powder coat mixes.  

On the Master Cylinder - Sure!  Powder coat all you want, just mask off all of the holes. Very little heat is generated in the M/C.

For the Calipers, just use high-heat powder coat, OR a high heat paint - they come in a bunch of colors (but no checkerboard if you're Cory Drake) and are typically good for over 600º.

Michael McKelvey posted:

@TRP, do you mean rotate the caliper? How do you rotate with the brake lines attached? I guess one needs to bend them and disconnect the parking brake cable.

*facepalm* Yes, sorry.  Rotate the caliper ON the rotor so the bleed screw is at 12 o clock. Bleed the system. Rotate back when done.  You should have rubber lines between the metal lines and the pan. Unhook the metal horse shoe clip and slide thst union out of the retainer... That will give you enough play to rorate things without bending things. 

Last edited by TRP

I wouldn't necessarily use your family's kitchen oven, though.  Especially when you can get a perfectly serviceable, used, Kitchen Oven for your shop from a place like a Habitat for Humanity "Re-Store" or Goodwill or even a free one from an appliance store that was removed when a new stove gets installed.  We had one in the car club down south and it was really handy.  All I have up here is an old counter-top toaster oven.

Valve covers for both the Speedster and the Mustang, exhaust pipes, my shift and 550 brake levers, the backs of my fog lights, a set of wrenches, a cast-iron piggy-bank thing, the tops of my carburetors, odds and ends in the shed, some of our Raleigh bicycle parts, a couple old Tonka trucks ... pretty much everything that can be baked in the ol' family oven ... has been.

I like to do that when Mrs. Drake is not at home, and thoroughly clean the oven afterward. I'm not big on residual bad stuff hanging around in there -- but if it comes down to me or the car, the car's going to last longer than I do anyway.

I'm sort of (not really) kidding.

PFFT.

Powder-coat doesn't off-gas at all. There are no distillates in the powder, so curing parts in the oven is probably safer than spraying that same oven down with Easy-Off. It's nothing at all like curing paint.

I'd love to build a big oven using an element and control from a cast-off electric range, but I'm still working out the design. 

I'll stick with my cast-off, Oster counter-top jobbie, thank you.

The one we got in Beaufort was a KitchenAid Electric range.  We actually got two that came from the same home, one was a single, YUGE! floor oven and the other was a wall-mount with an upper/lower config.  The big one could easily take a complete front A-Arm assembly from a full-size car, (or a 30 pound turkey) while the smaller ones were good for something up to brake drums and such.  NONE of them had heat accuracy worth a Dam so we used a BBQ thermometer to set the heat level - once set they would hold it to within 15 - 20 degrees or so.

Just another one of those things I wish I had room for (and many reasons to use it).

Last edited by Gordon Nichols
Art posted:

Greg;

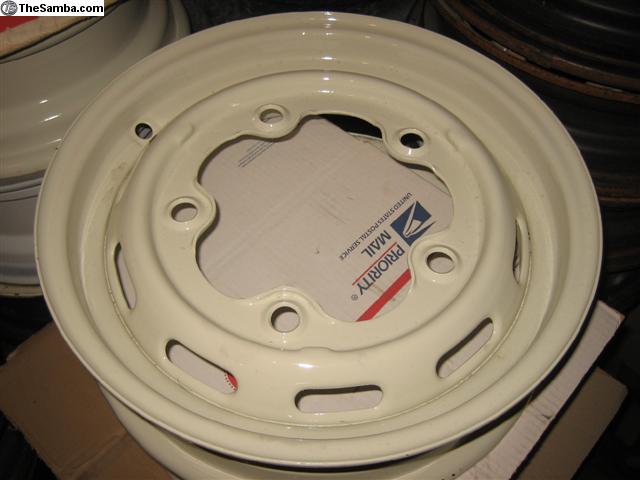
Isn't that 5" back spacing worse  than our Fuchs 2L  wheels.

I think I have missed something.  in any event, I also have a pinky finger clearance at the rear drivers side .

Wolfgang, what I was trying to understand, is that the larger the backspace number, the further the distance from the outside edge of the wheel well?? ie rub spot ?

thanks, Art

Art posted:
Art posted:

Greg;

Isn't that 5" back spacing worse  than our Fuchs 2L  wheels.

I think I have missed something.  in any event, I also have a pinky finger clearance at the rear drivers side .

Wolfgang, what I was trying to understand, is that the larger the backspace number, the further the distance from the outside edge of the wheel well?? ie rub spot ?

thanks, Art

Yes, Art. The larger the backspacing, the closer to the outside the mounting surfacace is and the further in the wheel sits. 

Lol, I keep reading these posts and it gets confusing.  

"The larger the backspacing, the closer to the outside the mounting surfacace is and the further in the wheel sits. "

So... the larger the backspacing, the more space is given from the front rim edge of the wheel to the fender and thus provides more clearance with the fender. 

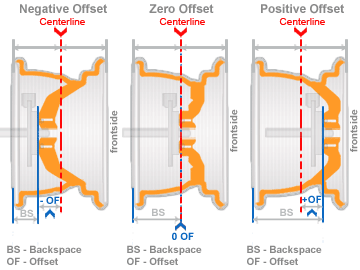
This will make the wheel rim look like it is a bottle cap, when placed on the hub, as nearly nothing of the rim is on the fender side and most of it is now sitting towards the   interior of the car.   as in the positive offset example below.

wheel-offset-backspace


Attachments

Images (1)
  • wheel-offset-backspace
Last edited by IaM-Ray

The deep dish look is kool on the ultra wide VS - but just can't work with a classic CMC rear.  The fake Fuchs at CIP1 say 5" back spacing so on 5.5" wheel that remarkable and hardly any to stick out and rub. A 4.5" wheel would work well but that is a skinny wheel and really too narrow for a 185 or probably 165 tire.

Check this wide 5 out - mounting surface has to be near flush with outer rim?

Photo

Last edited by WOLFGANG

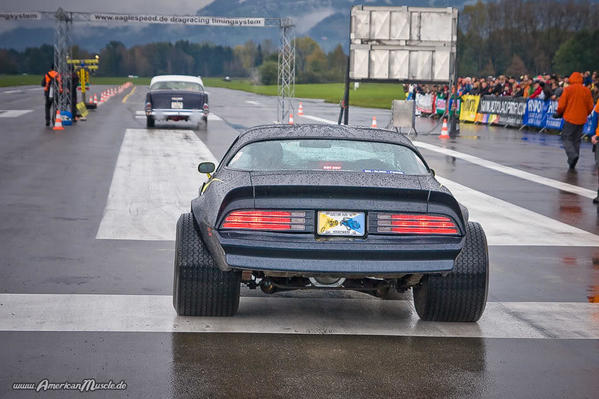
Negative Offset:

M50 on Firebird

Back in the day, this is what any self-respecting corn-fed white-boy aspired to. Mickey Thompson M50s on Cragar S/Ss sticking 3+" proud of the fender lips, air-shocks with 150 psi pressure so the bodywork would clear, chromed differential cover on the 12-bolt rear-end. Weight-transfer was horrible, but we all though the massive rubber made up for it. It was impressive when those big bias-ply meats broke loose.

This one must've had ladder bars, because I can't see any traction bars hanging under the leaves.

Attachments

Images (1)
  • M50 on Firebird
edsnova posted:

FYI: 4.5-inch rims are fine for 165/80-15s and will fit 185/65s without complaint. I currently have a garage full of these combos. Also: my TD runs 4-inch MWS wire wheels with 165/80-15s.

According to Tirerack- recommended rim size for a 165/80 is 4-5.5" As the aspect ratio goes down the recommended rim changes- for a 165/60 it calls for a 5- 6.5" rim. For a 185/65 a 5-6.5" rim is also recommended. Beetle owners (as well as the occasional Speedster owner) put 185's on 4.5" rims all the time and with such light cars we get away with it, but some tire shops might not want to do it (I guess for legal issues that would pop up if something happened).

Yes, a 185/65 calls for a minimum 5" rim. But experience has shown that a 4.5" rim works just fine. Like I said on this EXACT SAME ISSUE over at Spyderclub, I personally have over 40,000 road and track miles that say this is OK. 

So instead of trying to scare people, name me any incidences you have of this tire/rim combo rolling off. I've heard of and experienced zero.

And it's not illegal to mount, just not recommended.

Last edited by DannyP


 Mr. Panhandle,

 I am a long time drag and road racer (40 + years). I once had an Anglia Gas Coupe which had 3” wide front rims and the appropriate (very narrow) rubber. No one would attempt any high speed turns with this set-up except in a dire emergency !

 But perhaps of more relevance is my experience with my own Beck Spyder. When purchased from Adriana Lima and her husband, the car had 200 miles on the clock, and needed to have both front and rear suspension “tuned” and aligned... which I did.

 After some 2000 mile I was disappointed at “tuck” (understeer characteristics). Since the Mangels wheels could not be balanced (massive runout), I got rid of them, and only then discovered that the front rims fitted with 185/65/15” rubber were 4 ½ inches wide…inadequate…in every way, and that explained why the tires in the front literally peeled off the rims in entry to sharp corners, irrespective of  normal  (1.4-1.7 bar) tire pressures.

If you don’t go fast…it really does not matter…but if you try to go fast with the wrong set-up... there is a guard-rail out there waiting to get to know you better

  ReV

Again, Rev, you have proven to be an ass over here as well as at Spyderclub.

My car has never been on a trailer except when it was delivered, smart ass. And I have driven that car pretty darn hard, as all my buddies over here will attest to.

Are you a politician? Deflect and don't answer, yup, that's what they do.

So I'll ask you again and make it in caps, not because I'm yelling, because I'm not. It's because I actually want an answer!

PLEASE GIVE EXAMPLE(S) OF 185/65R15 TIRES ROLLING OFF A 4.5" RIM.

Or just go away.......

R Vosari posted:


 Mr. Panhandle,

 I am a long time drag and road racer (40 + years). I once had an Anglia Gas Coupe which had 3” wide front rims and the appropriate (very narrow) rubber. No one would attempt any high speed turns with this set-up except in a dire emergency !

 But perhaps of more relevance is my experience with my own Beck Spyder. When purchased from Adriana Lima and her husband, the car had 200 miles on the clock, and needed to have both front and rear suspension “tuned” and aligned... which I did.

 After some 2000 mile I was disappointed at “tuck” (understeer characteristics). Since the Mangels wheels could not be balanced (massive runout), I got rid of them, and only then discovered that the front rims fitted with 185/65/15” rubber were 4 ½ inches wide…inadequate…in every way, and that explained why the tires in the front literally peeled off the rims in entry to sharp corners, irrespective of  normal  (1.4-1.7 bar) tire pressures.

If you don’t go fast…it really does not matter…but if you try to go fast with the wrong set-up... there is a guard-rail out there waiting to get to know you better

  ReV

You'll note that I eliminated my earlier post. I Decided I just didn't want to get into this, but you saw the post before I eliminated it, so here goes.....

First, Mr. Panhandle is unnecessary. Just call me Bob.

Second, it may amaze you to learn that I actually understand the meaning of terms like "tuck". No need to define.

Thirdly, I am surprised that you didn't do a thorough inspection of the Spyder before acquiring it. If you had, you would have known what the tire and wheel size were. Something expected of a man with more than forty years of drag and road racing under his belt.

And, lastly, you come across as a pompous ass.

No need to respond, I don't have time for this. I have a lot of time, just not for this, and I am simply going to block you.

Panhandle Bob posted:
R Vosari posted:


 Mr. Panhandle,

 I am a long time drag and road racer (40 + years). I once had an Anglia Gas Coupe which had 3” wide front rims and the appropriate (very narrow) rubber. No one would attempt any high speed turns with this set-up except in a dire emergency !

 But perhaps of more relevance is my experience with my own Beck Spyder. When purchased from Adriana Lima and her husband, the car had 200 miles on the clock, and needed to have both front and rear suspension “tuned” and aligned... which I did.

 After some 2000 mile I was disappointed at “tuck” (understeer characteristics). Since the Mangels wheels could not be balanced (massive runout), I got rid of them, and only then discovered that the front rims fitted with 185/65/15” rubber were 4 ½ inches wide…inadequate…in every way, and that explained why the tires in the front literally peeled off the rims in entry to sharp corners, irrespective of  normal  (1.4-1.7 bar) tire pressures.

If you don’t go fast…it really does not matter…but if you try to go fast with the wrong set-up... there is a guard-rail out there waiting to get to know you better

  ReV

You'll note that I eliminated my earlier post. I Decided I just didn't want to get into this, but you saw the post before I eliminated it, so here goes.....

First, Mr. Panhandle is unnecessary. Just call me Bob.

Second, it may amaze you to learn that I actually understand the meaning of terms like "tuck". No need to define.

Thirdly, I am surprised that you didn't do a thorough inspection of the Spyder before acquiring it. If you had, you would have known what the tire and wheel size were. Something expected of a man with more than forty years of drag and road racing under his belt.

And, lastly, you come across as a pompous ass.

No need to respond, I don't have time for this. I have a lot of time, just not for this, and I am simply going to block you.

I guess I don't need to point this out to him, you handled it first!

Panhandle Bob posted:
R Vosari posted:


 Mr. Panhandle,

 I am a long time drag and road racer (40 + years). I once had an Anglia Gas Coupe which had 3” wide front rims and the appropriate (very narrow) rubber. No one would attempt any high speed turns with this set-up except in a dire emergency !

 But perhaps of more relevance is my experience with my own Beck Spyder. When purchased from Adriana Lima and her husband, the car had 200 miles on the clock, and needed to have both front and rear suspension “tuned” and aligned... which I did.

 After some 2000 mile I was disappointed at “tuck” (understeer characteristics). Since the Mangels wheels could not be balanced (massive runout), I got rid of them, and only then discovered that the front rims fitted with 185/65/15” rubber were 4 ½ inches wide…inadequate…in every way, and that explained why the tires in the front literally peeled off the rims in entry to sharp corners, irrespective of  normal  (1.4-1.7 bar) tire pressures.

If you don’t go fast…it really does not matter…but if you try to go fast with the wrong set-up... there is a guard-rail out there waiting to get to know you better

  ReV

You'll note that I eliminated my earlier post. I Decided I just didn't want to get into this, but you saw the post before I eliminated it, so here goes.....

First, Mr. Panhandle is unnecessary. Just call me Bob.

Second, it may amaze you to learn that I actually understand the meaning of terms like "tuck". No need to define.

Thirdly, I am surprised that you didn't do a thorough inspection of the Spyder before acquiring it. If you had, you would have known what the tire and wheel size were. Something expected of a man with more than forty years of drag and road racing under his belt.

And, lastly, you come across as a pompous ass.

No need to respond, I don't have time for this. I have a lot of time, just not for this, and I am simply going to block you.

THANK GOODNESS the PANHANDLE has blocked me also

I'd have to visit a SHRINK if he did NOT

POPCORN anyone?

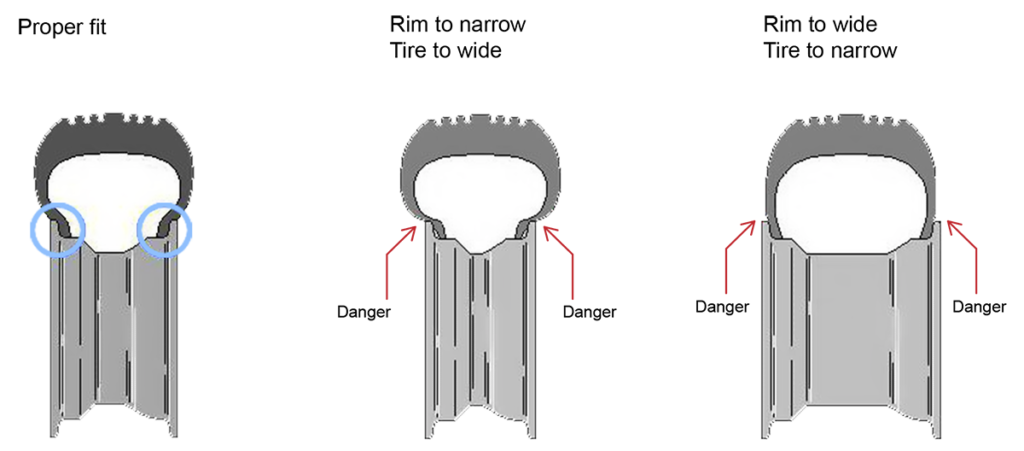
I've always followed the published tire size/rim width recommendations.  (I don't believe in Global warming though - especially the human contribution). Was told a 4-4.5 rim got a 145/155 tire and 5/5.5 got 165/175/185 tire.  The explanation was "too wide a tire on a rim could cause the side wall to start to roll over and lose air (suddenly deflate) in aggressive driving or the side wall to be damaged from the rim due to contact in area not designed for contact.  Newer rims (for tubeless tires so not early VW rims ) do have a safety bump in the rims to help prevent this and keep the stiff tire bead situated). The side wall on passenger tires are flimsy with like 2 ply nylon cord.  This maybe "old school" and is based on old tall tires (80 or 75 aspect ratio tires) like original '70 sports cars used).  With lower aspect ratios, the side walls are shorter so stiffer - even on 65 series but more so on 50/45/40. I suspect weight of car and tire compound has impact too.  A light car with wide tires on skinny rim and sticky rubber would be different than heavy powerful Chevy on same set up.

Image result for wide tires on skinny rims

I find any theory that cannot be questioned and where my tax dollars are commanded to be used by governments akin to a religion.  

Where Religious belief are questioned there is always suppositions of lack of intelligence to the one believing in reliigion or God, yet no one can question the theory of global warming or CO2 emissions.  

Let's face it, it is just the new religion that is state sponsored by zealots who have taken control of our governments, and their coffers and discovered that they can control the public purse to their advantage. 

Ethanol in gaz is another nonsense. 

I should also mention that while this was happening, the take over of the government purse that is,  those in the real world who happened to have a higher than normal IQ simply when off to make money in the capital system forgetting that those who chose the government sector, will when they get numerous enough, take control of the government coffers and policies, and cause  the sale of Government koolaid to be sold  from K to 12 and also universities.  

Science by it's definition is to be continually questioned until whatever is postulated can be replicated by any investigator.  It is Evidence based.  

Now we have the Ideology of historical science where no witness exists replacing real Science... 

Historical science is just theory, and to adopt it as fact, is certainly the new koolaid of government.  

Hence my definition of this koolaid being the new Religion.  Religion is not rational, and certainly mostly in your mind... hence the very definition of a delusional state. 

And it keeps on going. 

Hope you enjoyed my rant.


Will Hesch posted:

as a former Proof/Content Editor for two national fishing magazines, I get a kick out of this forum, many of the posts wouldn't pass muster in a 6th grade english class but...I love you all anyway, keep on destroying my (and Stan and Michaels) sensibilities...

As, English, Michael's

And Will, I'm just playing around. I do not care how people type on this forum. I've made many mistakes myself, especially when trying to post from my phone and don't proofread before I hit send.

Last edited by Robert M

Iam-RAY,  I did enjoy the rant.  As age takes over my mind and body, I have become more conservative and certainly more concerned about government influence on our daily freedoms. Unfortunately, living in the NY State of taxes my entire life has left me with an even deeper fear of government influence. I recently read a book by a strongly opinionated libertarian. "Progressivism: A Primer on the Idea Destroying America" 

  Great book on our public schools, political issues and our increasingly intrusive government regulators. I didn't agree with everything in the book. But, I agreed with most! 

  Sorry for continuing the thread drift.... mea culpa.  

To paraphrase a conversation between a TV reporter and Jerry Rubin of the 1960's radical political group "The Chicago 7":

Reporter: "What are you people against?

Rubin: "What have you got?"

I find myself more and more concerned about government intrusion as well, but I am following the path of many others, the more you acquire and value, the more you feel the need to protect it, and then you die and it doesn't matter.

I don't think Rubin owned a replica Speedster. Maybe the reporter did.

Panhandle Bob posted:

... the more you acquire and value, the more you feel the need to protect it, and then you die and it doesn't matter.

I regret that I have but one “like” to give for this comment.

I also (kinda’/sorta’) regret my pedantic comment regarding the absent “o”s. I’ve got no desire to pretend I am a grammar-Nazi. There/their, its/it’s, two/to/too, whether/weather, et al— I just need to get over it.

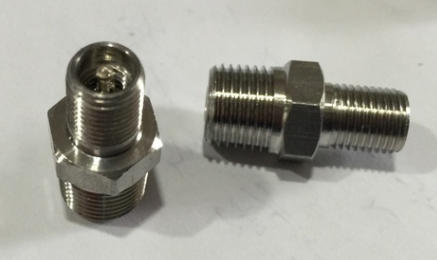
I have been thinking about what to do with the brake line to the caliper. With the AC kit and others, they use a hard line connected to a part of the caliper that moves, albeit not very much. Also, the hard line makes a 180-degree bend coming out of the caliper.

Should I be concerned about a hard line connecting to a moving part? Probably many, many people are driving their cars with this condition.

Airkewld sells a braided stainless hose with banjo fitting specifically for the AC caliper that replaces the whole hard line. I am tempted to use this, even though the cost would be about $64 plus shipping.

Another option would be a banjo fitting and short hose coming out of the caliper and then a hard line.

Any opinions?

Thanks.

Not from the spring plate pivots, but from the diagonal arm pivot points, instead.   Then short, flexible hoses from the torsion bar to the diagonal arms.  The lines down the diagonal arms to the calipers are both hard.  You can see them here:

I understand your question though, Mike.....   The caliper will move a bit as the pads wear and you want to allow for that movement.  I found this photo on the Samba that shows a short, flexible hose from the hard line to the caliper.  If it were mine I would weld a tab onto the diagonal arm on the other side of the hub to anchor the hard-to-flex connector to prevent vibration and then the caliper would be free to move as needed without failure of the brake lines:


Last edited by Gordon Nichols
Panhandle Bob posted:

I have always been advised that there needs  to be some part of that line between the master cylinder and the caliper that allows for some flex, e.g. the short section of flexible hose between the hardline from the master cylinder and the hardline to the caliper that you see on early beetles. You might noodle around on google and You Tube for the prevailing wisdom (?) on that.

I was referring to the front brakes, not the rears. I am currently fixated on them as I seek my own elusive "brass thingie", the brass flat brass retention plate that fits over the top of the pads. Lost it somehow and looking for another. 

Lots of good insight in this thread.

Mike wrote: "So, are you guys saying that I shouldn't be concerned about the end of the hard line at the caliper moving with the resulting flexing of the hard line?"

No, the opposite, You SHOULD be concerned.  And for that reason you should have TWO flexible hoses going to each rear wheel - the original flex hose between the torsion tube and the diagonal arm, a hard line going down the length of the diagonal arm and add a new, flexible hose at the hub end of the diagonal arm to go from the diagonal arm hard line to the caliper to allow the caliper to move.

Here is a few pics of my two builds (Speedster and Coupe). The Speedster has a 66' chassis and the Coupe uses a 74' (has IRS and swing-axle abilities). The last pic is the 74' and you can see how the hard lines are in different locations PLUS the need for another T fitting that has one hole plugged.

NO issues on the Speedster. Brakes are SOLID and stop on a dime. No leaks. No rubbing. Works perfectly.

IMG_6344IMG_634532968A09-3284-46A2-8619-2752F4680DB3

Attachments

Images (3)
  • IMG_6344
  • IMG_6345
  • 32968A09-3284-46A2-8619-2752F4680DB3

Mike:  Personally, I would not be a fan of running flexible hose from the torsion tube/chassis all the way to the caliper.  Why?  Because I believe (and I think brake designers might, too) believe that you would lose some braking efficiency as the hose flexes as you apply more foot pressure on the brake pedal.  For that reason, I would use as much (length) hard line along the diagonal arm as I could, with flexible hose as short as possible to provide adequate flex ability for the curve where needed.

You can anchor the line coupling near the caliper any way that works - nothing critical there, other than making it solid so it won’t fail due to vibration.

Remember, your IRS lines/hoses will be routed a bit differently than Longfella’s, just due to the difference in suspension design.

Last edited by Gordon Nichols
Gordon Nichols posted:

Because I believe (and I think brake designers might, too) believe that you would lose some braking efficiency as the hose flexes as you apply more foot pressure on the brake pedal.


I'm curious to what the actual efficiency loss would be. Any ideas? I'm not an expert, but I can't imagine it being a world of difference on such a light weight car.

As you can see on my Speedster (first two pics), I run a few SS lines. Granted I have four wheel disc brakes... I have had to brake rather fast a few times and I don't notice any degradation or sloppiness in my breaks.

I have the kit in question on the rear of my swing axle car. Mine came with steel braded lines to replace the rubber lines. It also came with a 2" rubber line to go betwee the hard line and the caliper. Remember... The rear calipers 'float'. One side is fixed... the other side floats and pulls away from the rotor a weee bit.  This is why you need the rubber line.

The 2" line is frankly too short. Mine wore out in 3 years (rubber dried and cracked) so Im about to replace them with 4" lines from CIP1.  Had I known about the braded banjo lines from Pete I would have considered it.


I'll weigh in here, as I've got the full Airkewld setup. All hard lines from master and one teflon/braided flex line to each caliper. The rear flex line goes from where the torsion tube would be( my car has a heim joint/trailing arm with coilovers) all the way to the caliper. In the case of the Spyder it's not long enough as furnished so longer ones were purchased from Pegasusautoracing.com. They are secured through the holes that the hard line would go through. I used some German fuel hose split lengthwise and plastic ties. This way the caliper line can move a bit and the line also moves at the suspension joint.

It all works fine and there is no problem with a mushy pedal. Teflon/braided lines don't flex like rubber lines. I've been running like this for a couple years now. Brakes are superb, no fade ever. I got the 4 piston front kit and the single piston rear with e-brake. They weren't cheap and did require a bit of machine work on the front. The opening for the grease seal in the hub wasn't large enough and the diameter where the metal cap goes was too large as well. Both were cured by dissasembly and a turn on my friend's lathe. Just be aware that these are custom parts and may require a little fettling to get them perfect.

In the last photo you can see the braided line as well as Charlie helping! I chose to mount the calipers so the bleeders are all straight up and down for convenience when bleeding. And I change the fluid every other year, very important!

IMG_20150502_154907450_HDRIMG_20150504_184519970IMG_20170506_210633005_HDR

Attachments

Images (3)
  • IMG_20150502_154907450_HDR
  • IMG_20150504_184519970
  • IMG_20170506_210633005_HDR

With my drum brakes, I shortened the e-brake cables at the handle.

With the disc brakes, I am wondering if I might want to keep the cables stock at the handle and shorten at the caliper.

If so, what should I clamp or crimp on the shortened cable at the caliper?

On the other hand, I may not be able to feed the stock end through the tube. I lined the steel tube with a polyethylene tube to make it more slippery.

I'm thinking I should replace my brake fluid. Should I empty everything before putting new fluid in?  If not and I let new fluid replace old as part of the bleeding process, I don't know if I will be able to see the change from old to new. My old fluid has about 5000 miles but is several years old.

If I should remove all old before putting in new, I can use my pressure bleeder and push in air. Would I open the calipers in the same sequence as for bleeding?

I would NOT push out the old fluid with air.   That might cause more problems than it's worth.

Just use your pressure bleeder with 1 - 2 quarts of new fluid.  Chances are, the old fluid in there has already begun to discolor so you should be able to see the color change as the new fluid hits the bleeder valve.  I can on mine, but I have clear vinyl hoses to drain the bleeders to a Mason jar.  If not, just bleed through a quart of new fluid, doing all four wheels and declare victory.  There's just under a quart of fluid in the system, including the reservoir, the Master Cylinder, wheel cylinders/calipers and lines.

Last edited by Gordon Nichols

You know, I have an (old) Mighty Vac hand pumper, and while it works, it is the reason I built a few el Cheapo pressure bleeders - they work SO MUCH better and easier and I made a couple for the Carlisle raffle along the way.  I can set it up with a quart of new juice and get all four wheels bled and done in, like, under 45 minutes, tops, including cleanup.

I used an ACE Hardware 2-quart bug sprayer to build mine.  Somewhere on here in the dim past is my DIY article on how to make one.  Total cost was under $25 bucks.

https://www.speedsterowners.co...694#2135445019039694

Mine is the new and greatly improved version of this:

http://vwparts.aircooled.net/M...04-p/motive-0104.htm

But I deleted the pressure gauge on mine in favor of a real, VW Type-1 fluid reservoir cap.  That's really the only unique thing you have to buy.  ACE should have lots of 2-qt bug sprayers on hand right about now....

Last edited by Gordon Nichols
Gordon Nichols posted:

https://www.speedsterowners.co...694#2135445019039694

Mine is the new and greatly improved version of this:

http://vwparts.aircooled.net/M...04-p/motive-0104.htm

But I deleted the pressure gauge on mine in favor of a real, VW Type-1 fluid reservoir cap.  That's really the only unique thing you have to buy.  ACE should have lots of 2-qt bug sprayers on hand right about now....

Hey show us a pict Gordon... I probably want to do this myself in a few years.  

schrader adapterReally all you need is an extra reservoir cap, an air source, and one of these here schrader to pipe thread adapters. Drill and tap the cap and screw it in. Fill the reservoir to the tippy top and put 5 psi or less of air on it. Bleed as usual, furthest to closest to MC.

CHECK THE RESERVOIR OFTEN, DON'T LET IT RUN DRY.

When it runs clear and not brownish, stop bleeding and move on to the next. Done by yourself, and cheap too. I do this every 2 years, like clockwork.

I have found that if you crack a line open or replace a hydraulic part, manual 2-person bleeding becomes a necessity, especially if the system is new or dry(new MC?). I'll start with an air bleed by myself to get a pedal, then get some pumping help from the GF or a buddy. You really need to pump 3 times violently then hold. Open bleeder and close BEFORE the foot comes off the pedal(I know 99% of you know this). This 3 hard pumps will force the finer bubbles out. This can take a few tries until you get it all out and get a consistent hard pedal.

Attachments

Images (1)
  • schrader adapter
Last edited by DannyP

Here you go, Ray...

Took a while to find it.

Brake Bleeder

The cap on the end of the hose is the same as the brake fluid reservoir cap you now have.  If you look closely, there is a short piece of copper tubing protruding to the left of the cap.  The length of that tubing sets the proper final level in the reservoir when you're done.  

Fill it with a quart of fluid, screw the cap onto your reservoir, give it 4 or 5 pumps and start bleeding.  When done, place the bug sprayer on the floor (if it isn't there already), unscrew the pump until it depressurizes and the excess fluid will drain out of the reservoir into the sprayer tank and just to the bottom of that copper tube, the exact level of the "Full" line of the reservoir.

This is an older photo, and I have now added a quick-disconnect fitting near the cap so I can use it on my Speedster, while my neighbor can use it on his motorcycle disk brakes and his slowly-becoming-a-classic pickup truck with different caps/adapters for each one, so we get a lot of use out of it.   The 2-quart size is what was on the shelf and has worked well - they also have a 1-quart smaller size if that works better for you.

Attachments

Images (1)
  • Brake Bleeder
Last edited by Gordon Nichols
Michael McKelvey posted:

Thanks for your replies. I thought that with what I thought was relatively few miles on the old fluid it may not have changed color much.

Any fluid recommendations, including DOTwhat? SoCal said DOT3.

It may not have many miles on it, Michael, but brake fluid absorbs water over time (I think the word is hygroscopic?) and the cylinders (or calipers) and hard lines will rust out from the inside over time, hence the recommendation to change it every couple of years.

Last edited by ALB

Add Reply

Post Content
×
×
×
×
Link copied to your clipboard.
×
×