Gents:

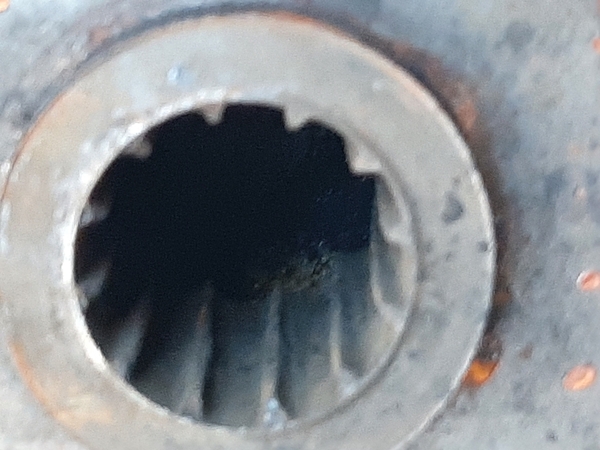
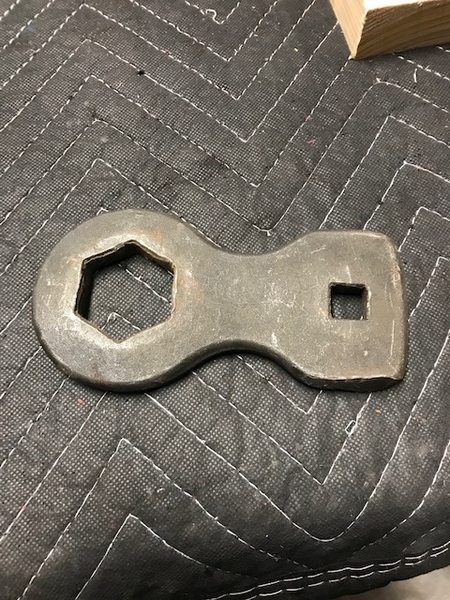
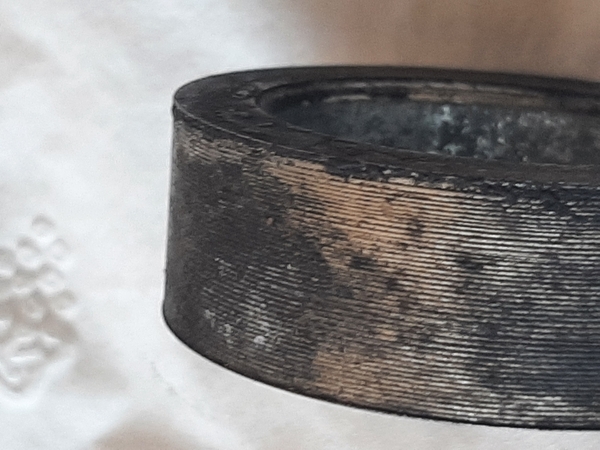
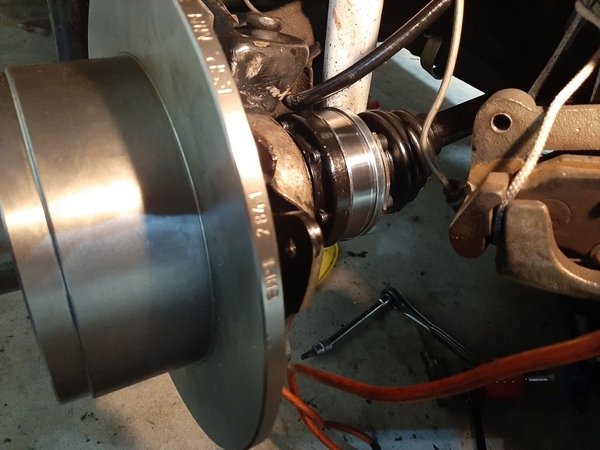
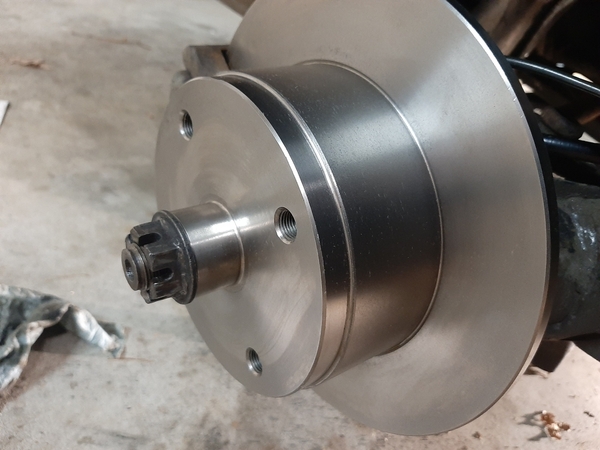
Some here may recall an embarrassing incident on the Rattler in NC this fall, Tour d'Smo.  Its not important to the message if you do not recall, but I think I figured out what was happening.  At the time, I suspected loose front wheel bearings introducing a little slop in the steering, and indeed that was the case, although I'm going to say that was minor.  Also I was able to fix that with a small adjustment to the clamping nuts on the front spindles.  But the larger problem was not fixed and indeed got a lot worse.  Driving the car after towing it 500 miles home, something terrible was certainly at play with the suspension.  I did hit a terrific pot hole on the last run on the Tour d'Smo, so figured maybe something important  broke??  @Stan Galat had an issue maybe from a similar encounter: he in fact broke something.  So I started to look around by shaking some wheels.  The rear left wheel seemed a little loose actually, and given what was going on with the front bearings, bearing wear was suspected.  I also noticed that the tire, which normally has a really close (but not touching) fit to the body was actually rubbing the FG. So I began a disassembly.  What I found is in the picture: The brake rotor spline has been worn pretty close to gone.  Talk about wobbly.  So i will need a new one of those, and I'm on to getting one.  All of that is preamble to my question to all you technical wizards, which is this:  Why??   I did notice that before I loosened the castle nut, there was some axial slop in the lash-up.  There is a spacer between the nut and the hub because the axle spline extends beyond the length of the hub spline, and I could turn that spacer with my fingers before loosening the nut; it should be clamped down tight to the bearings by the castle nut.  Hmmm  ... .  So I thought the bearings were indeed loose/worn and must be replaced. I Have not removed said bearings yet, but plan to.  Again the question: how does that outer spline in the hub wear itself down to about gone?  What lets that happen?  Cheap materials?  A natural consequence of worn bearings? Too many burn-outs??   I really did  drive the wheels off the thing on all those twisty mountain roads?  This curious mind  needs to know.

Rotor

2007 JPS MotorSports Speedster

Attachments

Images (1)
  • Rotor
Original Post

Replies sorted oldest to newest

PS: I had some trouble locating all the bearings and seals etc for the rebuild. No luck at my local stores that usually carry what I need; other on-line outlets list the parts, but turn out to be out of stock ... The folks at CB Performance did come through however, with two full sets of pieces and parts, shipped out chop-chop quick.  I mean if one bearing set is bad, the other must be too, right?

Purchased a used VS year ago on CT. While flat towing the speedster it started to sway quite a bit L & R and found the read drum was loose to the point I could turn the Castle nut with a vise grip. I cut some aluminum strips for shims from a aluminum soda can, set them in the drum spline opening and bending over the ends to make tabs. Sat on my butt kicking and forcing the drum on the axle shaft until it seated... Castle nut as tight as I could by pounding the vise crip with a rock and made the 250 trip back home.

I'm sorry for the trouble, @El Frazoo, but glad you found the problem.

I doubt your hub rounded out on the pothole where my suspension broke, but the roads and the way we drive on them surely contributed to both equipment failures. We're pushing well past the design parameters (assuming there were any) for aftermarket VW parts, which in most cases don't even approach the quality of OEM parts in a German economy car last built a half-century ago.

Tearing through the mountains at twice the posted speed limit was never what the Sainted German Engineers imagined, and the suspension and brake parts were never designed for how we use them. The absolute weakest of weak links is how the rear hubs are fastened to the car. It's a perfectly fine setup for profiling, and comically inadequate for how we use them.

Tom Boney had a similar failure in his IM on the same roads a few years back. I've actually torn the friction-welded center out of a CB rear hub several times channeling my inner hick-town, white-trash hooligan. The next setup on the car will be a CSP (I'd do an AirKewld, but the Euro is in the toilet, and Pete's pricing has gone nuts).

Suffice it to say, I feel your pain. The ultimate fix is to spend the long money to try to ensure it doesn't happen again, and to check the tightness of the castle-nuts frequently. When you think about what is actually happening, you can understand why this nut being really, really tight is the only thing standing between you and a pretty catastrophic failure.

The advice Gordon and Al give regarding the torque of the castle nut is good, but I've learned (out here by myself) that 217 lb ft or 250 lb ft (or whatever) is the barest minimum. You do you, but I'm torquing that particular nut as tight as I can get it. The chances of stripping it are near zero, and the downside of it being too loose is exceedingly bad. I go to at least 400 lb ft, but I'm a spot-torque man on this particular piece (torque it until you see spots). In this instance, I'd tighten with a breaker bar and cheater, and just check it with a torque wrench set to 300 lb ft. I just want the wrench not to click.

Other, better, more careful professional mechanics will be aghast at my ham-handed approach, but it's worked for me, and I'm a lowland gorilla who drives like his scalp is on fire.

I don't want to be accused of being a disciple here, but Stan is correct.

I am also of a mind to tighten the bejeesus out of this particular nut.

I use a 3 foot aluminum pipe over my 3/4" drive breaker bar. I lean on it pretty hard and give a couple bounces, so I'm at least 450 ft. lbs.

Same deal on the gland nut/flywheel.

You all know how I drive, and I've never had a failure.

"We've come this far so lets not ruin it by thinking !"  Well...I can't help but think about this one. I also know that many of you guys know way more than me but I'm not convinced that over torquing is a good idea. Especially if it's nearly double what is called for. On one torque chart a 1 1/8'-7tpi , grade 5, bolt with waxed threads requires 397 ft lbs which attains a clamping pressure around 43,000 lbs.  if the threads are clean and dry with no lubricant, it will take about 794 ft lbs to achieve the same clamping pressure.   My point being that any lubricant of any kind on the threads significantly decreases "thread drag resistance"and can significantly increase the amount of clamping pressure to the point that the bolt is over-stretched. Also the threads of the bolt and nut may fail by shearing.

In this particular case, I'm not convinced that even 44,000 lbs of clamping pressure will stand up to a launch.  Also cast iron, such as is the drums or disc's, has a very low shear force resistance. The axle is hardened steel and is capable of eating cast iron on any bad day.

I can't remember what VW says about oiling the threads but many car manufacturers say to use 10wt oil or they specify dry threads.  What ever you do, NEVER use Never-Seize on anything except non critical fasteners in high rust possibility areas........Bruce

The consensus for rear castle nut torque among some friends with fiberglass dune buggies that see challenging off-road several times a year is 280- 300 ft. lbs.  As a group we do 3 weekends, anywhere from 2-4 days a weekend, each summer, some do day trips out of town as well and I don't remember the last time anyone was plagued with stripped splines.  I know some of the local VW street crowd do about the same, and this includes a couple of guys with 11 and 12 second cars.  And don't forget the cotter pin!!

@Stan Galat posted:

...We're pushing well past the design parameters (assuming there were any) for aftermarket VW parts, which in most cases don't even approach the quality of OEM parts in a German economy car last built a half-century ago.

Tearing through the mountains at twice the posted speed limit was never what the Sainted German Engineers imagined, and the suspension and brake parts were never designed for how we use them. The absolute weakest of weak links is how the rear hubs are fastened to the car. It's a perfectly fine setup for profiling, and comically inadequate for how we use them...

The advice Gordon and Al give regarding the torque of the castle nut is good, but I've learned (out here by myself) that 217 lb ft or 250 lb ft (or whatever) is the barest minimum. You do you, but I'm torquing that particular nut as tight as I can get it. The chances of stripping it are near zero, and the downside of it being too loose is exceedingly bad. I go to at least 400 lb ft, but I'm a spot-torque man on this particular piece (torque it until you see spots). In this instance, I'd tighten with a breaker bar and cheater, and just check it with a torque wrench set to 300 lb ft. I just want the wrench not to click.

Other, better, more careful professional mechanics will be aghast at my ham-handed approach, but it's worked for me, and I'm a lowland gorilla who drives like his scalp is on fire.

Stan brings up a couple of great points- Dr. Porsche and the engineers at VW never imagined we'd be doing the things we do with their budget commuter car for the masses, and with a lot of aftermarket parts these days not even approaching OEM quality we have to come up with our own solutions to problems the factories guys simply couldn't begin to anticipate.

And Stan- is that 400 ft. lbs. lubed or dry?

@El Frazoo- Glad you caught it before it stranded you, Kelly!

Last edited by ALB

FWIW, back in the day I had to renew the drums on my old 356, so I know about the castle nut, and the big cheater bar. Still have the 36 mm socket I used back then. fits perfectly. And I do know about feet and pounds, mine being close to 200 at this point.  so me at 2 feet ought to get the job done.  I'll be checking on the torque on the other side too.  No wobble there that I can detect, but if one side went bad ...

I have now ordered parts sufficient to rebuild both sides top to bottom, bearings included.  [Do you think the bearings might also be affected by that sloppy spline?] Had a lot of trouble locating the rotors.  Many local and on-line shops list these but do not actually have them. Jbugs has them.  They also list the four hole rotors as both long and short spline, which I find interesting. The one I took off uses the short spline and a spacer, what they will send is a long spline.  Seems to me longer is better. When I ask, they admit these rotors are Empi parts. About the only game in town so far as I can tell.

I get aircooled (Bruce)'s technical essay on bolts, nuts and threads, torque etc. .  Its all been designed and spec'ed out by folks who build and understand such things, strength of materials and all of that. I'll be going for 220 + what it takes to get the cotter pin in place.

I note also the admonition to recheck these torques as a routine maintenance item. Hmmm.  I seem to recall such a note in the paperwork from JPS.  I did not do that, so maybe this is all on me.  And all those burn outs . . .

And go with 250 ft/lbs. plus the next hole, not 220 ft/lbs.  Experience has shown this to be prudent.  Just stand on the bar at the calculated distance from the center point with your 200 pounds (looks like 1'-3" out).  I've not found it necessary to bounce on the bar, but if you're feeling younger, so be it - one bounce, that's it.  Any more and "No Beer for YOU!"  We don't want to hear that you slipped off the bar and broke something that, at our age, won't readily grow back.

Also, add "rear hub torque check" to your growing list of Spring Maintenance items.

I also subscribe to Bruce's fear of over-torquing and potentially stripping threads or worse, but I'm either too ignorant or too lazy to look up different torques for waxed or lubed or dry fasteners (but the people at "Fastenal" know that stuff inside out).  So I always just assemble them dry, unless told otherwise, to the specified torque, more-or-less (but more for rear VW hubs).  If that was good enough for my Navy Sea-Bee uncle it was OK by me.

So the consensus is 217 Ft. Lbs. is NOT enough. I will submit that 250 isn't enough either. I like Al's 280-300 setting. A nice round number and a lot more than factory(which was only to hold 60 hp!).

As I said before, I've never stripped a hub. I do know that it is an often-checked item on the Formula Vee cars. Most guys use a hitch pin in the cotter pin hole. If it goes in easy, but comes out hard, you KNOW it's starting to back off. They recommend 250-300, the factory spec of 217 is NOT ENOUGH! And that's for 60 hp on a good day, but with slicks on a track pulling high G-loads.

Last edited by DannyP

@aircooled - Bruce, if you can stretch the threads on a stub shaft, remind me not to shake your hand (for fear of being crushed).

400 lb ft isn't gonna do it. I know this from experience.

Every time I climb up on the scale, it's like roulette - round and round she goes - where she stops, no one knows. Let's call it an even 250 lbs of rippling romance. I don't lube the threads, but they aren't "rusty dry" either. Me standing on the end of an 24" breaker bar is 500 lbs, but that would require balance I don't have, so let's just call it 400 lb ft. I bounce a little, leaning hard on the bar, and then go to the next hole. I may stand on it, but I'm balancing on something, else I crack my ginormous pineapple like a grape.

This gets me to the torque settings you guys are reporting with great specificity. I know you can math and all that but when you say, "I weigh 150 lbs and I have a 2 ft cheater, ergo: 300 lbs, I wonder - how do you pinpoint exactly the point your weight is centered on the bar. Your foot is 4" wide. You're guessing even with a torque wrench and a toque multiplier (there is loss in the gears of the tool)

I've used a hitch-pin forever. It looks like you care when you use one, and like you never check your hubs when you have a cotter pin.

I continue to contend that a torque wrench is for assembling an engine. I'll not be using them a bunch of places elsewhere. You get a feel for fasteners. My engineer son uses a torque wrench to tighten his lug-nuts on a Ram 1500.

I can't imagine.

Last edited by Stan Galat
@Stan Galat posted:

@aircooled - Bruce, if you can stretch the threads on a stub shaft, remind me not to shake your hand (for fear of being crushed).

400 lb ft isn't gonna do it. I know this from experience.

Every time I climb up on the scale, it's like roulette - round and round she goes - where she stops, no one knows. Let's call it an even 250 lbs of rippling romance. I don't lube the threads, but they aren't "rusty dry" either. Me standing on the end of an 24" breaker bar is 500 lbs, but that would require balance I don't have, so let's just call it 400 lb ft. I bounce a little, and then go to the next hole.

I've used a hitch-pin forever. It looks like you care when you use one.

I continue to contend that a torque wrench is for assembling an engine. I'll not be using them a bunch of places elsewhere. You get a feel for fasteners. My engineer son uses a torque wrench to tighten his lug-nuts on a Ram 1500.

I can't imagine.

I use a certain number of "ugga-duggas" on the air impact wrench LOL!

Here's a test to play with.  Take a 3/8 - 16 X 1" bolt, put 3 washers on it and then a nut.

Put some never seize on it and torque it to spec. (about 32 ft lbs) or what ever the chart says.  The bolt will fail before you get to the torque spec. Wheel bearing grease works well too !  Not trying to be a smart ass here. We just need to be careful/mindful of what we are trying to do.  Sometimes more is not better.......Bruce

@aircooled posted:

Here's a test to play with.  Take a 3/8 - 16 X 1" bolt, put 3 washers on it and then a nut.

Put some never seize on it and torque it to spec. (about 32 ft lbs) or what ever the chart says.  The bolt will fail before you get to the torque spec. Wheel bearing grease works well too !  Not trying to be a smart ass here. We just need to be careful/mindful of what we are trying to do.  Sometimes more is not better.......Bruce

Most torque readings are done dry (unless specifical lubrication is called for), are they not?  I was under the impression a lubricated nut/bolt normally used 10-15% less torque than the dry spec for that reason?

Here is a link to an old Mechanic’s Handbook which was standard issue for all hourly mechanics and technicians that worked at the Santa Susana Filed Laboratories.  This does not appear to be the most recent version, but it might be close.  Clearly some of the information is a bit outdated, or unique to the world of testing rocket engines. But there is a lot of good stuff on piping , tubing and fasteners and the art of measuring torque as a method for establishing a desired preload on the joint being torqued.  Torque values listed do assume appropriate lubricant is applied.

Jon

@ALB posted:

Most torque readings are done dry (unless specifical lubrication is called for), are they not?  I was under the impression a lubricated nut/bolt normally used 10-15% less torque than the dry spec for that reason?

The only fasteners I've used lube on for torque are internal engine parts.

ARP rod bolts come with specified grease to be used to torque the caps on. This gives just the right amount of bearing crush to give you 0.001" of gap all around for an oil film.

The other time was to torque a head gasket. I don't remember what brand of engine, but fresh engine oil was used on head bolts/nuts to achieve the correct clamping pressure. This may have been ARP studs and nuts on my Corrado G60, but it was a long time ago and I'm not sure.

@aircooled posted:

Here's a test to play with.  Take a 3/8 - 16 X 1" bolt, put 3 washers on it and then a nut.

Put some never seize on it and torque it to spec. (about 32 ft lbs) or what ever the chart says.  The bolt will fail before you get to the torque spec. Wheel bearing grease works well too !  Not trying to be a smart ass here. We just need to be careful/mindful of what we are trying to do.  Sometimes more is not better.......Bruce

If it's a cheap hardware store bolt, yes. But if it's grade 8 or AN(military or race car spec), it will not fail.

I'd love to see a stripped axle nut. Just try to do it. I'd bet on that not happening.

Last edited by DannyP

Well here's my take, sorry for being off the air for a little bit.  WRT Torqueing bolts and stuff: I think one should not be trying to second guess the amount of friction you need to overcome to get to a torque reading, i.e., "dry threads". Entirely too variable. Some lubricant seems correct to me.  As it is, there is Liquid wrench on there now, and so there is that.  I am a BIG fan of Neversieze, but sounds like that might be going too far.  Lets say I'll clean those threads up, they will be clean, not rusty, and I'll see how that all works out.  What I think I want is to develop the correct pressure on those threads (which, as a simple machine, is really a wedge) so as to put the bolt in the correct amount of tension.  Further, I think of this bolt in tension as a very very stiff spring, which means that it will stretch in proportion to the tensile load applied.   And you want the working load on that bolt to NEVER come close to counteracting the tensile preload in the bolt and bring it to zero, which implies that there will develop a gap in the lash up.  I do not have a problem with using 250-300 ft-lbs, and will report back about how that goes.  Should be fine. I have no idea how much torque on that large fine thread amounts to how much tensile stress in that bolt, but I do know that the yield stress for that bolt is probably about 30,000 psi, and the section of that big bolt might be about a square inch, so that's ~30,000 lbs tension to get to the elastic limit.  Even if only 1/2 in^2 root area, that's still 15,000 lb. The breaking stress would be higher.  That shaft is probably pretty decent steel. Likewise the nut.  The more likely failure mechanism here for overtightening would be due to shear stress in the thread.  And thats a whole other technology -- read as "black art". Further note: I have learned that the replacement disk hubs come with a long spline or a short spline.  Why this might be, I do not know, but I do know that my axle stub has a long spline and the damaged hub in the picture is a short spline.  Which requires a spacer be applied so the castle nut has something to push against.  And which also implies that the shaft has more bearing area in the spline than the hub can provide.  Does not sound like a good thing.  I will also inform that the replacement, due in next week, will have a matching long spline.  Perhaps the short spline gave too little bearing surface for the spline, and the longer spline will fix that -??-

I also plan to renew the bearings, just because why not, It's all apart anyway, so a few more bolts and selected bad words to R&R those bearings. I think me nemesis might be that snap ring on the inner bearing.  We will see.

As to precise torque readings, I'm kinda in the same camp as Stan and Pip: precision here is exactly what you need, for all the reasons provided above, when assembling an engine where the stretch of the bolt (remember, the bolt is a very stiff spring)  must be just so to preserve close tolerances in parts that need close tolerances.  This rear axle castle nut does not require these characteristics, so far as I can see.

Lastly, I do have a pneumatic impact wrench, which was handy to get that nut off, but I don't think I can use that device to "torque" the nut on.

@El Frazoo - May I call you "el"??

No, I wouldn't use an impact wrench to "torque" the castle nut on.  Off, yes....  On, no.

You really won't know what torque it is set to.  But then, I am not a mechanical Engineer, even though I've stayed in any number of Holiday Inn Express places over the years, but I think I can get you a bit closer to enlightenment:

Here is a handy-dandy torque guide for various size English and Metric bolts, from our friends at Fastenal, for common fasteners:

https://www.fastenal.com/conte...eference%20Guide.pdf

You'll need to know the diameter of the drive/stub axle which, for a 36mm nut, should be 24mm.  That's shown on here down towards the bottom:

https://www.insight-security.c...ow-metric-bolt-sizes

Now, go back to the Fastenal chart and scroll down the left side to Metric fasteners, then find 24mm and scroll over to the right to the Grade 8 section and that gives you 523 Ft/Lbs. Max. Dry.

(BTW: It shows 34,450 for the clamp load on a 24mm shaft so your guess was very close - I guess all those ME/Physics classes you took somehow paid off.)

The K=Factors are in the notes in the lower right corner and you should be using k = 0.15 (lowest torque) for a lubed connection and K = 0.20 for a Zinc/dry fit.

Stub axles are hardened and may be harder than Grade 8.8.  If so, go to the 10.9 section and the torques go up significantly.

Remember - These are MAX tightening figures, not to be exceeded.  Working torque ranges will be lower and determined by metal hardness, thread mating area, thread pitch, lubes used, if any, so the range of 250 - 300 ft/lbs is in about the middle of the range and should not damage stub axle or nut threads - I can't speak to the hub splines as I don't know the material.

I also think it's a great idea to go with the longer reach hubs - It makes the stack-up more logical.

Hope this helps.  gn

Last edited by Gordon Nichols
@Stan Galat posted:

400 lb ft (+/-) doesn't stretch, strip or otherwise harm the fasteners in any way. I'm struggling with why you all want to keep them looser than that.

Spot-torque.

You'll never damage the hardware. Check with a torque wrench to make sure you didn't get weak last night. Set for 300 lb ft the wrench shouldn't click.

If the wrench doesn’t click at 300 lb ft, then you don’t have 300 lb ft of torque on the fastener.  The click is the breakaway torque setting.  Maybe I’m not understanding what you mean?


BTW, how many people actually own a torque wrench that goes to 300 lb ft or more. I don’t know if they even make a 1/2” drive that goes that high, probably only comes in a 3/4” drive.

Last edited by LI-Rick

@LI-Rick, if your torque wrench doesn't go to 300 that is a good reason to use the Torquemeister where it would only need to go to 33.

I’ve never torqued an axle nut.  I put it on with an impact wrench and then use my axle nut wacker. I give it a couple of good hits with a hand sledge, then put in the cotter pin.  Has worked for me, even in my 10.90 drag car.  

55CB6097-F92B-4D33-8A2A-E2CE01E0DEBC

Attachments

Images (1)
  • 55CB6097-F92B-4D33-8A2A-E2CE01E0DEBC

How they did it BITD

BD1F2B55-A4E9-49C0-A0F4-BBA4C08EE77A

I’m almost to the point of water boarding my brother’s to get them to confess to who has the 21x36* that came in our Kombi’s tool kit. I have the pliers, and they’re one of my favorite tools.

03A94D5F-07CF-47B7-BC28-C94C98D271A7

* Wheel crown bolts and alternator bolt.


eta: I could stand it no longer. I found one on eBay and bought it. I’ll use it when I put my new drums on this winter.

Attachments

Images (2)
  • 03A94D5F-07CF-47B7-BC28-C94C98D271A7
  • BD1F2B55-A4E9-49C0-A0F4-BBA4C08EE77A
Last edited by dlearl476

I think I have an VW axle nut with stripped threads some where in my shop. Last I saw it,  it was on my arbor press being used as a spacer.  When I return from Baja I'll take a picture of it for you non believers that think one can't be stripped.  

The first Never-Seize I ever saw was labeled by International Harvester Corp. It came in quart cans and was recommended for liberal use on our D-8 Bulldozer Track assemblies with 2" studs/nuts. Later Caterpillar sent out a bulletin to stop using it due to fasteners failing..  We continued to use it but adjusted our torque settings (lower) after testing bolt stretch with micrometers.  Never-Seize is good stuff for preventing seizing up of lots of things but dangerous if used haphazardly.  The D-8's (two of them)  worked 16 hours a day in the Shoal Canyon Dump moving all sorts of trash and garbage around. High acid content and water were responsible for a lot of the damage to these two dozers.......Bruce

@aircooled posted:

I think I have an VW axle nut with stripped threads some where in my shop. Last I saw it,  it was on my arbor press being used as a spacer.  When I return from Baja I'll take a picture of it for you non believers that think one can't be stripped.  

Bruce, do you think it stripped from over tightening, or more likely from rust on removal?  I’ve had a few that were really hard to remove, had to let them soak for a while and them apply the heat.

@aircooled posted:

I think I have an VW axle nut with stripped threads some where in my shop. Last I saw it,  it was on my arbor press being used as a spacer.  When I return from Baja I'll take a picture of it for you non believers that think one can't be stripped.  

The first Never-Seize I ever saw was labeled by International Harvester Corp. It came in quart cans and was recommended for liberal use on our D-8 Bulldozer Track assemblies with 2" studs/nuts. Later Caterpillar sent out a bulletin to stop using it due to fasteners failing..  We continued to use it but adjusted our torque settings (lower) after testing bolt stretch with micrometers.  Never-Seize is good stuff for preventing seizing up of lots of things but dangerous if used haphazardly.  The D-8's (two of them)  worked 16 hours a day in the Shoal Canyon Dump moving all sorts of trash and garbage around. High acid content and water were responsible for a lot of the damage to these two dozers.......Bruce

I use Never-Seize a fair bit, especially on my FJ- it's my daily driver.  The local road crews do salt the roads for 4-5 months of the year, and with our FJ outings being frequently wet and muddy it sometimes sits for short whiles with the undercarriage caked before getting hosed off.  We get a lot of wet snow that can freeze as soon as it hits the road, is then compacted by traffic (especially when temps are falling in the late afternoon/early evening), becomes very slick and I can't imagine the traffic nightmares if we didn't use salt- but boy, does it take it's toll.  As mentioned before, I reduce torque by about 15% any time I put something back together (and Toyota has a torque spec for almost EVERY nut and bolt on this thing!).  Bruce, do you remember by how much you guys reduced the torque specs?

  Fluid Film sprayed inside the frame rails once yearly is an important anti-corrosion step as well.  That's what I just may be doing today...

Last edited by ALB

I've never stripped a VW hub nut, but I have had the occasional school bus wheel lugnut that stripped, especially on the rear wheels, due to rusting from road salt.  It was a tough spot to get a torch in there to heat the Bejeezus out of it, so once in a while one would strip.  Then a 20 minute job became an all day affair - removing the drum, pressing out the old stud and pressing in a new one.   🤬

@El Frazoo posted:

I have the spark plug tool and the lug wrench from my old 356s, plus maybe an open end wrench or two.  I had the leather roll up pouch too.  But no longer.

I have the full tool roll for my (son’s now) BMW R60/5. When I bought it in 1990, they were still available from the factory for a reasonable sum.  It’s not Hazel but another German brand, and most of the same tools as a VW touring kit. Only tire irons vs lug nut wrench. And the spark plug wrench doesn’t have the cool 4-way articulation.

Sorry Al...I don't remember what the torque reduction was or how much the fastener stretch was but it was only a few thousands of an inch as I recall. I do remember that the torque wrench was a hydraulic mechanism with a pressure gauge to determine the torque with a calculation based on the PSI.  The only other place I ever saw a torque wrench like that being used was on the giant nut (read 6" diameter nut here) that holds the rotor head in place on a Sikorsky military helicopter. (Navy SH3A)  It was used to loosen and tighten that nut and the jamb nut on top of it. That shaft was hollow, splined and tapered. Another hydraulic tool was used to press the rotor hub off and on.  That one nut job took about 2 hours as I recall.

Rick........I was told that the guy stripped the nut tightening it.  It was said that he did was using some sort of torque multiplier and did the calculations wrong.  So I guess the axle shaft is tougher than the nut.......Bruce

This may help a little bit as to torque and some of the reasons why the nuts loosen.

Give it a read-through: https://www.apexspeed.com/foru...55507-Rear-axle-nuts

If either of the drum clamp surfaces are worn, rough, or uneven in any way, the drum can loosen. Using the cheap spacer/washer that comes in the kits today IS A FACTOR in the drums loosening. The cheap spacers compress, even 0.001" of compression will loosen the nut.

If the spacer BEHIND the bearing isn't true, you'll have these problems as well.

These surfaces can be checked for runout and trued up on a lathe.

If your axle is bent, that could be it as well. That I'd just replace, you'll likely not be able to bend it back straight.

@aircooled posted:

Stan.......Maybe a "Nut Stripping Contest" could be an event at the next Carlisle show !

The winner gets two new unstripped nuts  and a whole can of Never- Seize !  Rules may apply,,,,,,,Bruce

As a champion nut-stripper (tighten it until it snaps or strips, then back it off an eighth) I'd enter, but Carlisle is always at a bad time of year for me.

Last edited by Stan Galat

I borrowed a battery impact from the local trailer shop ", his words were" Be careful that's 650 lbs at full tilt. Uh huh I thought,  I threaded a new chrome moly gland nut into the crankshaft then (all I did) was short " blurp " with the impact and there was the end of the gland nut now broken off the threaded end broken off in a just rebuild engine. Holy shty balls engine tear down was my first thought ... Then I simply I reached into the broken off threaded portion with a finger and unscrewed it from the crank :~) .

Last edited by Alan Merklin

I borrowed a battery impact from the local trailer shop ", his words were" Be careful that's 650 lbs at full tilt. Uh huh I thought,  I threaded a new chrome moly gland nut into the crankshaft then (all I did) was short " blurp " with the impact and there was the end of the gland nut now broken off the threaded end broken off in a just rebuild engine. Holy shty balls engine tear down was my first thought ... Then I simply I reached into the broken off threaded portion with a finger and unscrewed it from the crank :~) .

650? The battery ones reach peak torque QUICK, too. Snap-On or what?

I bought one over the summer. It says it's rated for 330 ft. lbs. I used it on some frame bolts on a rollback. It snapped two of them clean off. I use it to REMOVE stuff mostly.

I VERY carefully use it to tighten, just to snug. I always use a breaker bar or a torque wrench for the final torque.

It is possible that gland nut was defective. Probably a good thing you snapped it BEFORE the engine was fired up.

A Milwaukee M18 Fuel 1/2" high-torque (2767-20) impact is rated at 1000 ft/lbs of tightening torque, and 1400 breakaway. I'm not sure I believe that, but even if it only delivered half that (it'd be way more than that), it'd put 99% of the Chicago Pneumatic impacts (mine included) back in the toolbox.

I've got a bunch of M18 stuff. That impact looks pretty nice.

Last edited by Stan Galat

Back to the regularly scheduled program:

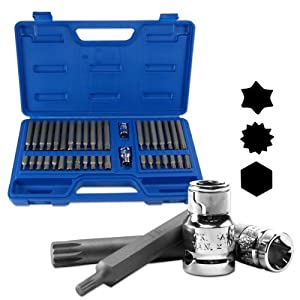
SITREP: I just wish I could have a decent comment about how easy it was for me to set a proper torque on by rear axle disk/hug castle nut with new bearings in place.  The reason I'm not there yet is I've bumped into that part of the job that nobody mentions and if you have not been there before, it's one of those things that you don't know that you don't know, so it comes as a serious WTF when you bump into it.  The issue in question is disassembling the CV joint so the half-shaft can be removed and the bearings accessed.  I have IRS equipment. CV joint is secured with six funky Allen type socket head bolts.  Shoulda watched more YouTube videos.  As I'm sure most of you already know, these bolts require a 8 mm 12 tooth socket wrench thingy, or you have no hope to loosen.  I found this out after trying to use a regular hex allen wrench, applied blind from the outside, so I could not readily see that the socket head was not a normal hex allen.  Did not work.  But . . . Now I know.  So I spent a day surveying local stores (including Harbor Freight) that might sell one of these, and came up short.  These socket head bolts and appropriate removal tool , apparently,  are a very specialized sort of thing, found only on CV joint flanges. Something everyone who sells VW parts on-line knows about, but fails to mention. They also carry these bolts and tools as standard stock.  I have said tool and new bolts coming from Jbugs, CA, ASAP. So now I know.

Good news:   New long-spline disks/hubs arrived and look like a winner.  If I really can get the CV joint apart and reach the bearings, I might be able to do the whole deed.  Current strategic plan is to assume that the CV joint is fine so no need to replace/rebuild on that one.  N.B.: some internet (YouTube) experts suggest that if you think to clean and rebuild the CV, better you should just buy a new assembly complete, both ends plus the half-shaft and boots, factory greased and ready to go. The thinking goes: if you are renewing a worn high mileage bearing set, the CV is probably worn too.  My eqt only has about 20,000 mi, and I think/hope the CV has not been affected by the loose castle nut and subsequent destruction of the disk/hub spline.  The factory CV/shaft assemblies turn out to be readily available for about $100 -- cheap.

It's a hobby . . .  It's a hobby ... It's a hobby . . .

Kelly, I take some tape before I start and tape around the CV joint joint seam, this keeps the joint from disassembling itself. Make sure the bolt centers are clean so that the tool gets inserted all the way.

Once the bolts are removed you can then move the whole axle assembly up out of the way so have something to tie it up as the axle stub will be coming out the back towards the tranny. When handling the CV joint you do not want to pull the joint with any force towards you or you could over come the tape on the joint causing it to move and sometimes lock up.

I put the castle nut back on the stub to protect the treads and tap the stub out towards the tranny.

On the subject of replacing axles I just disassemble,clean and put new boots on. My axles are original 1975 and thus from the fatherland.

I put a couple of lug nuts on the studs to hold the axle from rotating as I remove the CV bolts as you need to be straight on or they tend to distort and slip the head.

@Stan Galat posted:

A Milwaukee M18 Fuel 1/2" high-torque (2767-20) impact is rated at 1000 ft/lbs of tightening torque, and 1400 breakaway. I'm not sure I believe that, but even if it only delivered half that (it'd be way more than that), it'd put 99% of the Chicago Pneumatic impacts (mine included) back in the toolbox.

I've got a bunch of M18 stuff. That impact looks pretty nice.

Mine is a Porter Cable. I bought it because I already have a bunch of their 20v Lithium stuff, and it was $160 w/charger and HUGE battery. Plus it was down the street at the local Tractor Supply. It stays with the race tool kit.

I have two drill/drivers, a sawzall, a 4.5" circular/trim saw, and a flashlight(which we almost never use). I now have three chargers and 5 batteries. They are all compatible which is worth a lot to me. No hunting for chargers or batteries. I have two chargers in the basement, and one in the garage mounted on the wall. There is always a fresh battery available.

I bought the first drill years ago, and Michelle bought me the rest as a kit for Christmas a few years ago. She uses it more than I do LOL!

Agreed, that Milwaukee stuff IS nice, and I would buy it if I wasn't already invested in Porter Cable.

Last edited by DannyP

@El Frazoo listen to Mike here, he speaks from experience. Even if you think the socket heads are clean, insert the tool only and tap lightly with a hammer to seat it. There is nothing worse than a stripped 12 point internal socket head.

If you do strip one you can get a small (8") pipe wrench in there to grab the outside of the bolt head and break it loose.

I first experienced these bolts in the 80s with my old 1st gen. Scirocco.

I seriously doubt there is anything at all wrong with your current axles, as long as the boots aren't ripped. Normally you don't need new bolts either.

Funny anecdote: My Vanagon Westfalia started making a clunking noise when going on and off throttle one winter. I bought new shafts and was preparing to swap them. I got under there and figured out that sliding them in and out towards the transmission and hub fixed it. The grease was merely cold, stiff, and displaced away from the bearings. After moving the grease, the noise disappeared never to re-appear. The store took the new shafts back, no problem. I figured there was NO WAY that the whopping 90hp was gonna wear the joints out!

Last edited by DannyP
@MikelB posted:

Kelly, I take some tape before I start and tape around the CV joint joint seam, this keeps the joint from disassembling itself. Make sure the bolt centers are clean so that the tool gets inserted all the way.


Get a couple nuts and put them opposite each other leaving two CV bolts in the joint. This prevents the boot/metal cover/joint from coming apart. I then tape a plastic bag over the joint to keep everything clean.

Every Tuesday I get an email from Harbor Freight for "New Tool Tuesday".

This week featured Quinn torque gauges/adapters. These go between your socket and ratchet/breaker bar and indicate actual torque, like a socket extension. They are available in 3/8", 1/2", and 3/4" drive.

The biggest one is of interest to me, it registers to 750 ft. lbs. The 1/2 inch drive only goes to 250, which explains why I've broken MANY 1/2" breaker bars, even Snap-On.

Last edited by DannyP
@DannyP posted:

@El Frazoo listen to Mike here, he speaks from experience. Even if you think the socket heads are clean, insert the tool only and tap lightly with a hammer to seat it. There is nothing worse than a stripped 12 point internal socket head.

If you do strip one you can get a small (8") pipe wrench in there to grab the outside of the bolt head and break it loose...

I seriously doubt there is anything at all wrong with your current axles, as long as the boots aren't ripped. Normally you don't need new bolts either...

Great tips from Danny here.  I will add that if you had to dig dirt out of the socket heads, after inserting the tool and tapping it in as far as it will go, remove and check the bottom again with whatever you used to clean it originally- it's very important that the 12 point socket seats ALL the way to the bottom properly!  The only time I've had a problem with a cv bolt is when I didn't clean the inset properly before trying to remove it.

And Kelly, I also agree with Danny that there's probably nothing wrong with your current axles and cv joints.  You'll hear a click turning when a cv goes bad so until then you're better off keeping what you have.  They're probably better quality than the replacement stuff you're looking at.

@DannyP posted:

Mine is a Porter Cable. I bought it because I already have a bunch of their 20v Lithium stuff, and it was $160 w/charger and HUGE battery. Plus it was down the street at the local Tractor Supply. It stays with the race tool kit.

I have two drill/drivers, a sawzall, a 4.5" circular/trim saw, and a flashlight(which we almost never use). I now have three chargers and 5 batteries. They are all compatible which is worth a lot to me. No hunting for chargers or batteries. I have two chargers in the basement, and one in the garage mounted on the wall. There is always a fresh battery available.

I bought the first drill years ago, and Michelle bought me the rest as a kit for Christmas a few years ago. She uses it more than I do LOL!

Agreed, that Milwaukee stuff IS nice, and I would buy it if I wasn't already invested in Porter Cable.

Oh, heck yeah - there's nothing wrong with Porter Cable. They're good tools for shorter money than the big "M".

As you mention, once you are in a "system", you should stay there. We're in the M18 system, so we've got all manner of 5 AH batteries and tools. We carry a 1/2" hammer drill, a 1/4" drive impact driver, a sawzall, and an angle-grinder on the trucks. There are probably 6 or more of the drills and impacts floating around, with the flashlights nobody uses (but they come so it can be a "3-tool kit"). I wish we had more angle-grinders floating around.

I'm an absolute sucker for the blow-molded cases. I have no need or want of "tool bags", I want a case where I can keep all the bits, etc.

I've got the full-sized skill-saw and an oscillating tool with the carpentry stuff. My carpenter son-in-law has ALL of it, an M18 pin-gun, etc.

That 1/2" impact looks pretty sweet.

Last edited by Stan Galat

Again, my friends, txs for the tips.  I was wondering about how this CV thing might want to come apart.  So far the videos I have seen really do not address this, exactly.  They do mention covering the exposed part so it stays clean.  And I think maybe I have bunged up one of the bolts using the wrong tool to try to move it.  Jury still out on that one.  Digging the dirt out of the socket is a good tip.  Will advise. Pipe wrench? How about vice grips?  Worst case might by a metal blade multitool, cutting the head off. Then having to deal with the remaining stud. Gaaack.  Sure not looking fwd to that.  Pray for me that the right 12-pt tool seated deeply even though the socket is somewhat damaged, works.

As for the current parts being any better or worse than what I might buy again today, this car is a JPS special, so pretty sure these parts are same as what one would find today, i.e., EMPI, or whatever would be the best price.  The saga continues . . .

Battery powered hand tools, of all kinds: a blessing and a curse.  I have few DeWalt carpentry types.  Various ages, and all different batteries, all different chargers.  The Tower of Babble.   They eliminate the cord when in use, but require you to have a charger and spare batts all over the place, at the ready; spares often are not cheap.  And as I have said, even w same mfr, the batts do not always match.

I suspect that with the right torx bit for those CV joint bolts you'll be able to walk it back out if you gently tap it in to seat it fully.  The worst thing you could do is to cut the head off, but that would certainly release the bolt.   The remaining shaft sticking out will be over 1/2" long through the CV mounting flange so it should remove easily w/o a head.

I'll look in the shop to see if I have an extra 12-point torx bolt kicking around in my spares stash that I might send to you, unless you already have one - Stay tuned.

@El Frazoo posted:
As for the current parts being any better or worse than what I might buy again today, this car is a JPS special, so pretty sure these parts are same as what one would find today, i.e., EMPI, or whatever would be the best price.  The saga continues . .

Not to cloud the water further than it already is, but there is a difference in the quality of the CV joints. If yours are worn out, you want German Lobro joints. I’m pretty sure CBP sells them.

Price is irrelevant. Buy once, cry once.

Last edited by Stan Galat

@El Frazoo!

I wrote: "I'll look in the shop to see if I have an extra 12-point Torx bolt kicking around in my spares stash that I might send to you, unless you already have one - Stay tuned."

I found one in stock along with the serrated washer.   If you need them, let me know and I'll get it out Post-Haste.

My neighbor races Moto GP track bikes and has those Torx 12-point head bolts all over his bikes.  He says to first wait for the Torx 12-point bit to arrive and try tapping that in to seat it and then try slowly backing the bolt out (clean the dirt out of the bolt head first).  
If that doesn't work, then an appropriate sized "Easy-Out" tapped into the bolt head should spin it out and if THAT doesn't work you should be able to get a big, Honkin' pair of Vice Grips on the head of the bolt and turn it out.

Next to last resort is to  use a Dremel to cut a screwdriver slot into the bolt head and turn it out and last resort is to carefully cut off the bolt head and then the rest of it should spin right out.

Good Luck!

@LI-Rick -  Prob'ly because it looks a lot like a Torx bit?  🤷‍♂️

But, OK.....   I'll call it a 12-point from now on.

Last edited by Gordon Nichols

@Gordon Nichols, I’m a tool whore, and am a believer in the correct tool for the job.  As an aside, there is also a double square, that has 8 points.  These are commonly used to hold the skin on enclosed trailers.  They look a lot closer to a Torx than a Triple Square.

@El Frazoo,  when you get the correct driver, after cleaning out the heads and tapping the driver in, if it doesn’t immediately come out, STOP.  Grab a pair of vice grips, and put those on also. Then turn both the driver and vice grips at the same time. I’ve never failed to get one out with this method, even here in the land of rust.

@El Frazoo posted:

Again, my friends, txs for the tips.  I was wondering about how this CV thing might want to come apart.  So far the videos I have seen really do not address this, exactly.  They do mention covering the exposed part so it stays clean.  ...

The CV's just detach at the flange. You won't be messing with the bearings inside those boots.

Just bag them up and do the R&R you need to on the hubs, then bolt them back in.

Here's Bridget's with the "wheel of death" vehicle speed sensor I made for the Suby swap. Had to take those troublesome bolts out to do it. I have the correct socket if you want to come get.

Last edited by edsnova

Update: magic 12 pt "spline" driver, as I see it is called, arrived.  It's not an allen (six flats) and it's not a Torx (six stars) , to be precise. Fits like a champ in five of the six sockets. Specs say these bolts are 25 ft-lb tight.  3/8 ratchet handle makes it work.  Keeping the axle from turning was a bit of a trick, and my approach involved replacing the disk/hub on the spline, then tightening a wheel lug nut back into the hub, like really really tight.  Has to be really really tight because the torque you will be putting on the C V joint flange bolt will want to loosen that lug nut.  So put the lug down tight, and then use your lug nut wrench to hold the disc steady while you loosen the 12-pt socket head bolts (~25 ft-lb) with the magic tool and ratchet handle.  I'm here to tell you: it worked.  And so what about the bunged up #6 bolt? @Ll-Rick (the hyperlink thing is not working ??? ) and I appear to be on the same beam. Plan A: I Applied the 12-pt bit, it did not want to go in there; slapped it a bit with a small hammer, not too much, but enough to know that the bit would not seat.  That socket is/was too damaged. Damn.  Plan B was as mentioned by others: vice grips.  I happen to have a new pair with fresh teeth, which I think helped. Was a struggle, but I'm here to tell you that this worked.  All six bolts are removed.  Big relief, but short lived.  None of the really cool videos on line show exactly how you just drop that half shaft out of the way.  @edsnova says the same thing, just drop it down, bag it, and hang it out of the way.   I guess for these folks that's what it does on an IRS rig: just drops out of the way. Well ...  It certainly did not just drop down.  It certainly did not budge with some light tapping. Nor with some light prying at the seam with the bearing holder structure.  So I am stumped once again.  The joint appears in all videos as a clean and slightly dished flange, so the two halves, with bolts removed should just slip past each other without having to undo the tranny end, which of course is exactly the same arrangement.  The CV joint half axel assemblies I see on-line are symmetric, it seems, as they do not have an inner or outer, or left or right end.  So the bolts are out, but I can't move the CV joint flange,  wont budge.   So now what?

Speaking of wheels and tires here's a photo of the truck tires used in the largest salt factory in the world.  (the largest salt buyer form this factory is Canada for their roads in winter)  The factory is in Guerrero Negro BCS Mex. (Baja). I was told that the tires out last the steel rims due to salt corrosion !!  Amazing !!  That's me in the wheel last month.......Bruce

Attachments

Images (2)
  • IMG_5092
  • IMG_5106

If the boots aren’t torn, and you aren’t going to replace them, I would just bag the end to keep dirt out while you are working on it.  
If the boots are torn and are being replaced, then I would disassemble each joint, clean them and then put them back together, with new grease.  They aren’t hard to do, but a little tricky. They can go together 2 ways, only 1 which is correct.  Get it wrong and they don’t move, just bind up.

Last edited by LI-Rick

Everybody's different, but if I had the CVs free from the car, I'd definitely replace the boots and grease them. Boots are about $40 for 4 of them. Finding the right grease is harder than it sounds, but happiness is seeing nice clean grease in nice clean CVs, hiding under nice new boots. I've got an IM, which means a lot of good things, but which also means I have to R/R IRS boots with some regularity, at least every 2 years.

As far as "if it ain't broke, don't fix it" - that sounds great... sorta' like "If it feels good, do it!" and "what doesn't kill you only makes you stronger".

I doubt it's really how you live your life, though. If you did, you'd never change your oil. I'm seriously hoping the next airplane I get on doesn't ascribe to this philosophy. Got a septic tank? Let me know how leaving it alone works.

A lack of maintenance is what got Kelly in this situation to start with.

Last edited by Stan Galat

You know Stan and I are usually in lock-step on many issues. This isn't one of them.

CV joint boots routinely go over 100K miles, even today. My Cayman has 110K on the factory boots, CVs, and axles. Pretty much the same situation Kelly has: a stock transmission position and small arc of travel.

If the boots are pliable and not cracked, leave them alone. If the grease looks clean and doesn't smell burnt, leave it alone. If the balls and cages/races aren't blued from excess heat, leave them alone.

I get your position, Stan, on your IM. The forward position of the trans is great for balance and handling. Not so much good for CVs and boots.

@LI-Rick posted:

@Stan Galat,  are your boots tearing?  Every 2 years seems excessive, otherwise.  Aircooled.Net sells some European ones that are supposed to be better, and include the grease and new bolts.

https://vwparts.aircooled.net/...n-p/321-498-201a.htm

All tube-framed Intermeccanicas are IRS, and they are designed to move the engines and transaxles forward in the car 2" so the CV shafts are "butterflied" and on a greater angle than those in a pan car.

This is fantastic for packaging (more room for exhaust, etc.), and especially for weight distribution - but it's hard on boots. EMPI level boots (and that includes those from NAPA, etc.) last about 2-3 years for me. Yes, they tear.

I wasn't aware of ACN's european boots, but I'll definitely try them. Thanks for the link.

Last edited by Stan Galat
@LI-Rick posted:

@Stan Galat,  are your boots tearing?  Every 2 years seems excessive, otherwise.  Aircooled.Net sells some European ones that are supposed to be better, and include the grease and new bolts.

https://vwparts.aircooled.net/...n-p/321-498-201a.htm

As an aside - aircooled.net has been a bit of a question-mark since John Connelly kinda' stepped away about 10 years ago.

They used to share a building in an industrial park in St. Lake City with Art Thraen, and I actually walked in and got some 10- 15 years ago. Art sold to Justin and Colton McCallister, and they moved the shop up to Idaho a couple of years ago.

aircooled.net's website has shown more and more stuff out of stock since Covid. Today, when I tried to buy the boots I got this:

Screenshot 2022-11-12 111743

I'm not sure what that even means, but it can't be good.

Attachments

Images (1)
  • Screenshot 2022-11-12 111743
@Stan Galat posted:

As an aside - aircooled.net has been a bit of a question-mark since John Connelly kinda' stepped away about 10 years ago.

They used to share a building in an industrial park in St. Lake City with Art Thraen, and I actually walked in and got some 10- 15 years ago. Art sold to Justin and Colton McCallister, and they moved the shop up to Idaho a couple of years ago.

aircooled.net's website has shown more and more stuff out of stock since Covid. Today, when I tried to buy the boots I got this:

Screenshot 2022-11-12 111743

I'm not sure what that even means, but it can't be good.

Wow, looks like another bites the dust.

Idaho is becoming a hotbed of HiPo VW, with Blackline and now RLR both moved there!

Last edited by LI-Rick

CV joint maximum angularity,

Type 1 is 12 degrees
Type 2 is 17 degrees
Type 4 is 22 degrees
930     is 25 degrees

With the forward position of Stan’s transaxle, he would definitely benefit from more angularity.  The type 2 joint is 32mm wide, same as a type 1. A type 4 joint is 34mm wide. They are all the same spline.  You can use any of these CV joints with the stock axles, but with the type 4, you will have to cut the shoulder back 2mm on each side.  Not really a big deal for a guy with a lathe.  I don’t think you could ever break a stock axle on street tires.  If you go for 930, new axles are mandatory, as they have a different spline count.  You will have to change the stub axles and transmission flanges to match whatever joint you chose.

OK, so the aircooled.net boots were Febi/Bilstein, and are purported to be manufactured in the Fatherland. They're available from S&S Aircooled (who I never heard of before a search), for $17/each.

There are Rein brand boots, supposedly made by Italian elves, available for 6 bucks each, from a place called FCB Euro. $6 is absurdly cheap, and the shipping is free. The only worry is that I've read that Italy has very high end manufacturers and no small number on the very low end. There's nothing in-between. I can guess where on the spectrum a $6 CV boot lands.

I'd give either of them a try next go-around, if I didn't already have boots from NAPA on the car, and a set of EMPIs in the hole.

I'll say that the boots look very nice, no tears, pretty clean, supple.  An earlier question was: can you effectively wash out the grease and repack the one CV end without taking it all apart? That is, with the tranny end still untouched, with the service tech recumbent under the car?  Is that just a stupid idea?? If you have a nice pan to catch the gunk, can it be done effectively?  And I'm hip about how the CVs go together, saw a nice video about that.

Have not had a chance to whack the outboard CV/half-shaft loose yet.  Maybe tomorrow ??

"Lack of maintenance" ... ouch ... thanks  @Stan Galat for pointing that out.  That's not my general approach to stuff, esp'y car stuff, but in this case the evidence is too damning -- me culpa, shoulda checked those castle nuts.   That said, I can't help thinking that using the short spline disk hubs + spacer,  coupled to that torquey 2332 may have played in to all of this too.  I can even throw in several days on a few Tour d'Smos, and I may have asked for more than those parts could keep delivering.   [Please recall no less a personage than Stan G. broke his very fine car on the 'Smo, and nobody is ragging on him about sloppy maintenance.  Just sayin' ] So blame the 'Smo. And as you can see, by this logic, this is all @Lane Anderson 's fault. Or maybe @Carlos.

.

@Stan Galat , you may want to give Anthony a call.

He's well acquainted with the IM boot issue and replaces a lot of them, so he may have some advice on sources or remedies to forestall the inevitable.

And BTW, he once put a Berg 5 in an IM (although I think he swore he'd never attempt it again), so he may have some counsel for that, too. I drove the car afterwards, and it was solid as a rock.

.

@Sacto Mitch posted:

.@Stan Galat , you may want to give Anthony a call.

He's well acquainted with the IM boot issue and replaces a lot of them, so he may have some advice on sources or remedies to forestall the inevitable.

And BTW, he once put a Berg 5 in an IM (although I think he swore he'd never attempt it again), so he may have some counsel for that, too. I drove the car afterwards, and it was solid as a rock.

Oh, my friend - I'm way, way ahead of you on that.

Last edited by Stan Galat
@El Frazoo posted:

.... can you effectively wash out the grease and repack the one CV end without taking it all apart? That is, with the tranny end still untouched, with the service tech recumbent under the car?  Is that just a stupid idea?? If you have a nice pan to catch the gunk, can it be done effectively?

If you insist on repacking the outer joint, why in Heaven's name would you do half the job?

If you still insist on repacking just take the axle out. It's 6 stupid little bolts.

You should either leave it alone or do the whole enchilada.

You've missed nothing, Senior Mitchster.

I'm not very big on starting "I'm gonna' do this" threads. I'm more of a "I did this" kind of guy, because nothing about this hobby moves very quickly, at least when you are a pedant.

... and it's a good thing too, in this instance. The boilers of progress move the train slowly. Unbelievably slowly in this instance. Glaciers move more quickly than this 5-speed has gone together. This cake has been baking for several years.

When we started the Berg-5, I didn't know what I was going to put it in - but I got the feeling the Bergs weren't going to be able to keep the wheels on GBE forever, and if I wanted the thing for anything ever, I had better get going on it sooner rather than later.

A catastrophic failure in my rear suspension at the Tour de Smo this year was enough to push me over the edge into something I wanted/didn't want to do (put the 5-speed in this car). We're redoing the rear suspension into a coil-over setup, which is required in an IM for the "size-giant" Berg nosecone to fit.

Regarding the unending delays - at first, I was in no hurry and said so, which in the language of small business means that continental drift moves more quickly. I knew that and was OK with it.

But then came Covid, then shop help issues, then solar flares, then the zombie-apocalypse, with everything aggravated by "not being close by" issues, and now a 3rd gear that appears to be more rare than shards of the one true cross.

This transaxle has had issues like a Jr. High girl, but we've moved through the seven stages of grief, and I'm at acceptance. I'm on the front burner now, but we can't grunt real hard and extrude a 1.39 3rd, so here we are. It'll be done when it's done. "Serenity now" as it were.

Hopefully, I can actually enjoy it before my eventual atrophy and demise.

Last edited by Stan Galat

whole enchilada ... I like enchiladas OK, prefer burritos.  I guess I'm at one of those stages Stan refers to -- not sure which one tho.  And the problem just keeps getting bigger and bigger. Started with:  bearings must be bad, so order bearings, learn how to do that; then the hub spline turns out to be what is REALLY bad, so order that; then stupid CV bolts won't undo, totally bung-up one trying to undo it, so get the special tool and new bolts, and learn how to cope, study CV joints and what they are all about.  And now i'm looking at a rebuild of the entire half shaft, and have not even yet attended to the bearings, which will be last to do, as other shyt keeps piling up in the way.  So, just eat the enchilada and quit whining.

... which says nothing about the issue with my transmission, wherein I found a rather large portion of a gear tooth in the bottom of the case when I changed the tranny oil this spring.  Can't move out on that until the rear wheel works again.  I have a plan for that in the works, but can't move out until ... and even that may be fraught with uncertainty, as Stan also points out: getting parts.  Seems I will need at least a ring and pinion set, and beyond that I can't say.  My info is that getting these parts might take months.

Atrophy and demise??  Have not addressed that problem in any serious way yet . . .

@El Frazoo posted:

... which says nothing about the issue with my transmission, wherein I found a rather large portion of a gear tooth in the bottom of the case when I changed the tranny oil this spring.  Can't move out on that until the rear wheel works again.  I have a plan for that in the works, but can't move out until ... and even that may be fraught with uncertainty, as Stan also points out: getting parts.  Seems I will need at least a ring and pinion set, and beyond that I can't say.  My info is that getting these parts might take months.

Atrophy and demise??  Have not addressed that problem in any serious way yet . . .

Kelly- if you can find some locally to rebuild your transaxle he will probably have a stash of used parts.

I have a local resource lined up for the tranny work.  The info I relay is from that source: parts are taking a long time to arrive, depending on what you need.

And I understand about just punting on the refurb of existing CV parts, and just buy a half shaft ass'y all ready to go.  $100 +/-.  Some on-line videos on this topic recommend that.  My thought is that we're talking less than 20,000 mi on the CVs I have, so they should be OK, right?  I have no reason to suspect otherwise.  OTOH  . . .

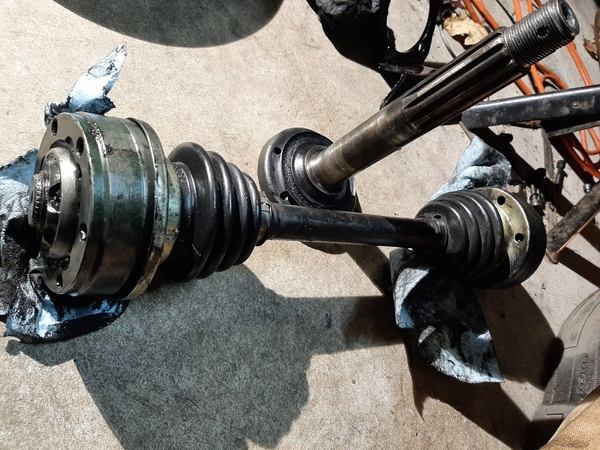
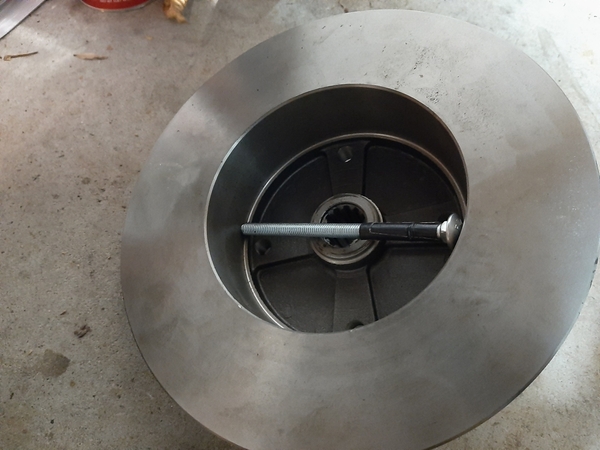
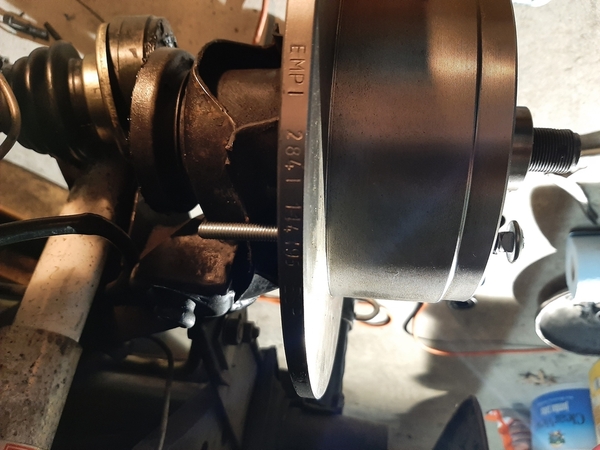
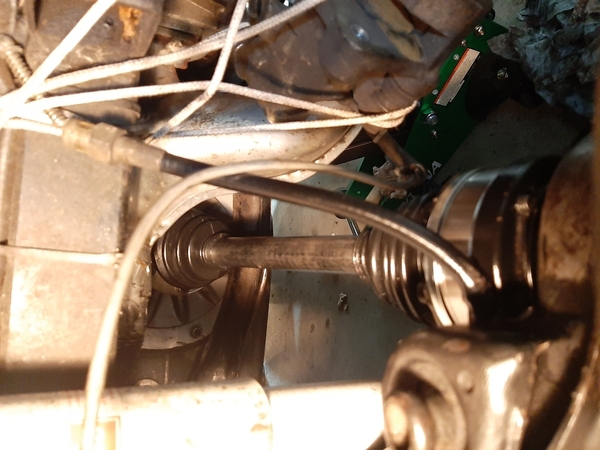
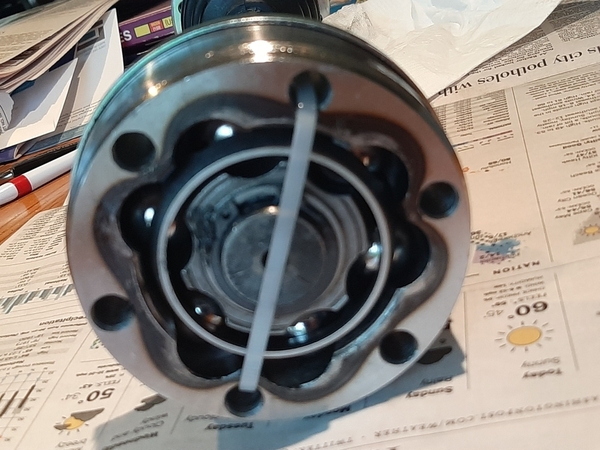
SITREP #  ???, but who's counting?  Couple of things. First is undoing the funky 12-pt spline bolts holding the CV ass'y in place, six each end, has proven to be a couple day job.  Not 8 hour days, tho. The problem was to secure the axel against the torque need to loosen those bolts.  Finally figured that one out, see pics.  I slipped on the new disk and ran a long bolt thru the tapped  lug bolt hole, one long enough to interfere with the suspension arms.  Tried the pipe wrench on the bare shaft, that did not really work -- wrench slipped, and too many hands needed. Also tried vice grips, but that was very cumbersome and did not do it either. I tried to get a  long threaded metric bolt that would thread in like the lug bolt, but local hardware could not get the right thread.  So just got a slightly smaller  one the would poke through without threading.  Worked like a charm.  Half shaft and CV joints removed.  Now about those CVs: removed the circlips on each end and figured the CV cage and such would just come right off. I'd clean it all up nice and purty, and regrease, good as new.  Well, no.  The very end of the shaft outboard of the circlip grove appears to be to big to let the CV thingie come off the end.  So, I'm stuck on that one. Must be missing something really important.  [If you look closely at the first picture, the CV ass'y end at left is wiped off a bit, and the end of the shaft is just visible, and looks to have tiny gear teeth around it, just outside of the circlip groove.  These are too big to slip past the CV bearing inner part.  Curious, as I see no other way to take this contraption apart.] Looks like I'll be buying a new half shaft ass'y, and  going full monty.  Further: one end of the CV is all floppy and wiggly, kinda like I would expect.  The other end is really really stiff.  it moves, but you have to really push on it to articulate.  Hmmm . . .

As I am going all out on this tear-down, ( the new brake disk of course, plus now the CV ass'y, AND new bearings), I need to get the old bearings out. Outer bearing, no sweat at all. But I am stuck on the inner bearing removal; smacking it with a drift and hammer from the  outboard end via the little cut-outs in the strut bore isn't moving that sucker an iota.  I guess there's a special tool, gear puller sort of thing, that would work, which of course I do not have. Does anybody have the answer to this riddle? The required special tool?  a shade-tree work-around that actually does work?  Need help ASAP.

Half-shaftWheel-lock1Wheel-lock2

Attachments

Images (3)
  • Half-shaft
  • Wheel-lock1
  • Wheel-lock2

I think you made getting the cv bolts out much harder than it is.  To keep the flange from turning, set the parking brake.  Loosen the transmission side first, than loosen the drive flange side next.
After removing the c clip, the CV is a slip fit to the axle.  The reason you can’t  just slide it off is the splines are buggered up.  Clean the ends, then use a file and clean up the splines.  The cv’s should be able to float on the splines. Aftermarket axles, such as Swayaway, have no inner stop and much longer splines.

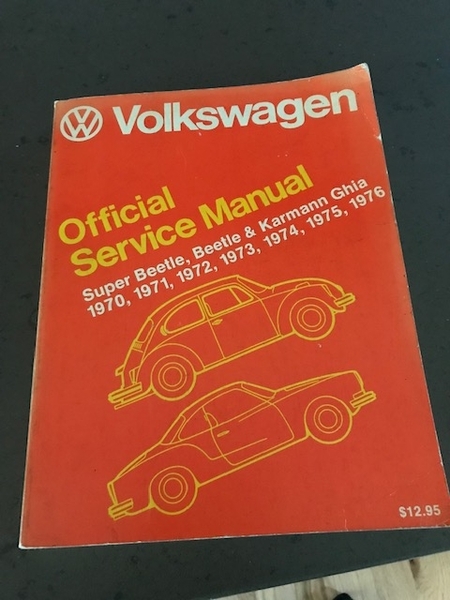
I just checked my Bentley manual (see above and well worth the $$) and the one and only time I decided to remove the CV joint from the axle shaft I removed it with a shop press  - The same way the Bentley manual recommends.  IIRC, mine was stiff going over the end splines, too, and rather than beat on it I just used the press.  That was decades ago and after rebuilding the shaft and getting everything all back together, I decided that it was such a major PITA that I've bought new, assembled, driveaxle shafts ever since.  At $100-ish each for new ones, it's well worth your time to just get new ones.   Ask if they'll take the old ones back, too.

I replaced the stub axle bearings on one side of my car when in SC one year as the bearings began to growl on that side.  Removed the drive axle and then the entire diagonal arm and took it to a local shop to press the old bearings out and the new bearings in.  Had it back later that day and in by evening.

Unlike Gordon, I would rather use the old German axles.  The new axles you get are likely to be made in China, of inferior quality metal.  Years ago, I turned the inner stop off a pair of stock axles, and they are hard!  I also shortened a pair of Latest Rage axles for a bus into bug transmission conversion, and they cut like butter. Just saying.
I see no point in replacing things that don’t require it. Seems wasteful to me, maybe I have some of the old Yankee thrift.

... trouble is, These parts are likely not "original old German", as this car is a turn=key replica from JPS, so a good  bet would be All the parts are EMPI or similar.  But just for fun, let's say I'd like to order a new good German or similar quality part, where would I do that?  Locally my NAPA and Advance shops list these out on website, but  do not have and cannot get.  Jbugs likely has, so need to call them, but then need to wait yet some more until they arrive.  Groan.

As to a rebuild of the ones I have, sounds like I need to take a file to the slight protruding end of the drive shaft and get it to size so will pass the CV ball cage ass'y.  I could do that if that is the way. I'm also of the old school, where if it ain't broke just clean it off and reuse it school too.  But everyone just seems to say: shyt, go buy a new one and don't get all greasy.  BTW, if I really have real VW parts, would there be a V-over-W logo embossed thereon?

Parts apparently available on Amazon, exact same thing  (US mfr , GSP??) as NAPA would provide.  $68/ea -- too cheap??  Well we'll see.  On the one I took out, Why would one end be really floppy loose, easy to wobble, the other stiff as can be?  Fried grease in one of them?  Everyone mentions the need for high temp special CV grease.  I have the Red Line product supposedly good for 800F.  The grease that is in there is black as night, and there is plenty of it, and does not smell bad, so ??? Meanwhile I ordered two of these from Amazon.  And will have an adventure on my bench with the one I took off -- will see if I can get it apart while I wait for new stuff.   This "project" has turned into a real adventure.  A learning experience.  It's a hobby, right?? If/when I do the other side, at least I'll know how to do it.  Right now all I intend to do there is be sure the castle nut is tight enough.  We all remember about that castle nut right?  It's where this long and windy road started.

I just checked my Bentley manual (see above and well worth the $$) and the one and only time I decided to remove the CV joint from the axle shaft I removed it with a shop press  - The same way the Bentley manual recommends.

What am I missing here? I'm intimately familiar with this process, as I do it oftener than anybody here, I'd imagine. The CV joints slide on the axle shafts easily, and are retained only by a circlip. I'm confused where the press comes in.

Regarding axle-shafts and the quality of aftermarket stuff - I agree with Rick in principle, although I think coming up with OG axles-shafts (or any other parts, really) must be considerably easier in Long Island or Long Beach than in Buttscratch, Outer Flyover, USA.

Given that Kelly is struggling so very mightily with this, and given that he definitely doesn't have OG shafts or Lobro CW joints anyhow (John Steel would never spring for such frippery), I'd also recommend just buying the East Asian shafts and joints already assembled. I understand thrift, but I also understand that not everybody has the desire to use CV grease as a body lotion.

I'm not buying an assembled shaft, but I've never struggled at all with this.

Last edited by Stan Galat

Rick, you might be right in your assessment. I know for certain that JPS bought old VWs wherever and whenever he could, likely still does.  Napolean's hat and other fun stuff at the back where the works hangs on are from a '71 beetle -- my title says so. My tranny is supposed to be new, or at least newly rebuilt, as is the engine and most other stuff.  As to the axels, what you say may be the exact case. Maybe I have two 1971 VW half-shafts, never seen the light of day since made.  Perhaps I'll find out.  Stan: I was, as expressed, completely flummoxed when the clips were off and the CVs would not budge off the shafts.  Will report out later when I see how to get them apart.  Might throw in a picture or two.

A Further thought, as my time spent working in DoD R&D involved finding out why a test flight or other experiment failed, often dramatically.  I have witnessed and have been, to a certain extent, responsible for manufacturing great balls of fire and lots of unintentional shrapnel, and in such cases it is always a must at the Failure Review Board (FRB) to locate the root cause. When you pick up all that shrapnel, its often not too clear what led to the demise.  So . . . If Rick here has put a finger on it, could a bad CV bearing have ultimately led to the observed outer failure, namely a loose castle nut and a nearly worn smooth brake hub spline?  Do those dots connect?  Back at the FRB, we called this the Failure Tree, which often displayed not as a tree but as what we called  Fish-bone chart.  Lots of proposed root causes as ribs of a fish, feeding in to a central spine that would lead to what you observe at the end.

... to be continued ...

To answer your last question: NO, the CV joints can't loosen the big nut. No, they can't cause the failure you have.

@El Frazoo All I hear is "blah blah blah", and then some more "blah" to top it off.

Am I being harsh? Maybe just a little.

I told you to leave the darn CV alone. LI-Rick told you. Uncle Stan told you. Those two guys I respect mightily. You're just like a few others on here that can't seem to leave things alone that really aren't a problem.

But no, you're gonna do what you're gonna do. Which is fine. Just stop being an "ask-hole" and wasting everybody's time when clearly you are not that mechanically inclined.

Do NOT file the end of the axle to get it apart. It did go together that way. This job is above your paygrade.

Please. for the love of anything at all, pay somebody to do the rest of the job. You know, before you really break something. Or worse, you hurt yourself or someone else.

You say you've got a tranny guy. Let him do the whole thing. Please.

Last edited by DannyP

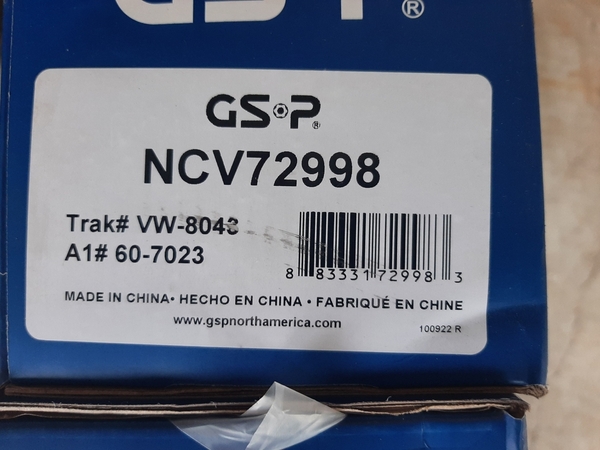
From the GSP website --- sounds good,, is it true, or just fine marketing gibberish? The VW Beetle part number is: NCV72998, pretty sure.  Read on:

"GSP New CV Axle's are made from only the finest materials using premium steel, boot, and grease. GSP CV Axles are designed to exceed the original equipment specifications for a trouble free ride."

https://www.gspnorthamerica.com/product/ncv72998

HEAT TREATED

All GSP Axle components are heat treated to the highest standards to provide premium strength, increased tensile, and extended service life.

QUALITY CONTROL

All CV Shafts undergo an extensive quality control  process to ensure a long and trouble-free performance.

PRECISION FITMENT

Machined Splines for precise OEM fitment

PREMIUM MATERIALS

GSP sources only premium raw materials to manufacture their products.

Get into gear with GSP’s most popular product line. GSP CV Axles are the one you can trust when you want reliability and quality from drivetrain replacement part.

GSP Extreme Duty (XD) Axles

Gear.png

Constructed with TPE and CRR for a tougher, temperature resistant boot

Gear.png

Durable stepless ear clamps for consistent pressure to ensure proper seal

Gear.png

High quality, temperature resistance grease with higher frictional and abrasion resistance

Gear.png

Over 24 SKU’s

Gear.png

Warranty: limited lifetime

@El Frazoo posted:

could a bad CV bearing have ultimately led to the observed outer failure, namely a loose castle nut and a nearly worn smooth brake hub spline?  Do those dots connect?

No.

I'm a simple man. If a thing walks like a duck and quacks like a duck, it probably isn't a duck-billed platypus.

Your hub rounded out because your nut was loose. I'd have to look at the pictures of your splines again to see if they're worn - but a lot of times they aren't. Even the best cast iron is no match for hardened splines, and the cast iron on your brakes was likely not German steel.

I wouldn't have touched the stub axle if the teeth weren't worn, which would have made this entire thing a one hour job, with 30 minutes of that being locating the parts and pushing the appropriate buttons on the cormpooter.

I'm not sure at what point we decided the CV joints needed anything at all, except when one of the balls fell out, which is not a failure (it's the normal nature of the thing). I recommended new boots, but I was superimposing the way I do things onto the way you're doing them, Kelly. I take it back.

At the current rate, we're going to be talking about diagonal arm bushings soon.

Stop the madness. At this point, just buy cheap axle assemblies, and figure you're going to put in a new stub axle and bearings. Or leave the stub axle alone, and just replace the axle assembly, assuming you haven't irreparably harmed anything back there.

"First, do no harm".

SITREP # ??+1: Just FYI, those who get bored easily and have seen it all, heard it all and can't take it anymore are invited to check one of the other threads. There are many.

Old CV/axel ass'y: I filed down the bunged up end a little and got the CV bearing thing out, and cleaned. (How does that little end of the axel get "bunged up?? another puzzle)  The CV innards looks just fine, and I can see a tiny wear spot where the balls bear. Cant detect any actual wear, just a little shiny spot.  I will attempt a refurb here: clean and regrease.  Because: why not?  The boots look pristine. Cant tell who made these half shafts.

New CV/axel ass'y: two of same on order, see info on the parts above, GSP. Arrive next week, says here.

Inner bearing: popped the circlip, knocked the bearing out from outside.  Says "HUNGARY" on it. Seems to be fine, but I have new FAG so will use those.  Busy cleaning up all parts.

Stan wants to know why.  I could say, well shyt, its winter, why not?  I wonder if he ever said such a thing.  Oh wait, I think he's doing that right now.  But Nevermind, this is not about Stan . . .  Here is the basic thought train here, by way of review for those who tuned in late. Car got a lot wobbly during recent Tour d'Smo, generating a mild WTF?? Left rear tire now rubs the body a little and when you grab and shake the wheel, it shakes with some play, makes noise.  So: must be bearings. Attacking the castle nut, I find out it is WAY loose. I know that's not good, but cant noodle out why it might be so. That nut is  supposed to be torqued to bejeezus and back and develops a terrific axial load on the spacers and bearing inner races that carry the stub axel.  How does that stack get un-tensioned during use?  Again, I dunno, but clearly it did.  And the nut did not move as it's captured by the cotter pin.  So the stack-up moved/shrank a smidge.  How? again: dunno.  Not tight when built? Maybe. The eqt as found has a final outboard spacer under the castle nut because the disc hub has a short spline vs the stub axel spline length.  This spacer shows some distortion upon close inspection.  Not sure what to make of that. Upon removal of brake disc I discover the spline there chewed to almost nothing (see picture). Stub axel wiggles a tiny bit laterally (bearing wear??) and has a bit of end play.  Wiggle still suggests bearing, and as best as I can tell a little endplay is fine.  So Order two new disks with longer spline, obviating that outer spacer. Next, Gotta get to the inner bearing which means gotta undo the half shaft. Outer bearing just sorta came out easy peasy.  I Totally screwed up the CV unbolting using a 6 flat allen rather than 12pt spline wrench since did not look and did not know.  My bad.  Vice grips saved the day as I tottally f***ed the one socket bolt socket. I got the right  12-pt tool, and Bob's my Uncle.  Internet Videos show the half shaft when unbolted at outer end just swings out of the way.  Not that I can see. So I must undo the inner CV flange and take out the whole thing.  At this point: Rebuild or buy new CV drive shaft ass'y?  See above, as that is where I am.
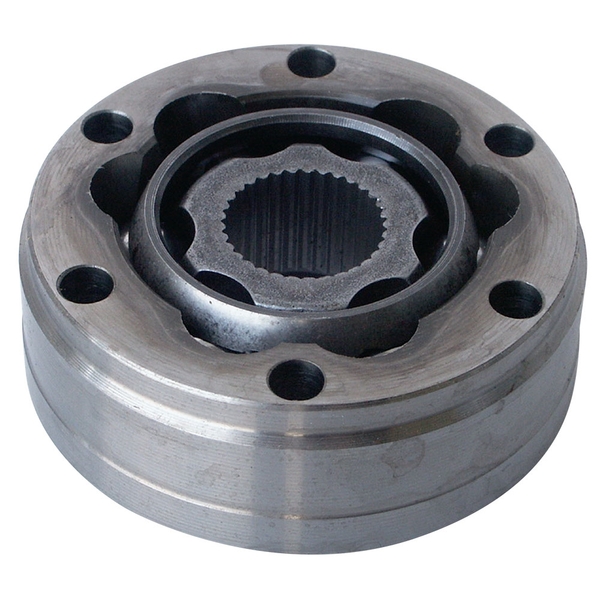
Usually it's one or more of three things that cause this failure. Maybe there are more, but these are the most common:

1. Not enough torque applied.

2. Irregularity or uneven stack of spacer, bearings etc.

3.VERY IMPORTANT: Cheesy "spacer/large flat washer" that simply crushes out because it's not made of sturdy enough metal. This spacer comes in the cheap seal kits and should be thrown out and not used. Even 0.001" of crush here will destroy the hub splines.

Last edited by DannyP

Tomorrow is Black Friday, and mine will be a bit of that, cleaning up the bearings and such from some really black grease.  I hope all have had a pleasant Thanksgiving and are properly fed, as that seems to be the main idea.  All good here on that score.  I now have all parts needed to reassemble my right rear drive train: new CV axel half shaft, all bearings, new brake disk.  I hope it all fits up right.  The GS-P CVs arrived and remain to be carefully inspected.  Here's hoping that the website advert (see above) is correct, despite the fact that these items are Hecho en China, because, well, isn't everything?

As to the "root cause", the speculation above suggests that the poor spacer used in original lash-up is it.  Could be.  I enclose a picture, as promised, of said spacer where I can feel a slight mushrooming of the edge of the piece, maybe almost visible in the picture.  It can be felt with a finger.  So it deformed a little.  And a little is all it takes to loosen the tension/compression in the assembly created by tightening the castle nut.  So, the new brake hub has a longer spline, and no spacer is needed, says here.  Should be better.  Hope so.20221124_10495220221124_105450

Attachments

Images (2)
  • 20221124_104952
  • 20221124_105450

So what have I managed to get here? New bearings are FAG, and says made in Korea.  New brake disk is EMPI, made in China of course, because could find nothing else.  Jbugs is the supplier.  They really do seem to have at least one of everything. CV half shafts are, as mentioned, also made in China, ordered from Amazon.  If any of these parts are made in the USA, or Germany, I was unable to locate such a part.  Lots of local suppliers  (e.g., NAPA, Advance Auto) list these parts on websites, but in fact do not have them, cannot get them.  Just FYI.

.

Things are just getting curiouser and curiouser.

My dad was born in 1904 and died in 1973.

I'm wondering how I would even begin explaining to him that I'm driving a fiberglass copy of a 65-year-old German car and that new parts for it come in a box stamped 'Hecho en China'.

He'd probably tell me I'd be fine as long as nothing on it was made in Japan.

Last edited by Sacto Mitch

My Dad's lawyer was a Navy fighter pilot, shot down and captured by the Japanese during the battle of Bataan.  He was a strapping 6'4" 250 pounds when he became a pilot.  He was also part of the March of Bataan during the war.  70,000 prisoners started that 65 mile march across the Philippines and around 15,000 died along the route.  He was a survivor, but when finally rescued he weighed about 80 pounds and had been sterilized by his captors.  He later married the nurse who was assigned to care for him and after a long, recuperative hospital stay they made it home to Massachusetts and he lived into his late 70's with his wife and their two adopted kids.   He wrote a book about his experience, but it's quite difficult to read.  

It's things like that, made it hard for people living in the 1950's - 1970's, who were much closer to WW II than we are, today, to buy Japanese products.

@LI-Rick posted:

My grandfather sailed on the USS McCalla throughout WWII.   He wouldn’t give a Japanese person the time of day.  Didn’t hold any grudge against the Germans.

My dad was the same (Army Air Corps South Pacific). I suspect it's easier to treat others badly if their skin isn't the same color as yours, but that wouldn't explain Nanking.

Japan had a very nationalistic military during that time and it was touch and go whether they were going to let the emperor surrender. Maybe that nationalism contributed more to the cruelty than did the color of the prisoners' skin.

In any event, my dad loved and sponsored the citizenship of many folks from the Philippines. He didn't have any kind words for the "Japs."

Our history in the U. S. doesn't give us a pedestal to stand on considering our massacres of American Indians or our enslavement of other people of color. I suspect all nations are capable of atrocities, and the real question is how we avoid falling back into those attitudes so prevalent in the "good old days."

I know my dad's prejudice would melt if he'd lived long enough to know his 2 little Japanese-American grandkids. Nobody could resist those little charmers.

.

Wartime sentiments notwithstanding, my dad's product advice was, for the most part, hard-nosed and practical.

In the decade or so after the war, when Japan industrial production was still rising from the ashes, the US market was flooded with cheaply-made Japanese consumer goods that were often half-hearted copies of stuff made in the US (back when stuff was still made in the US). And those products were almost always genuinely terrible. At the time, the Japanese reputation for shoddy workmanship was well-earned and enduring.

But, I posted the previous comment to remind myself how completely times can change.

Partly as a reaction to how their products were being received in world markets, Japanese industrialists resolved to turn things around and set about doing that with a vengeance. It would be a while before the efforts of folks like Mr. Honda and Mr. Toyoda would make ripples on our shores, but they eventually did. Our industrial heartland would never be the same.

I've posted before about a cross-country trip I took in 1967 in one of the first model Toyotas to be sold here in any quantity. It's design was still strongly influenced by what was selling well here then. Front bench seat. Three on the tree. Ford Falconesque styling.

But the damned thing made it coast to coast and back without a single door handle falling off. The temp gauge didn't budge a notch all the way across the Mojave Desert in July. The effin' clock still worked.

It was starting to look like we'd have to find new things to make jokes about.

.

Last edited by Sacto Mitch
@LI-Rick posted:

And then along came the Renault LeCar! Lol

I owned a Renault Alliance, purchased used with 2500 mi. after it was named MT’s “car of the year”. The timing chain ground a hole in the block before the odometer rolled over to 10,000 mi.  

It was the single worst automobile I’ve ever owned, including an endless string of $50 cars I drove while building/storing my “street machines” back in the very early 1980s.

That excruciatingly bad Renault held the record for my most disappointing vehicular purchase until 2002, when I had the misfortune of ordering and buying a car from John Steele at JPS Motorsports.

Both cars proved the adage that you don’t always get what you pay for, but you always pay for what you get.

Last edited by Stan Galat

All in the above posts is true, and the big difference in the future of industry of those two countries (Japan and France) was the introduction of W. Edwards Deming, a statistical measuring and product quality expert, to some major Japanese industrial heads by General MacArthur as a way of improving Japanese industrial quality and productivity and thereby reduce costs of production and become competitive in the post-war world economy.  The rest is history, but it is a terrific story and well worth reading about (if you’re a production quality geek).  Stan’s experience with his Renault shows what happens when you ignore product quality as “too costly” to apply to manufacturing.

My old company bought in to the Deming philosophy hook, line and sinker from the CEO down to the janitors and after several years of concerted efforts had not only the best product quality in our industry, but according to Forbes we had the best product quality (and lowest relative product costs) of any industry by the end of the 1990’s.  Deming’s Statistical Product Control methods really work and we proved it in the US Computer biz.

Last edited by Gordon Nichols

Many sporty car buffs rightly revere the Datsun 240Z. But it's still worth noting what Mother Nissan was holding back as it began dominating USA race tracks:

Engine bay, 1969 Nissan Skyline GT-R.

Triple carbs...check.

Factory headers...check.

Crossflow head...check.

Dual OHC...check.

Four freakin' valves per cylinder...check.

Rated at 160 HP from two liters displacement, this little beast redlined (according to the tach on the dash) at 7500 RPM.

—I emphasize: this engine was made in 1969, and installed in the equivalent of a K-Car.

Meanwhile, the American-spec 2.4L-6: 151 HP @5600; redline at 6500.

.

@edsnova posted:

.

Triple carbs...check.

Factory headers...check.

Crossflow head...check.

Dual OHC...check.

Four freakin' valves per cylinder...check.


Pass the new US smog laws?  ... uh, probably no check


A lot of the hottest European and Asian motors had to cool their jets (ahem) when we started sniffing for hydrocarbons.

BMW's hot 1600 TI (twin dual-throat Webers) couldn't make it across the pond (the sneaky, last-minute single-carb 2-liter substitution met with some success, though).

Porsche's European 911S had to be defanged for our shores, too.

My '68 1600 had no smog stuff, but the '71 had a belt-driven pump that blew air into the exhaust manifold to help burn off the bad stuff — at the cost of a few ponies it could ill afford to lose.

January 1, 1969 may not have been the day the music died, but it was starting to get a lot more quiet around here.

.

Last edited by Sacto Mitch

Holyshyt, where to start?? I'll take on the hijack first.  My dad spent WWII as a USNavy officer working with the Brits and Eisenhower (?) on the invasion.  He sailed across the Atlantic a few times when such travel carried huge risk from U-boats. He was a gunnery officer off shore, pounding the German positions at Normandy. I Never really had a chance to quiz him about all of that, as he did not make it past 50.  I never heard him say a thing about Germans, Japanese, or anybody else having to do with the war.  That said, I'm sure he had opinions, I just never had a chance to find out what they were.

And so how about those fancy CV drive axels.  Pictures of the assembly included.  By my careful inspection, they appear to be made just fine, and I hope they mean what they say about exceeding OEM specs.  The CV assemblies seem stout, shiny, smooth to flex. I'm hoping that there are truly fine manufacturing entities in China where the folks there actually know what they are doing, and use proper materials. The CVs came unloaded with grease, and I'm here to tell those who already know that pumping those things with grease is a messy affair.  I think I loaded them up good.  So the status is I now have on the left rear drive side: a new CV drive axel, new bearings/seals inner and outer (the old inner bearing definitely had some rattle and grind to it), and the new disk brake hub.  All seems to lash up well, and I am praying that the dimensions all stack up about the same so when I mount the tire, it does not rub the body.  The old lash-up had the thinnest possible clearance.

And I got CoolToolNewHubBearingsCV01NewHubBeraingsCV02one of those torque indicators (1/2" drive) and can report that it works pretty well.  Have yet to apply it to the castle nut,; that will come to the fore tomorrow. It's good to 250 ft-lbs says here. I measured out 25 ft-lb on the CV bolts (all new), and 40 ft-lbs on the bearing cover bolts.
As to the other side, my plan is to replace that hub/disk with one that matches the new one on the left, featuring the longer spline in the hub.  Mostly to be sure that the  castle nut there is torqued properly. Will leave the bearings and CVs as are -- I do not (yet) suspect them. OTOH, if after I look more closely at that side, I may change my mind.  I certainly know what to do and how to do it now wrt R&R, so maybe won't take me a week to get it done.  When buying my necessary parts for the left side, I ordered enough to do both sides.

Careful observers might notice in photo #2 that my car did not come with rubber bump stops at the rear.  Which fact I have never noticed before.  And I wonder why they are not there.  Yet another oversight by the fine QC Dept at JPS?  Possibly.  Is there any good reason why they would not be supplied?  I am now wondering what might have gone on back there when I hit that monster pot hole on the Tour d'Smo.  Actually, I went on a cruise in Pittsburgh this past July and hit an even deeper  pot hole at speed on that cruise and heard/felt a rather large thump/knock in the body that was heretofore unprecedented.   More mysteries. PS: two rubber bump stops are on their way to my garage..

And lastly, for my good buddy and Esteemed President-for-Life of the Peoples' Republic of Stanistan, regarding his advice about who I should do. I only have one me to do, so what you see is what you get.

Attachments

Images (3)
  • CoolTool
  • NewHubBearingsCV01
  • NewHubBeraingsCV02

Further thought, trying as I might to connect dots and sort through who struck John first and then what happened next, etc, that led to this fine exercise.  So consider this: Fact 1, the CV drive axel I removed (I determined that it is indeed an EMPI part) had the spline cuts at the very end of the drive shaft, outside of the circlip, mushroomed out a little such that the CV bearing doo-dad would not just slip off the shaft after the clip was removed. I had to file the nubs down enough to get the bearing cage to come off the shaft.  Fact 2: when the suspension flexes, the CV drive axel must stretch to accommodate, and the clever design is such that the shaft assembly indeed can extend in or out through a limited range.  If one tries too much travel of the suspension wrt the body the limit of axial motion of the CVs will be reached and the circlips will press hard against the shoulder of the groove they are seated in.  There is precious little material left at the end of the shaft outboard of the circlip groove.  If the suspension travel is sudden (think pothole) there will be a sizeable impact on that clip and the material that it retains.  Some deformation of that material could easily happen, esp'y if repeated enough times and the material is, um, not as fine a piece of steel as it might be. Do the following dots connect?: no bump stops means the suspension is free to move through an arc larger than possible with a bump stops present,  and the CV drive axel can not properly accommodate the asked for linear extension.  Just wondering how this all might play. If we have  an actual extreme event here, the jolt would be transmitted through the entire assembly: bearings, stub axel, spacers and that ever present castle nut.  It might even put some kind of undue force on some of the transmission innards.  BTW: I know I have a broken gear tooth in my tranny.  The broken tooth is on my dining room table.

My list of such items grows longer.  The one I like (hate) the most is a bump stop of a different kind.  The steering gear pitman has design that will provide a mechanical lmit to the amount of turning one can do.  Without this adjustable stop, one could turn the front so much the tires hit the trailing arm knuckle.  Ask me how I know.  i have the JPS hybrid tube chassis and this involves some custom framework at front .  This frame work involves the aforementioned mechanical stops.  My frame members had the appropriate threaded nut welded in the exact right place to hold a bolt and locknut that would provide that adjustable steering limiter. Only one thing wrong: nobody installed the adjuster bolt.  I nearly had a blow out from the tire that rubbed almost through the cords on the inner sidewall before I tumbled to this.  John did make good by sending me a new tire. So at JPS anything is possible.  I'm more than 10 years out and one could say I'm still sorting ...  On the positive side: when the car is running right it is pretty much right good fast fun.

Meanwhile . . .

The new left side rebuild is complete, almost.  Everything got lashed up proper and the tore does not rub the body -- whoo-ha!! I lashed up the new torque indicator, got my breaker bar arranged and hopped my 200+ lbs on that handle until  the new gizmo beeped, having been set at 220 ft-lbs. The peak indicator registered about 217 ft-lbs.  Given the ideal alignment of the cotter pin hole at this setting, I called this good enough. Might be ready to roll.  Also, as a matter of maintenance, I will check the torque again after some driving.

Right side: plan as mentioned is to install a new long-spline disk there, requiring removal of what turns out to be a rather very tight castle nut.  My pneumatic impact wrench did not budge it.  But again my 200+ lbs and the 1/2 breaker bar at about 16" got is loose.  Will do an R&R on that disk tomorrow, if I can manage it.  The rest of the drive line on that side seems to be just fine.  I sense no untoward looseness side to side, fore and aft. So will leave it as is.


AllDone

Also, for completeness I enclose a close up of the GS-P CV drive axel, so any interested party   can see what I ended up with. An obvious feature is the coloration applied to the shaft splines and the CV bearing race that would indicate a hardening operation.  Again, these units look real good, and operate really smooth and easy by hand, which was not the case with the one I removed.

NewCVaxel

Attachments

Images (2)
  • AllDone
  • NewCVaxel

Mostly Meh, maybe.

Some VW years had rear suspension stops that had a stud and were essentially bolted onto the shock tower.  Other (later?) years had a similar-looking bumper, but it was somehow glued on to that mounting position.  It was pretty good glue, otherwise they could fall off after bottoming out a few times from having three fat friends with you.

If the mounting spot for your bumper has no hole and you wish to use the studded bumper you could just drill a suitable hole where they mount and put them in.  You can get great access from below.  

If you glue them in I would use something like Locktite Power Grab to really hold them on.

Just remember that with a lowered car, such as you have, adding the rear bumpers will give you about 2" - 3" less downward suspension travel.  If that's OK for you, then go for it.  Peek up in there and see how much room you have with the car at rest, either on a drive-on lift or with jack stands under the shock mounts, rather than the frame, to get the suspension to settle at "neutral".

Just FYI, I haven't had rear suspension bumpers on Pearl since day one.

It's hard to know, on these lowered cars, whether when it "bottoms out" you're hitting the suspension stops or bottoming the shock absorbers.  If you have "stock" shocks, they're expecting more suspension travel, simply because the original VW design sat 3" or so higher than our cars, so the entire shock absorber is longer.  I took a quick look on several parts sites and did not find any rear shocks for "lowered rear suspension" so I can't offer much advice on that.  Everyone sells shorter shocks for lowered front ends but not rear.  That would make it more likely that you might bottom the shocks by full compression before hitting the suspension bumpers.  

Something to think about.

Gordon, txs for the insight.  I'm Still in a quandary about what to do.  I have ordered some OEM-ish bumpers and will see how much free travel I have left with them applied, this being a concern I thought about, understanding the lower posture of the car vs std VW.   These OEM things do seem kinda tall and so are going to use up some of the suspension travel.  Maybe I can put them on and cut them down a little?  Upon reflection, I'm pretty sure I must have hit some kind of hard stop this summer when on that cruise in PA.  was it the diagonal arm hitting the metal plate on the shock tower?  was it the shock bottoming out?  Can't say for sure, but it was a definite hard knock.

Ed, I'll look in to this and report back.  I like the idea of a soft landing when the suspension gets whacked a good one.  As I posit above, if my rear suspension can travel all the way up to the bump plate without a bumper in place, that would be a really hard knock and maybe too long of a stretch for the CV drive axel assembly. Those CV bearings can accommodate a certain amount of axial movement (stretching, if you will)  but there would be a limit.  Did I reach and try to exceed that limit?  Maybe.

I've no idea if this is the case with rear shocks, but front shocks have internal rubber bumpers to slow them down when near their shortest point.

I know this because my old shocks were regular length, and my old car was pretty low in the front. The front shocks were bottoming out. I cut the steel dust covers off, cut half the bumpers off, then welded the steel covers back on and spritzed with paint. The shocks were KYB GR2 that a bunch of folks use. This worked nicely for me.

The bumpers integral to the shock in the front might be required due to the ball joint front end NOT having bump stops.

Somebody would have to dissect the rear shocks to find out.

You may or may not be able to tell by compressing your rear shocks by hand, but certainly could stick a small inspection camera in there to find out without surgery.

@DannyP posted:

I've no idea if this is the case with rear shocks, but front shocks have internal rubber bumpers to slow them down when near their shortest point.

I know this because my old shocks were regular length, and my old car was pretty low in the front. The front shocks were bottoming out. I cut the steel dust covers off, cut half the bumpers off, then welded the steel covers back on and spritzed with paint. The shocks were KYB GR2 that a bunch of folks use. This worked nicely for me.

The bumpers integral to the shock in the front might be required due to the ball joint front end NOT having bump stops.

Somebody would have to dissect the rear shocks to find out.

You may or may not be able to tell by compressing your rear shocks by hand, but certainly could stick a small inspection camera in there to find out without surgery.

I’ve cut the covers off some rear KYB Gas-a-just shocks 30 years ago.  There were no built in snubbers.  Back in my low dollar drag racing days, this was a common mod. We would then use a sway bar link bushing, slit it to slip over the shaft, put a hose clamp on and then move the snubber up or down to tune to the track.

@El Frazoo posted:

Meanwhile . . .

The new left side rebuild is complete, almost.  Everything got lashed up proper and the tore does not rub the body -- whoo-ha!! I lashed up the new torque indicator, got my breaker bar arranged and hopped my 200+ lbs on that handle until  the new gizmo beeped, having been set at 220 ft-lbs. The peak indicator registered about 217 ft-lbs.  Given the ideal alignment of the cotter pin hole at this setting, I called this good enough. Might be ready to roll.  Also, as a matter of maintenance, I will check the torque again after some driving.

Right side: plan as mentioned is to install a new long-spline disk there, requiring removal of what turns out to be a rather very tight castle nut.  My pneumatic impact wrench did not budge it.  But again my 200+ lbs and the 1/2 breaker bar at about 16" got is loose.  Will do an R&R on that disk tomorrow, if I can manage it.  The rest of the drive line on that side seems to be just fine.  I sense no untoward looseness side to side, fore and aft. So will leave it as is.

I think you're risking the same result using the stock torque figure putting it all back together.  As a number of us have already mentioned, Kelly, upping the torque to 250- 300 ft. lbs has no ill effects (other than 1 having to bounce a little further out on the breaker bar to loosen the castle nut for maintenance) and will ensure nothing comes loose.  217 ft. lbs works for a stock car driven as intended by VW but the engineers never envisioned what we would be doing with their creations all these years later.

From what you said above, it sounds like the right side castle nut is/was a little tighter than the left and it's fine- what does that tell you?  You don't need to be a rocket scientist to figure this 1 out (or do I need to call you Kerry again to really get your attention?).

Last edited by ALB

Castle nuts . . . I mentioned that I was going to replace the right side disk rotor/hub with a new long spline version, like the one I put on the left.  And so that happened today.  In order to get the cotter pin hole to line up I had to jounce and jiggle on that breaker bar to something like 230 ft-lbs.  But I goterdun.  I'm not sure that I would be able to turn that nut on the left side enough more to get it to the next hole and slot alignment.  I could try.  How many degrees or turn equals one full slot alignment?  that would be the $64 question. Also, please consider this about the left side troubles.  I had a short spline hub and spacer,  The spacer I took out on the left was clearly deformed a little and a little is all it took to loosen the tension.  Why that spacer deformed, what sort of load was put on it that made it do that, I can't rightly figure.  That spacer element is no longer part of the lash-up on that side -- or the other side either, for that matter.  All of the materials in the compression chain there now are fine and upstanding steel parts designed to do the job as speced.  On th right side, the spacer looked very good and as I mentioned it took about 230 ft lbs to loosen that bad boy up to remove the old disk. So here is the deal I'm willing to make: I will take the buggy out as-is and thrash it around a bit, and then come back and pounce on that left castle nut until I can run it down to the next slot/hole alignment -- IF I can.NewRotor.  And then report back.

Attachments

Images (1)
  • NewRotor

Hey, you stubborn old rocket scientist:

How many people told you AT LEAST 250-300 or more? The Formula Vee guys usually do 320, with a whopping 58-60 hp.

Tighten it more, or do it again in a year or two. 230? That's just about stock, which is 217. Wow, a whole 13 ft. lbs. more than stock. Oh boy, that's really too tight...

There must have been ten guys on here telling you MORE than the factory setting is the ticket. We must all be stupid.

Last edited by DannyP

One thing that was said in Kelly's last post that makes 100% sense is: take it out as is and recheck.  In our shakedown we torque on assembly but do not install the cotter pin.  We retorque after about 100 miles and then pin it.

**IMPORTANT NOTE** Not sure of it was said above but one good thing remember is that all of these torque specs were set in the 50s/60s/70s and based on the parts that were used at that time.  MANY of those things have changed over the years and while they are still probably a good ballpark, they are not gospel.  I'll use today's pitman arms as an example.  Pitman arm pinch bolt factory spec is 51 ft/lbs, however today's castings are made with more gap at the pinch so 51 ft/lbs doesn't begin to tighten it enough to not slip.

Kelly FYI on one of my cars—can't remember if it was the Spyder or Bridget—I had the same dilemma as you: Torquemeister @220 ft-lbs got it right into a slot for the pin. I scratched my chin a bit, pondered and decided, No, one more groove would be more groovy.

And getting there was no trouble at all. I don't know what the spec ended up being but it was not too hard to turn.

@El Frazoo posted:

Mike, I have a torque indicator (see pic above) that goes to 250 ft-lbs, and is used to quote the numbers above.  So the deal is: I have the nuts down to about 220 ft-lbs as they are now.  After I  drive the car around a little,  I will double up and push for the next open hole in the shaft for the pin.  That might exceed 250 indicated, but so what?

Please report back, Kelly, as to whether you're under/over 250- I'm betting under...

Post Content
×
×
×
×
Link copied to your clipboard.
×
×