

I totally agree. Well, Done!
If Ed can make the basic alloy tonneau the fitment would be up to the car owner. I got mine from Fibersteel in 2015 and had to buy and install the fittings, two tenax buttons to fit my Becks pins, two connections at the side curtains and the rear fire wall connection. The challenge was drilling the two tenax holes in the tonneau perfectly to match the Beck pins and being sure to align the right side and rear attachment points.
I think it would be super cool if Ed could make a few for others.
Pete
@Sacto Mitch posted:.
"...I'm thinking of making a batch of these..."
Woulda thought, on these cars, that each one would have to be individually fitted.
.
You're right, they need to be fitted with hardware, but all the cockpits are the same size and from the same molds(Chuck Beck's) AFAIK.
The only one that would be different would be Anand's CMI Spyder.
Ed! Found a new, low-bucks automated hammer for ya!
I may build one, too! Hot Rod Ron already has the forge...
Wasn't it Plato who said "necessity is the mother of invention"? ![]()
Plato was wrong. According to my grandfather laziness is the mother of invention.
Word on the web is that the Harbor Freight $100 (cheaper with coupon) planishing hammer is a very good tool. Apparently they stopped selling them about five years ago.
Nobody thinks their English Wheel is good for much. . . .
I may invest in their shrinker/stretcher and might just get a throatless shear from Eastwood or Woodward in the coming months, as the .050 alloy is just a little too much to cut with the snips (which anyway leave an edge that requires finishing attention.
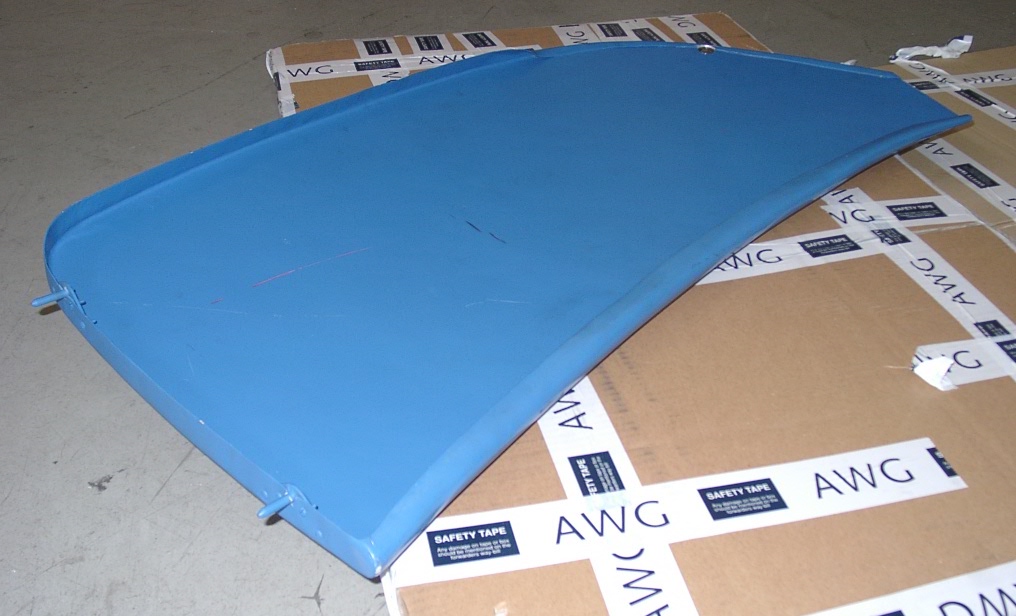
Assuming (big word) I'm able to finish off this first half tonneau so that it looks like somebody cared, what do you all think might be a fair price for the part? I'd send them out bare with the rear pins made and located but not riveted in (to facilitate fitment); buyers would need to source their own front Tenax buttons according to what they wanted or had already on their dash.
Apparently there's a European supplier that gets about $1,000 US for the part.
I think I could beat that.
Ed, there's some metal working tools that show up locally on Craigslist or FB marketplace from time to time, but they're in demand so you have to jump on them. One of my high school friends, Hot Rod Randy, managed to buy all of the metal working tools from our old HS shop for peanuts when the town built a new HS and deleted the shop courses in favor of those kids going to a regional Vocational Arts school. They weren't fancy, but they were quality tools. I used his metal shear when I was making the plenum for my heater. Come to think of it, I wonder what my old shop teacher, Mr. Malkesian, would think of what I've done on my car.
Wray Schelin offers both DIY build documentation and kits of three different size English wheels and his are RUGGED. I would love one but have no room to put it, but there are two in town that I can use if I ever start making curvy things (it would probably take me longer to learn how to use it than to make the part).
BTW, three of Wray's early English wheels, as he was developing his design, used rollers that came from the production line at Norton Abrasives in Worcester when a section was phased out. That's the Norton/Bear sandpaper company. Lots of good stuff was sold off for scrap prices over the years from Norton and a bunch of other factories in the area. Keep your eyes peeled for local auction notifications.
@edsnova, I have some experience with HF sheet metal tools, or as I like to call them, "kits". A lot of their products get you 75% there, but you need to finish up the last 25% on your own.
English Wheel, very flexible, needs to be stiffened up. I welded a box frame around mine, made a new top wheel mount so I can put the wheel on 90 degrees from normal, added a bolt to tighten the fit on the lower wheel raising mechanism. Works real well now. Wray makes a kit to help out these Wheels.


Shrinker/Stretcher. Not bad, tune up the jaws, but difficult to operate. They need foot pedal operation. I built the stand with the foot pedals, much more useful now. I also build a deep shrinker using a set of HF jaws I found on eBay. Lets me reach in much further.


Next up, the Shear. Terrible fit and finish. Totally disassembled, bead blasted back to bare castings. A bunch of time with a hand file to get the gears to mesh nicely. Honed the blades. It cuts amazingly well for what it is! It took them 3 tries to get the blade retention screw correct, see holes in the picture. Lol

Lastly for now, the planishing hammer. I looked at the HF, I thought it was so bad I decide to build from scratch. The zip gun used on the HF unit is weak. Grizzly had a model that used what looked like a needle scaler on it. I bought a needle scaler, removed the needles and got a top die from Grizzly. I built the frame about 50% bigger than HF, and made the mount changeable. I added a foot pedal, got lower dies from Grizzly, and for good measure added an auto oiler.


Attachments
Images (9)
I just had a great idea.
Once this Covid BS is over and we can get out to the Lime Rock Vintage races again, I can easily set up a Pro-Shapers shop tour at Wray's shop. Lime Rock Park is maybe a 2 hour ride from Wray's place so I would put a day aside for a shop tour. Maybe if there are vintage races coming up at Thompson, Stafford Springs or Palmer race tracks, those are all within 30 minutes of Wray's shop and more easily managed. I'll keep this in mind as things open up in 2021. I organized a couple of tech sessions there for the New England 356 club and he can easily handle shop tours of 20 people or less and I'm sure I could get a few Hot Rodders from the area to join us - All it cost me was a smoked turkey sandwich for Wray for lunch from BT's Smokehouse down the street.
Of course, his Youtube videos can't be beat and show lots of his shop and projects, too.
Rick, I'm bowing my head and averting my gaze. You are a master-fabricator.
Great idea, Gordon /\
I still want to get to the Lime Rock Vintage races in September, then head to Watkins Glen the next weekend; that is, assuming the 2021 schedules mesh.
@Stan Galat posted:Rick, I'm bowing my head and averting my gaze. You are a master-fabricator.
Thanks Stan, but I just hack around in my shop. I am following your lead on those Panchito heads with Beehive springs, I like the idea of the single spring. I also have a TF-1 case on order when Todd does the next batch, as he is out of stock.
Rick thanks for that tutorial.
Gordon, I'd love that. So much is still up in the air schedule wise for 2021 I can't commit to anything. But I will make it a priority.
I totally understand the reticence in committing to anything next year.
Personally, depending on the roll-out schedule for the vaccines and whether or not the general public continues or increases social safety actions, I don’t expect to be doing anything out in public until after the Summer, but that’s me.
I’ll keep watching things develop and see what we can all safely do. I’m looking forward to getting back to Lime Rock some day.
Put a couple hours in the tonneau project. This is going to work.
I dinged up the front of the piece after folding over the front lip and trying to smooth the underside. Here's magic marker looking for the high spots for the shrinking disc.

The disk did knock them down. It also ground some material off (not good!), so I'll be working this area with sandpaper later. I checked the fit to see how it's go if I had 1.5-inch pins jutting out the back. Needed a trim on the outside front corner.

Since I had the cutoff wheel spinning I decided to correct my front fold-over. I thought the long doubled edge would strengthen the part, but it just causes problems.

Pulled up the upholstery to check the depth and width of the overhang on the rear bulkhead where the pin receivers will have to go. It's only like an inch down.

—that means the pins go about 5/8 below the top of the tonneau. I drilled the tonneau skirt and then marked the steel triangle things. I'll weld 5/16 bolts I cut the threads off of to these, and then rivet them to the skirt later.

Again, from Type550.com, an original(?):
Attachments
Images (5)
Holy cow, you're one busy dude!
I thought I had got a lot done yesterday by sneaking out to the hardware store for a few 4-40 screws for a project. Suddenly, I feel like a slacker...........
Back at it this a.m.


Attachments
Images (10)
Bespoke. Nice work, Ed.
Tenax's are located.
Still fettling. I put the pin receivers in the bulkhead and set about straightening the pins out so everything is parallel.

Smoothing the edges and the underside, trying to get dial the gaps in.


Ran into a problem with the German Tenax (nka Loxx) fasteners: After putting the tonneau on and taking it off about a dozen times, they stopped locking.
I thought maybe they were set too high, so I dimpled their mounting pads a little; no joy.
Finally I took a look down their throats: 

Both were all jumbled up inside; the spring loaded jaw-like grabber bits all akimbo. I actually bought a spare. Looks like:

Friends, I've never heard of these failing like this. Any insight or advice welcomed.
Attachments
Images (6)
OK so I got the two best Tenax's to work. They need to be perfectly (and I mean perfectly) centered. I don't love how they work in this application. Getting them to release with this windscreen in place is going to require a lever tool, which I will now make. If I had the little solo windshield or the Speedster one on it there'd be room for fingers to work.
Now it's down to sanding out the little rough bits and prepping for paint. When it's painted I'll run a strip of soft foam across the underside of the leading edge to keep if from bothering the paint on the dashboard.

As compared to
I think it came out pretty good, but it's a little high on the rear inside corner and I don't love the gap in the rear outside radius

...so I altered the buck to make the next one fit better.


 Having a steel edge to work against here should help. A shrinking die will help more.
I'll probably buy another sheet of 5051 and hammer another one or two out.
If anyone wants one let me know. With the measurement from the leading edge of the rear firewall to the front middle tonneau fastener I could lengthen these to work with the existing fasteners on any Beck or Vintage Spyder. The one I made is shorter than most because of the low plexi windshield I used, and that length would also work on any of these cars, but would require the addition of front fasteners on top of the dash.
Attachments
Images (12)

Looks great @edsnova.
In reference to the Tenax at the windscreen, I feel for you. Mine are the same exact way. My installer placed them quite close to the windscreen. But, I’m lucky in that my tonneau is canvas. I just simply unhook the rear tenax fasteners to take the stress off the front ones and the front ones pop easily.
I think of it as my security system. Who in their right mind would go through all that trouble to remove the darn tonneau. That said, they’d probably get upset and just cut it. Or rip it off.
These are officially for sale. See my ad in the Spyder classifieds below. I'll ship unfinished, with foam padding for the dash connection and complete rear hardware but front fasteners will be up to the installer.
Corrected a dumbass mistake I made with the O2 sensor bung. I don't know what I was thinking, putting it at 6 O'clock where the Sensor's wire side would end up 2 inches off the hot pavement. Maybe I envisioned a dyno-only scenario?
Of course, moving the bung meant I also had to relocate the rear hanger ears.


Anyway, now at 10-11 we be able to get on with the jetting and setting.

A little high-heat paint touch-up and it's ready to go back on. (Yeah, I just left the old bung in place. Think of it as a skid plate).

What else? Glad you asked! I also dug out some 1/4-inch steel plate and made a tow loop.


Attachments
Images (9)
I locked out my 009 distributer and wired in the Black Box today. After considerable angst getting the drivers for the serial-to-USB adaptor cord to download and install, we had ignition.
Nice work, @edsnova! I love looking at your car. The details are just amazing. Congrats
The transistor silicon chip path is certainly a dark and lonely path. It does seem times are a-changin'. First me(Megajolt), then Mike, then Stan, and now you, Ed. LOL! Maybe not so lonely any more...
The BB is worth the trouble.
I started running mine in 2015 or so. The software is very, very old-- but once you get it running, being able to map the curve is fantastic.
Well done.
Here's the blog post detailing all the hassles. It really wasn't that bad; I only screamed and wanted to punch a wall one time. The whole operation— from measuring wires and crimping ends to the end of the test drive—was about six hours, including the dreaded driver chase. The only tricky part so far was getting the adaptor cables to talk to the computer. Once that happened it all seemed to work smoothly.
I did drive the car a few miles on the stock spark tables. It already seems better.

Next thing is I'll reset the rev limiter to like 3500 RPM just to test it.
Then its on to making a custom ignition curve for this particular motor. Hopefully that will be fun.
@edsnova posted:Then its on to making a custom ignition curve for this particular motor. Hopefully that will be fun.
Start with mechanical only-- you can worry about trying to figure out the load part of it once you get that dialed in. I'm not sure that with a big cam the vacuum port does much of anything, since the same box can be used for NA or boosted applications (vacuum doesn't change much on the screen when tuning in real-time).
What I REALLY like about it is that initial advance can be wherever you want it, and total advance is an independent function. I put as much advance in as quickly as possible until I got detonation, then backed it out til I didn't. It really, really picks up the transition when you aren't relying on weights and springs.
Once you get what you like (and it'll be pretty quick), save the map and start playing with the load. You can put more timing into the transition if you can sense load in that range and back it out to where you had it set (prior to worrying about load).
For $200, you'll never do better.
Neatened up the wire looms, tested the rev limiter (good) and started adjusting the spark table.

Took the car for a ride the other day to stress test it and listen for pinging, and heard none, but the brake pedal was going too deep so I rolled home.
Got a chance finally today to bleed the brakes: fair amount of air came out the passenger rear, and that brought up the pedal pretty well. No leaks detected anywhere though so I'm looking around for where the air got in.
I did spot a possible drop on that front sender switch so I tightened it an eighth turn. 
Thinking the brake bias adjuster might be the culprit. We got the bubbles after my assistant turned the knob on that thing.

I plumbed it in years ago just because it came with the other parts I got. Was a bit of a thing too, since the threads in its ports don't match what VW Bug brake lines come with. I had to flare on the new connections myself, and was right surprised when they worked without dripping.
Still no sign of a drip from the device, or either of the connections.
I'll be a bit miffed if the part itself turns out to be NG. Though that would be pretty on-brand for this build.
Attachments
Images (3)
.
You can usually get those things to drip some brake fluid if you buff up the paintwork immediately below them.
If you scratch the paint or otherwise mar it somewhat, they never drip again.
.
Ran the car to the unofficial cars & coffee Saturday AM. It ran well, although I will have to bleed the brakes again as it's still just a little bit spongy. Once parked (with the VWs but right next to a pretty sweet 911 Targa), the result was as usual.


It was somewhere between getting mobbed and working a receiving line. I could hardly wander away to see the other cars. Met a guy who told me he had dinner once at a Rennfest Reunion or some such with the man who owns the ex-Jean Behra 550 (probably 0067 but he didn't say and I couldn't remember), another French Blue car.
I told him I'd actually toyed with the idea of making a copy of the sticker someone affixed to that car's fan shroud.
On the way home I hit a hilly part of Rt 7 and lugged her in 4th. Thought I heard just a little pinging around 2200 RPM.
So today after the rain I fired up the laptop, fired up the engine and cut 2 degrees off the 2300 cells on the right three columns. Also tested the MAP sensor in the Black Box by sucking on a bit of vacuum tubing I attached to the inlet port on it. It works.
Took a drive with the computer.

(Put it in the passenger seat).
Tried lugging it on the hills. No rattly sounds. Did two full-stop, full throttle takeoffs, and, gentlemen, I think we got this.
Next up: wideband.
Attachments
Images (3)
@edsnova posted:Tried lugging it on the hills. No rattly sounds. Did two full-stop, full throttle takeoffs, and, gentlemen, I think we got this.
Next up: wideband.
Nicely done. Just what I would have done. It feels nice to dial it in, eh?
Got around finally to checking my fuel pressure. No issue there.
Carter rotary pump for the win.

Wired the O2 sensor to test as well. It works. So now it's down to getting a nice day so I can warm up the car and take readings.
Attachments
Images (1)
VW Pumps sometimes slowly die...
I hate to be a Debbie Downer here, but I'll share this.
We haven't used the Carter fuel pump in many years, so things may have changed, BUT we had a 100% failure rate with Carter pumps within the first few years in service. This included a few private labeled carter pumps (CB brand internally regulated was carter at this time). Anyway, every single one of them eventually lost its ability to regulate pressure and defaults to roughly 9lbs. When this happens everything works OK at partial to full throttle, but at idle the cars drown and sitting still they flood completely and die... Not a big deal if you catch it early, but as you all probably know, a flood carb and a backfire can mean a call to the fire department and that ain't good....
Interesting. I bought a Carter in 2016 and recently just removed it from the Spyder when going to EFI. It has been flawless.
What year were your Carter pumps, Carey? I do remember people having problems with the CB(Carter) pumps crapping out, but that was usually from clamping them too tightly. I'm guessing late 2000s?
I installed a CB Perf. rotary (maybe a Carter? I dunno) way back in 1999 and it's still going strong. It has always made a weird growl-y whine when it starts up from day one, but it's still pumping - This will be the 12'th year!
@chines1 posted:I hate to be a Debbie Downer here, but I'll share this.
We haven't used the Carter fuel pump in many years, so things may have changed, BUT we had a 100% failure rate with Carter pumps within the first few years in service. This included a few private labeled carter pumps (CB brand internally regulated was carter at this time). Anyway, every single one of them eventually lost its ability to regulate pressure and defaults to roughly 9lbs. When this happens everything works OK at partial to full throttle, but at idle the cars drown and sitting still they flood completely and die... Not a big deal if you catch it early, but as you all probably know, a flood carb and a backfire can mean a call to the fire department and that ain't good....
Well, thanks for that background, Carey. I thought you were partial to the Holley pumps but didn't know why. First I'm hearing of this.
fwiw it's my intention to put the Malpassi filter/regulator back on the car, which I hope will keep the fuel pressure in spec even in the event of a pump default pressure failure.
@edsnova a regulator inline would be a good fail safe as the pumps never stopped pumping, just pumped too much. And maybe we just hit a bad year range for these pumps or something...
@DannyP 2003 to ???? probably 05/06 After replacing several dozen we just stopped using them outright and I probably replaced some on used cars that were still good but I didn't want to chance it. So... 100% failure rate is overstated, maybe 80-90%. But 90% of all statistics are made up anyway LMAO. That makes me think of Randy's favorite saying "15/16th of the world uses the metric system" I don't know why it made me think of that, probably lack of sleep. OK, back to work for me.
Great, now I have to go find what electric fuel pump I put on a few years back. ![]()
@Chris MacDonald posted:Great, now I have to go find what electric fuel pump I put on a few years back.
Chris just buy another one and put it in your emergency kit ![]()
Chris, don't worry about it. If the pump is a few years old, it's probably OK.
Put the Filter King back in. Bought a new bowl and bowl gasket last year because it was leaking. Seems good now. Re-tested pressure and got a steady 3.25 lbs.

Attachments
Images (2)
Welp...back apart.

Started out this am intending to do a 15 minute brake bleed to just perfect the pedal feel. After two hours (bleed. Try again. Try again with the front calipers off and clocked, Try again from the beginning) we found a drip below the T fitting on the rear firewall. That's the replacement fitting for the one that split at the seam after I installed it like two years ago. WTF?
The leak is very small: one drop after standing on the brakes. With the proportioning valve partly closed before there was no leak, but now that it's wide open, here we are.
We tried tightening all three and got no movement, but my assistant did manage to round off the flare nut from the main feed.
As I recall, I assembled this new one on the bench and the only flare I attached in situ was that main line from the proportioning valve. I may have put some red threadlock on these...
Of course, with the engine in it's hard as hell to get any kind of reasonable access to this part, so Vicegrips were employed.

No joy. So I pulled off the carbs to get some clearance to pull off the T and inspect.


Hopefully I'll be able to get it out tomorrow without damaging anything. And I'll put the CB vacuum reference plates under the carbs when they go back on.
I am a bit miffed though.
Attachments
Images (4)
This may sound redundant but when I initially bleed brakes, I place pieces of paper towel at all connections to confirm there isn't a slight leak.
.
I think the 20th century philosopher Santayana put it best when he said, "If it's not one thing, it's another."
No wait, sorry, it was Roseannadanna. I always get the two mixed up.
.
I feel your pain..... It took me a year to sort out my "turnkey" first Spyder..... Time to put in the Antifreeze mentioned in another topic and come back tomorrow when its had time to do its stuff..... You'll get there![]()

Attachments
Images (1)
@Gordon Nichols posted:
I'd add the tag-line, "so use good hardware".
@edsnova - really sorry, man. Hang in there.
So I got in there this am and put the wheels back on the front, then lifted up the rear a few inches to put the end of the main brake line above the height of the fluid reservoir. Put garbage bags on my seats in case I'd have to pull out lines in there between them, and then managed to extract the troublesome manifold and its attendant brake lines.

I could see that the T junction was not split again, so in reconsidering those steel braided lines—which came in bags with the rest of the parts I bought with the kit, I compared the male end of one with the bubble flared fitting that's supposed to go in there. Interesting:

It was these fittings which had given trouble before. So much so I gave them each a wrap of teflon tape before screwing them in last time.
In consultation with Cory Drake I learned that fitment issues with these are very common, if not universal. He suggested I replace them with "stock" hoses and, digging through my box of brake lines I did come up with something a bit less flashy:

About three inches shorter than the steel braided lines, but by then I had already decided to put a short length of hard line into the T junction to give it something it likes, and I had a spare male/male barrel fitting in stock.
Comparing the business end of the "rubber" line to the braided line we see maybe what the problem has been:
I'm thinking that the beveled edge, in steel, is different enough from what is supposed to fit in there as to account for my troubles.* Fingers crossed on that.
So I reassembled the whole mess on the bench and then popped it in the car.

Went out to buy a power bleeder but it's Easter, ya know, so I just pumped the brake pedal a little with a mop while I opened and closed the bleeders. Seems like maybe it will work. I'll get an assistant back in here tomorrow or Tuesday and—I hope—finally get the brakes squared away.
=
*Hat tip to Gordon as well on this.
Attachments
Images (6)
Interesting. Where did those braided lines come from?
Mine came from Airkewld in Arizona. But since they are designed to fit a Beetle, the rears were nowhere near long enough. The ones I got were AN-3 on both ends. Metric adapters to the hard lines in the chassis and a banjo adapter at the caliper. I bought the longer hoses from Pegasus racing.
Believe it or not, I had absolutely no trouble with any leaks of any kind.
Hope you get it sorted, Ed.
Like I said, D: They were in a bag which was in a box with the other brake parts I got with the build. Cory says the first set he got for the Hoopty (EMPI or CB) did something similar and he ended up going back to stock lines. Sartwell told him they were bad all over the hobby at the time.
I of course knew nothing of this. The threads are regular VW metric (M10-1?) and that's what fooled me.
Cory surmised that some Chinese manufacturer made them wrong and a salesman on commission pawned them off on EMPI's (or someone's) buyer anyway. This would have been mid 2000s. Pretty sure that's when most of the parts I got were stockpiled for this build.
Update: Pumped the brakes, bled them, the air came out, the pedal came up, and then...
We broke them. Pedal sank to the floor. Spongy, comes up a little when pumped but not where it was. I think we blew a seal in the MC.
So that's pretty great.
No leaks up front. A tiny drip still from the damned T junction.
Plan is to again R&R the rear system—all new lines and fittings—and see about changing out the MC as well. Because that little drip ain't what did this.
Knowledgable advice welcomed.
I'm glad it broke under test conditions, Ed. You'll feel much better once it's out and you've got your new parts going in. Good luck.
.
Have you been monitoring fluid level at the MC reservoir?
Did it just drop?
.
@edsnova posted:Interesting:
It was these fittings which had given trouble before. So much so I gave them each a wrap of teflon tape before screwing them in last time.
I'm not sure exactly what I'm looking at, but it appears that those are two dissimilar fittings. Like one of each of these?
FWIW, my long time buddy and pro Ducati mechanic once warned me that Teflon tape was for plumbing and if he ever found any on my bike again, he'd never work on my bike again. (After he'd dug a microscopic piece of Teflon tape out of one of my carbs after trying for two hours to get them sync'ed.)
Brake line fittings seal at the flange, if you're using tape to get them to seal, you're just putting a bandaid on a leaking flare (which will most likely always allow air into your lines.)
Attachments
Images (1)
Yeah, and since the brass T had the wrong fitting in it, it's seat is trashed now and needs to be replaced.
Ed can't seem to catch a brake these days. ![]()
@Sacto Mitch posted:.
Have you been monitoring fluid level at the MC reservoir?
Did it just drop?
.
it dropped in proportion to how much I was bleeding out, and I refilled it as needed.
Bob: IM S6 will be appearing all week in the Speedster Lounge high atop the first floor of the lovely Fixxit Resort Hotel and Carwash. Shows at 3:00 am and 5:45 am. No cover, 11 drink mimimum, try the pheasant! Drawing for a free Spyder Bimini top at each show.
That's show business, folks... ![]()
Good one, PB. Those with removable bikini tops get free admission.
Late update. Neighbor lent me his vacuum bleeder and my brakes are operable. Took the car to a little show in Glen Burnie last Saturday and met up with Cory and Chris.
What was the problem, you ask? It was not just the T junction in back! Nor the couplers. It was also the brake light sender switch in front. Bleeding through the spade connectors. So I chucked that one and plugged the port, and moved the wires to the other switch.
So the brakes work. But I'm also waiting for flex lines with banjo fittings, as my hard lines, where they go into the calipers, hit the bodywork on hard bumps. They'll be OK for now like this but as soon as the new parts come in I'll be re-making the rear brake lines a third time.
Oil also seeping from the axle boots. I got those big accordion style ones not realizing I could also get a split boot shaped more like the stock item. So I ordered a set of those, supposedly German made.
Tried aiming the headlights last night. I think they might be OK.
Today I made a set of rear axle limiting straps similar to the one's @DannyP made for his car.

With these, downward axle travel is limited to about 2 1/2 inches from the neutral ride height, meaning the suspension cannot "jack." Maybe not needed for the way I'm driving it but worth trying out to see if they harm the ride quality. They can be put on or taken off in about 10 minutes with a couple 3/4-inch wrenches.


I do still like this car.


Attachments
Images (7)

Lots and lots of little details to see in every photo - Those little things that make you say, "Wow, that's really nice" when you see them. And you keep seeing more every time you look.
Nice job, Mr. Ericson
Second that motion ![]() ... it will be hard the day you sell that baby. Looks so awesome.
... it will be hard the day you sell that baby. Looks so awesome.
Each time i look at the photos I see more cool stuff !
Ed-That’s the same thing that happened to my switch when I bottomed out over a set of railroad tracks and thumped my MC.
Only it was leaking everywhere. The spade lugs like yours as well as where the metal sides were crimped over the phenolic and the threads, too.
"I do still like this car."
As well you should.
Cory, Kelly and I all jammed into the Annapolis C&C at The City Dock. Couldn't park near each other but we managed to make contact.
I got there first (an hour drive!) (And I got lost and had to ask the Navy dudes guarding the base where the hell I was going!) circa 8:20. Parked it and got swamped.

Kelly rolled in next with his maroon beauty. His car is running well, as is mine.
Cory did his usual get-off-work-come-to-show thing, I think. He got a spot next to the water and ended up chatting with a bunch of Mustang fellas he's interacted with in the past. Hoopty is also looking good these days.
Gorgeous setting, this is. Yacht club with public rest rooms. There was a fairly good sized contingent of young kids running significant stereos as well.
Basically everyone who gets a new Vette brings...

I bugged out after about an hour to make brunch for Karen. Also hit the FedEx copy store and Office Depot for some Carlisle accoutrements. Driving the Spyder in normal afternoon city traffic is still fun...but not as fun as other situations. Anyway, a bunch of stops, a bunch of hot starts, and no mishaps or trouble of any kind. Cleaned these bugs off the car when I got home and set about making our name tags.

Attachments
Images (3)


It's a light for nighttime racing use.
@DannyP posted:It's a light for nighttime racing use.
oh, now I'm seeing them on the side also...
wow, all the details that can be done on these cars
I thought it was where you inserted the rolled up $100 bills 🙂
No those are the "wallet lightening holes." Lots of them on every Spyder.
@edsnova posted:No those are the "wallet lightening holes." Lots of them on every Spyder.
Those accept stacks of $100 bills
OK guys! 2 days 'til Carlisle and I went ahead and rebuilt the rear brake lines using some soft lines with banjo fittings that shipped from Latvia. The hard lines to the rear calipers had to come up and over and make a sharp bend down into the ports, and I found that the apex of that bend hit the inner fenders on strong bumps.
The car was stopping fine but for how long? The banjo fittings make for a lower profile connection at the top of the caliper and now the high point is a bolt head. Plus it's now a flex line that goes to a hard line running along the frame rail to a bend where it goes to the T fitting, instead of a hard line from the caliper running along the spring plate to a soft line bending to another hard line to the T fitting.
No leaks and she stops OK.
This morning I strapped the hard lines in neat and then got after the sump plate.

It's been dripping a while now (no, not that bad!) because one of the studs was short and the acorn nut on it was missing the copper washer and only had like 2 threads. I figured while I was in there...
So I got a new gasket and stud/nut/copper washer kit. When I checked the stud it was just turned in too far, not pulled out or stripped as I'd feared. All the rest were solid so I left those and went with the new nuts and one new stud.
Decided while the plate was out I'd put in a drain plug, as the other one I put in the sump is less than perfectly accessible with the underpan on the car (you can see it in the lower left).
So I got a quarter inch NPT drain plug and the requisite tapered 18 thread tap. The plate was already center-punched on the thicker boss, so it wasn't too tough. Three quarts of Brad Penn and we're back to just above the "add" line, which seems to be the sweet spot with this engine.

I'll run it tomorrow and throw it back up on the lift before stepping off for the hotel. May have to once again sideline my Filter King as well. Hope it's all good.
Attachments
Images (2)
Well done, Captain Ed!
One step forward..........
Uh, better not finish that statement, Alan. 🥴
Uh... Uh... shoulda said Gordon. Doh!
Thanks to all who gave encouragement and help in this build, and at Carlisle.
Nice update, Ed. Glad it got the attention it deserves.
Hats off to you Ed, great perseverance.
Finally got back on the job this week. Bought the paint for the half tonneau ($200!) on Thursday and got after it today.
I decided not to use any filler on the panel, in keeping with my "messy as they probably were" aesthetic. Hit the rough spots with the Dremel, gave it a final bit of scuff, blew air on it, then wiped it down with acetone and a tack rag.


Primer is a 2k epoxy. The paint shop gave me this stuff in a spray can—just enough to cover the half tonneau. I suited up against the isocyanates.


I painted just outside the garage, then left it in the sun for an hour and flipped it to do the other side. Couple hours later and its in the garage again. I'll wet sand it tomorrow with a 400 grit block before mixing down 8 ounces the base coat, loading it into  —and trying my luck.
Weather's supposed to be like today—75, partly cloudy, not too humid or windy.
I'll hang the panel with wire and S hooks from a Krause folding ladder in the driveway. That should give me good access to all sides.
If I'm lucky I'll be able to clear coat it on Tuesday or so.
Attachments
Images (6)
Looking good, Ed. Nice gun, too!
.
Suiting Up Against The Isocyanates

If you ever decide to write some dime store science fiction, dammit Ed, you’ve got the title and the cover art right there.
Attachments
Images (1)
Yeah. Looking like Michael J. Fox in Back To The Future...
First time painting with my fancy new hplv gun it did not go smoothly. Had a deuce of a time getting the air pressure and spray pattern dialed in.

So the job required some remedial efforts with the 400 and then the 800 paper.
Eventually I got it looking OK.

Wish me luck on the next stage.
Attachments
Images (3)
Looks pretty good for first time with a new gun. Every can of paint shoots a little bit different, too. As I'm sure you know, cardboard test shoots are your friend.
The good news is that with a Finish Line gun, you know it's all your fault and not the equipment :-)
That's true about Finishline guns - they're usually pretty good. I had a beloved DeVilbis for many years and now don't have a glue where it got to - Chris may have it but by now it's OLD! My one try with a HVLP gun (borrowed from a friend in Beaufort) was equally a disaster. I just couldn't get the hang of it - Same goes for water-borne paints. Give me something with thinners and fixers any time!
I second the cardboard test cards, though. If you can't get the pattern you want on cardboard, it ain't gonna get any better on metal.
All this is precisely why I farmed out the paint on Pearl, BTW.......
I still use a De Vilbis JGA 502 that I've had for close to 40 years now- just painted a friend's buggy with it 2(?) weeks ago, shooting a 2 component urethane. I tried something a little different and got the best finish yet with that type of material- this is in a mutual friend's garage/workshop. I mixed different thinners for the 2nd and final coats. We wet down the floor a little bit to keep the fan (and me while moving around) from stirring up dust.
Attachments
Images (1)
@ALB, beautiful job! Those thinners seemed to do the trick.
The most important thing I learned in my 18 months of auto-body class was that painters are worth every penny you pay them.
My teacher, with 30 years of experience, could set a gun in about 30 seconds with three trial sprays. It would take me 3 minutes and a half-pint of paint. ![]()
Not to diverge too much into paint, but since I sold my painting setup in RI before we retired out here, I had to re-equip for the speedster spraying.
As some of you may remember, I bought a Fuji 2804-T75G Mini-Mite 4 Platinum turbine HPLV system. No compressor, oil/water traps etc. It's a shoebox size lightweight turbine blower that works great with the HPLV gun that comes with it. It was perfect for my situation and is comfortably stored for when I need it.
I had gotten used to my DeVilbiss gun and 60 gallon compressor, but with just a little practice, I felt like I could do as good of a job with the Fuji (again, skill limited outcomes, not equipment limits).
Just throwing it in there for folks who are considering equipment.
I’m blessed in that about 30% of the guys I grew up with do auto body. I learned enough in my classes to do a hell of a prep, and can get a pro-level result by getting any of them to spray my work.
I'm a house/construction painter with lots of spray experience- everything from catalyzed furniture lacquer to interior and exterior latexes/architectural coatings to various 2, 3 and even (in one case) 4 component epoxies (trust me, you never want to have to spray coal tar epoxy!), with (over the years) a fair bit of after hours dabbling in various automotive enamels and urethanes/polyurethanes. Although I'm fairly well versed with most spray systems- conventional, airless, electrostatic and even hvlp, I still prefer a conventional cup gun for automotive enamels and urethanes. Conventional and airless are what I know best. I have used an electrostatic (what a pain in the a$$!) and have limited hvlp experience- I understand it's different now, but when it first came out any nice materials I saw sprayed with hvlp had to be cut-polished to get rid of the orange peel and maximize the gloss/finish. It just didn't seem to atomize the material all that well (again, like the electrostatic, it was one of the first hvlp's out there) so I never bothered to pursue it.
I don't spray stuff like that all that often (3 buggies in the last 5? years) and at the tender age of 64 I only do it for friends, so I'll stick with what I know. I'm like Mike, that if I bought an hvlp unit and played with it a while I'm sure I could get acceptable results, but I'm not that into it...
I sprayed 3 or 4 cars back in the 80s.
I learned a lot about myself in the process. Painting takes something i don't have - the ability to stop when something is going sideways, and the ability to not pick at the flaws.
I'll never be a good painter (or drywaller), but that's OK. I know now.
I can paint cars fairly well but don't let me use an airless sprayer as that's another story. My first home I bought we gutted the walls and re-rocked it. Rented an airless sprayer to save time and get a primer coat on the walls and ceilings, I started in a closet so I could get the hang of it ... I pulled the trigger, the paint line fitting popped out of the gun shooting the entire closet in primer and most of me, in two seconds....
@Michael Pickett posted:@ALB, beautiful job! Those thinners seemed to do the trick.
I've sprayed urethanes/polyurethanes a few times over the years; being an industrial paint, they are a little more difficult to work with and get a really nice, automotive quality finish. It's just not what that type of coating was originally designed to do. I've always followed mixing volume instructions precisely using the proper temp thinner for conditions (almost always medium for anything around room temp, iIrc) and never failed to produce decent finishes (the guys were always happy and thought it looked great) but after the 2nd or 3rd time thought it could be a wee bit better. This time around I talked Nelson into letting me buy a liter of slow thinner as well as the medium (the gentleman at the autobody supply store didn't think the slow thinner was necessary) and, working in balmy 78- 80° weather, I mixed the first coat with the recommended amount of medium speed thinner, mixed 20-25% slow thinner into 2nd coat and 3rd coat was close to 50% medium/50% slow thinner (and a splash more thinner than recommended overall as well). It gave the top coat just that little bit longer to flow and outgas before skinning over and produced (what I consider) the nicest finish yet! And that's my brother in the background...

Attachments
Images (1)
Update: I am not good at the painting.

Attachments
Images (2)
When my painting attains that level of quality, I switch to sandpaper. I keep lots of sandpaper around the house.
It'll work out.
@edsnova posted:Update: I am not good at the painting.
It's good to know oneself. Self-awareness is woefully lacking in the modern age.
Next time I see you, I'll buy you a beer. Misery loves company.
.
Give a man a rattle can and he sands for a day.
Teach a man how to use a paint gun, and he sands for the rest of his life.
.
@Sacto Mitch posted:.
Give a man a rattle can and he sands for a day.
Teach a man how to use a paint gun, and he sands for the rest of his life.
.
Mitch, you have no idea how true that statement is!![]()
So it turns out that if you spray 2-part clear coat at 23 pounds per square inch pressure from a nice spray gun directly at a 10-ounce sheet of bent 5052 aluminum that is suspended from two holes along its top edge, what will happen is the spray pressure from the gun will swing the work farther away as you work down, and the swinging action of this sheet of material will cause the spray distance to vary significantly enough to cause trouble.
So what happened with the slower thinner vis a vis reducing orange peel?
Do you think that it self leveled during the slower cure or is something else afoot?
@edsnova posted:So it turns out that if you spray 2-part clear coat at 23 pounds per square inch pressure from a nice spray gun directly at a 10-ounce sheet of bent 5052 aluminum that is suspended from two holes along its top edge, what will happen is the spray pressure from the gun will swing the work farther away as you work down, and the swinging action of this sheet of material will cause the spray distance to vary significantly enough to cause trouble.
Had the same issue spraying MC gas tanks. Ending up draping them over a door/fender stand instead.
These things are handy for all sorts of stuff. I have a 2’x4’ piece of 1/2” Arboron that I set on top and it’s heavy enough to make a pretty stable work bench.
Attachments
Images (1)
@Gordon Nichols posted:So what happened with the slower thinner vis a vis reducing orange peel?
Do you think that it self leveled during the slower cure or is something else afoot?
You get serious orange peel when something isn't right, usually either not enough pressure (the paint won't atomize properly and will look in extreme cases somewhat rough or 'pebbly' and too much pressure can cause this as well), not slowing down enough while spraying to put enough on (more important during the final coats to combat the wavy but glossy orange peel look) , the material isn't thinned enough or a combination there of. I think that the slower thinner probably helped it level out, but what I also noticed working with this material is that the overspray that lands on places already coated didn't always melt in the way I thought it should. I don't have access to a booth so everything counts. I'm probably just being picky, and as I said before, no one else has noticed, but I think it made a difference. We're going out with Nelson and his car tomorrow so I'll let you know what I think after the weekend, and maybe have a few pics as well... Al


Attachments
Images (7)


How much time did you put into that wet sanding? Looks great!!
Spent about three hours messing with it. First I sliced off the runs with a blade. Then I wrapped a wet paint stick with wet 400 grit and ground the drips down close to flat. Then I worked those areas with 800.
Then I wet sanded the whole panel with 800, 2 passes. Cleaned the whole thing with glass cleaner.
Two passes with 1000, two more with 1500 and one more with 2000. Cleaned it between sandings and looked for trouble spots.
Then I compounded with a "rough" sponge pad, 2 passes. Cleaned again with glass cleaner. Then one more with a medium pad. Cleaned.
Once over with a fine pad with polishing compound. Then a buffing wheel to finish.
It's not close to perfect. I'll probably have to re-shoot the drip spot at least.
But it's not terrible.
Ed, you continue to amaze me.
@edsnova posted:Spent about three hours messing with it. First I sliced off the runs with a blade. Then I wrapped a wet paint stick with wet 400 grit and ground the drips down close to flat. Then I worked those areas with 800.
Then I wet sanded the whole panel with 800, 2 passes. Cleaned the whole thing with glass cleaner.
Two passes with 1000, two more with 1500 and one more with 2000. Cleaned it between sandings and looked for trouble spots.
Then I compounded with a "rough" sponge pad, 2 passes. Cleaned again with glass cleaner. Then one more with a medium pad. Cleaned.
Once over with a fine pad with polishing compound. Then a buffing wheel to finish.
It's not close to perfect. I'll probably have to re-shoot the drip spot at least.
But it's not terrible.
My bodywork teacher told me that color sanding/cut and buff was good inspiration for getting your gun set right the first time. A**hole. ![]()
When I did my class project (Mercedes Hood and Rear hatch) I messed up getting the gun back together right and my first clear coat had some globs in it. He had me just lay on a few extra coats, extra thick, to leave enough material to wet sand it out.
Worked great except the finish product turned out nicer than the OEM finish in the rest of the car. ![]()
.
I think I'd stop now, Ed.
Before long, this will be too pretty to drive.
You'll have to get a trailer for it and haul it around to car shows.
And beach chairs. You'll need some beach chairs so you can sit in front of it at the car shows.
Really, it's nice enough just the way it is.
.
You are probably the only one to notice the imperfections, it's better to let it be than to unintentionally make it worse .
I agree. It looks great and you should only mess with it if you get complaints from your sweetie.
@Alan Merklin posted:You are probably the only one to notice the imperfections, it's better to let it be than to unintentionally make it worse .
Think of it as Patina. Probably painted better than any one that left the factory. ![]()
Here's the inner clam and spare tire compare/contrast.

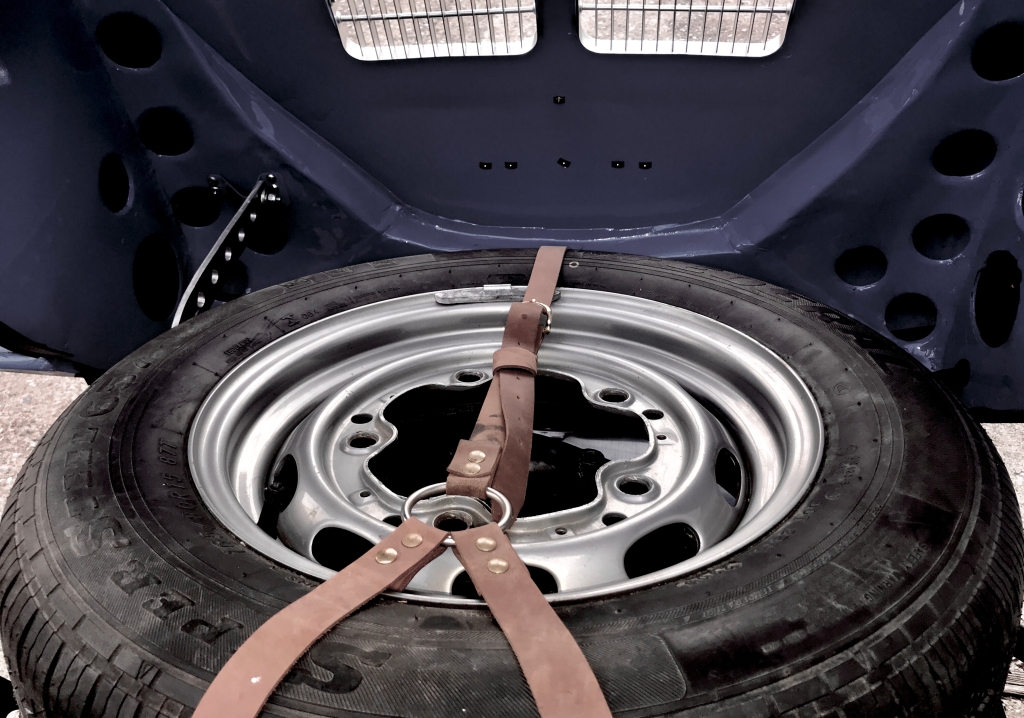
I like your clamshell prop better. I'm pretty confident that Al does, too.

@Michael Pickett posted:I like your clamshell prop better. I'm pretty confident that Al does, too.
Good eye, Michael; it took your pointing it out for me to see it, and yeah, it's way cooler than the original!
Yours is truly bespoked to your specification, your looking for someone who can appreciate the nuances of such a build and they are out there. ![]()
Like @IaM-Ray said. You have an amazing eye for detail. Combined with your fabrication skills and patience, you've built a one in a million (or in our case, maybe a few thousand) auto that any discerning collector will appreciate. It is just a matter of finding the right match. Good luck!
And... did we say you did a lot of unbelievable research to find all those nuances. ![]()
Just reposting the latest blog update. Cold start after 4 month's rest, shakedown, and a little engine sound compare/contrast with a real one. 
Attachments
Images (1)

Improved the Spyder's leg room last week.
Seems good after a short test drive.
@edsnova posted:Improved the Spyder's leg room last week. Seems good after a short test drive.
Huzzah! I'm wondering if that brake pedal arm is going to bend if an elephant wants a test drive. Amazing attention to detail, Ed!
Just...update.


Attachments
Images (3)

Neato. Did you make that?
.
Give me a lever long enough, and a place to stand...
.
@Michael Pickett posted:Neato. Did you make that?
I did look into making one but for the money Fibersteel made more sense.
And, for the record, I do not have the stones to actually jack the car with it. Yes, it should work, and it can obviously hold the car up, but the angle you start at with that little cup on the jack point does not inspire confidence.
For the picture I lifted the right side with a floor jack and then slipped the lever jack under the left side.
.
@edsnova posted:....For the picture I lifted the right side with a floor jack and then slipped the lever jack under the left side...
Is there nothing I can believe in anymore?
.
@Sacto Mitch posted:.
Is there nothing I can believe in anymore?
.
Ed Garageshopped the pic.
.
@Michael Pickett posted:.Ed Garageshopped the pic.
I don’t want the truth.
I can’t handle the truth.
Ed uses words like ‘barber pole vinyl’, ‘autopulse fuel pump’, Wendler badge. He uses these words as the backbone of a life spent defending something.
Deep down in places I don’t talk about at parties, I want Ed in that garage.
I need Ed in that garage.
.
This car is still for sale. DM me if interested.
i mdont get under a car unless absolutely necessary and only with oak firewood round placed strategically
Ed, I am utterly confused that someone hasn't bought this work of art. It'll happen.
No worries, Lane.
Three Saturdays ago when I tried to back into a space at Cars & Coffee my shift lever popped off. Disconnected at the base, stranding me 15 feet from my destination. Luckily it was in neutral. I dragooned a couple of bystanders to push the Spyder into the slot.
I quickly found it wasn't broken. Just disassembled. The lever screws into a socket near the floor of the shift housing, and somehow it had backed out. A few minutes later I'd turned it back into place with some borrowed pliers (thanks to this kindly UniMog-with-grenade-launcher owner).

And I was happy, because I now understood why my reverse lock-out feature had been getting funky.
The stock Brandwood shift lever is a complicated thing. Really it's two levers, one nested inside the other, so the outer one can be pushed down to allow the lock-out nub to dip below a gate to get reverse gear. As the inner shaft unscrewed it made the whole thing slightly taller—too tall to allow the outer shaft to be pushed down far enough unless I opened up room above it by backing the knob off a turn or two.

I had cut and welded on that box several times during the build in an effort to make it more compact and Spyder-like, yet never took it apart to see how it worked. Now, seeing how it went together, I also realized how easy it would be to replace with a longer stick.
One of the silly things I added to the box was a reverse lockout lever, the similar to the originals. Turns out it works as intended, so to make the shifter "realer" all I needed was a simple stick, not a nesting doll arrangement.
The other night I got to work.
From what I can gather by photos, the real cars' shifters were about an inch and a half taller than the one I was using, including the extension I scabbed on during the build.
Out of the spare parts bin I grabbed a likely-looking old shifter and cut off the ball end.
The shaft screws in with a 3/8-inch threaded rod at 24 tpi; standard SAE fine threads. Of course I had every kind of bolt but that one, so I ran to HD and spent $3 on two Grade 5 (they didn't have 8) zinc-plated bolts.
Cut off the head of one. Drilled out the bottom of the cut shifter and mocked up the parts.

That loop thingie is what controls the big fore-aft cable. It's about a quarter inch thick. I was going to use a nut for my version but found a piece of quarter inch plate with the requisite quarter-inch hole drilled through it on my work bench. A little surgery with the angle grinder and...

Shortly:
And then:

Once installed, the loop for the cable keeps it from backing out.


The only thing missing now is the correct mushroom-shaped knob. I believe they are available commercially, but if anyone has one loitering about their spare parts bin, I'd sure like to have it. 12mm threads.
Attachments
Images (10)
Beautiful work, Ed!
.
Good job.
Why is it, it's always the guy with the grenade launcher who's most likely to have tools?
.
@Sacto Mitch posted:.
Good job.
Why is it, it's always the guy with the grenade launcher who's most likely to have tools?
.
@Sacto Mitch if you can’t fix it blow it up 😎🤙
Ed's beautiful blue Spyder -- the gift that keeps on giving. 59 pages and counting. I think @Lane Anderson had the old record.
@calmotion posted:@Sacto Mitch if you can’t fix it blow it up 😎🤙
My philosophy as well.
I had a shift knob that was a certain mm,,shift lever was too thick,,had a machinist rethread to proper diamater...problem solved
Update: found the shift knob I knew I had.

reference photo:
Attachments
Images (1)

That looks like an early VW shift knob. Did they use that on 550s, too?
The knob I have is a Bug knob as supplied by Vintage Speed. Spyder knob is a li'l different and I don't know of a supplier of the exact correct knob. Here's another int shot with the shifter displayed. This is from a Mechum auction of an Alloy Cars replica.

Attachments
Images (1)

.
Went through the archives and found this of a 502 Motorworks high-end replica (from Monterey a few years ago). This looks like what you are describing, but maybe shows it in better detail. It's a mushroom shape, but a little different from the Bug mushroom.
As any scoutmaster will tell you, not all mushrooms are the same.

.
Attachments
Images (1)
found it. Fibersteel. 

Attachments
Images (1)

But the price...
.
If all you need is the knob (guessing Fibersteel won't sell that as a separate piece), this looks like something that would be a good candidate for 3D printing — and you could spec threads that fit your shifter.
.
Fibersteel does make some nice stuff. I have a set of drumskins from them. Also, the front jack points(faux style, not for actual use).
But honestly that shifter is a STOCK-style VW shifter in a cheap steel box with a fancy $2 plastic custom-made knob. $1455? They are a bit too big for their britches over there. They could sell it for $500 and make a ton of profit on it.
And that is why I won't buy anything from them today, they've added the P-tax for replica stuff.
I bought a custom 3D-printed gauge pod, intended for a GTI, and installed it in my Cayman. It was $75 delivered in a week. I'd wager anyone with a 3D printer could sell the knob alone for less than $50 and do quite well.
Get me some white plastic or better yet some aluminum stock and I'll make it for you on my lathe. Then paint it white(I think Marty did this in his former IM).
If you can turn it from Al, you can turn it from Nylon, and skip the paining part. Just sayin' . . .
So you've operated a lathe Kelly?
Plastic sometimes is rough after machining, aluminum is sturdier, finishes better and will hold up to more abuse. Just one opinion...
Powder coat it ivory and clear and it will last almost forever.
Find Ed some ivory-colored nylon(it has to be the CORRECT ivory). Good luck with that.
My machinist said he could turn it down from nylon. He's a Bug guy so he knows the color scheme.
Well yes, I have done a little very simple machining, but I have witnessed (and directed) a great deal at the hand of a few masters. If you have the right profile, I bet a CNC guy could have the first one out in ~30 mins, and the next 100 in another 5 mins each. Just guessing.
My first real job was in a machine shop that made automatic valves for all sorts of industrial applications. (Natural gas pipeines, refineries, nuclear power plants)
We made seals and shims out of all kinds of plastics: Teflon, Abs, Nylon, Viton. Some of it you had to turn really slow, some really fast.
But I have to say, 3D printing would probably be a better way to go with a mushroom shiftknob.
Suddenly, I feel like following in my 12-year-old grandson's footsteps and ask Santa for a 3-D printer for Christmas.
I thought about buying a 3-D printer, but decided that it would probably just end up in frequent, awkward requests for more magenta...

Looks really right, Ed. You've nailed the height, too!
Thanks. It's about as close as I'm going to get with a Brandwood shifter. It works pretty well too.