

I am totally unfamiliar with what it is....Is it a motion reverser for a hood gidget to attach to a slip-slide to the fornacrcatator ?...........Bruce
The key thing, in this application, is that I did not have to weld on any of it.
I could gas weld it for ya..... Jus’ sayin......
And did you know you can “learn” how to weld on YouTube? ![]()
Basically what I'm trying to do, Gordo.
You Tube and practice, except, instead of a nice 4x4-foot piece of quarter-inch plate, I've been using

and
Attachments
Images (1)
Yup, that works. My son learned from a couple of friends and from Youtube. To practice, he built a car hauler for his track car and later that became my hauler for Pearl. You can see how the welds got nicer looking as he went along and by the time he finished he was really good.
Car Hauler, Bridget, 1/4" plate - Whatever'll take a bead.....And just DO IT!
Been fighting the car the last couple days. The throttle linkage works, but I don't like the bend in the cable. Should have bought a foot shorter.

While I'm at it, an ignition question: Anyone here ever use CB Performance's "Black Box" device? Kind of looks like a deal for those of us with plain 009s who'd rather not convert to crankfire or go with the full MSD or Mallory kit.
Not really digging the serial cable interface, but that's a minor issue, I think, if the software generally works.
—which is always the question, isn't it?
Attachments
Images (1)
edsnova posted:Been fighting the car the last couple days. The throttle linkage works, but I don't like the bend in the cable. Should have bought a foot shorter.
While I'm at it, an ignition question: Anyone here ever use CB Performance's "Black Box" device? Kind of looks like a deal for those of us with plain 009s who'd rather not convert to crankfire or go with the full MSD or Mallory kit.
Not really digging the serial cable interface, but that's a minor issue, I think, if the software generally works.
—which is always the question, isn't it?
@Teby S has the CB Performance "black box" and as far as I know he likes it. If he were to complain about it I'd certainly here from him about it. Maybe he'll come on and tell us about it.
I run a CB black box converted to drive two coils for my twin-spark. Don’t use a Pertronics module, and it’s the shizzle, as they (used to) say.
The serial-port interface is pretty old-school (rectified with a cheap adapter cable from Amazon), and the software is not beautiful looking— but once everything is set up, it works great.
I have no idea why it isn’t more popular. It’s 200 bucks and it works great.
These are the best endorsements I could hope for.
The engine I bought came with a 009 and Pertronix. Everything I hear and read suggests it's not the optimal setup, particularly in the low & mid-range throttle response department. Originally was thinking Megajolt/IDIS (along with a bunch of really stupid experimental junk to make the engine look more "Fuhrmannesque"), but that's all out the window since the fan shroud project is on indefinite hold.
I wanted to make a better spark map, so the next likely suspect was Mallory or Pat's Magnaspark, but this box looks like it has what I want and nothing I don't need.
Also...it'd look real nice mounted on the firewall, just to the right and below the fuel pressure regulator, right in the spot where the voltage regulator was on original 550s...
Thanks for the quick responses.
Stan Galat posted:
...I have no idea why it isn’t more popular. It’s 200 bucks and it works great...
Could be a lot of folks think you need to be a rocket scientist to set it up and program it.
And, then, you still need a distributor and you have to fiddle with that to lock out the mechanical advance.
So, just how tricky is it to get it working and find the best curve?
You need to connect a laptop, no?
It's got a serial port, so you need to buy a USB to Serial adapter, AND make sure your laptop has correct drivers for same, then It;s a slam-dunk. I recommend the FTDI chipset cable, drivers are easy to find.
I found all this out in the XP era when everything was supposed to be plug and play and just, well, wasn't.
Same stuff I went through with Megajolt though, exactly the same.
Ed, I believe that Stan's distributor is LOCKED out, as in no advance weights and springs. Easy enough to do yourself but check with him on that.
Stan, are you using points to trigger the box?
DannyP posted:...It's got a serial port, so you need to buy a USB to Serial adapter, AND make sure your laptop has correct drivers for same, then It;s a slam-dunk. I recommend the FTDI chipset cable, drivers are easy to find...
So, PC laptop only, I guess. No way with a Mac? I gave up on PC's years ago - my most recent PC laptop is Windows 7. Would that work?
DannyP posted:
...Ed, I believe that Stan's distributor is LOCKED out, as in no advance weights and springs. Easy enough to do yourself but check with him on that...
Yeah, I thought that was the whole point of the black box - control the advance curve entirely in software and cut out any possibility of sloppy advance hardware mucking things up.
I notice there's also an input on the box for manifold vacuum pressure, to fine tune the curve for engine load and throttle position. It looks like there's a plate that installs between the carb and the manifold. Do you HAVE to use that to make it work? Do you sacrifice a lot if you choose not to?
Mitch, I don't know about Mac, the only Apple product I have is an Ipod Nano. As long as the software will run on MAC, I can't see why it wouldn't work.
You don't need the plate between carb and manifold. There is one vacuum takeoff on a Weber IDF, you could use 1 or possibly a T and both vacuum takeoffs if you want, but I'm not 100% sure that will give you a good manifold vacuum signal. I think it is a vacuum port designed for a distributor, but which distributor IDK. There is a very small slotted brass screw in the vacuum port as a plug.
If you've got an old vacuum gauge, hook a long hose up and go for a drive and look at your light throttle conditions to see if you get a decent vacuum. If you don't, keep reading. I bought one at Autozone/Advance for $25-30. It also measures fuel pressure up to 10 psi or so.
If the Weber vacuum takeoffs don't work you could drill and tap each runner for a pipe thread fitting and run 4 hoses together, usually to a reservoir about the size of a pack of cigarettes is a good volume I've heard.
The vacuum advance gives you more advance at light throttle settings and can increase your mileage, if that's what you're looking for.
Instead of all that vacuum hose nonsense, I just made a bracket for a Ford Escort TPS and did it that way.
Thanks, Danny.
Problem with Macs is that they haven't had serial ports since the Eisenhower administration. (OK, I wax hyperbolic.)
So, if there's no USB option, Macs are out, I guess. There may still be some kind of hardware solution for Mac that emulates a serial connection via USB, but I haven't heard of such a thing in years. Next question is does CBP supply software that will load on a Mac? Anyone? Bueller?
And, again, can you run the Black Box at all without some kind of vacuum feed? If so, does it seriously compromise performance to do so? In other words, if you get the box, should you assume you'll need to hook up a vacuum feed, too?
PC only, I think.
Yes, the distributor is locked out-- it has to be to work with the "Black Box". I removed the weights and spot-welded the advance plates, but CB sends a little plastic washed that will accomplish the same thing. My twin-spark distributor is just an 009, locked out, with some adapter hardware to get an early '80s Datsun twin-spark 4-cylinder cap and rotor to work.
I've got nothing against the Chinese copy distributors... if you lock them out anyhow. At that point, it's a tab and a shaft.
DO NOT USE A PERTRONIX points replacement module! They're horrible. Mine cost me a full year of tuning. Lots of the spark-scatter you see with a generic 009 is the module. I'm using a Compu-tronix (yeah, I know Pertronix owns them now, but the modules are better). Points would be fine as well, since it's just being used to generate a signal for the Black-Box.
The spark table can be as easy or as complicated as you want it to be. The Black Box has provision for a vacuum signal (instead of a throttle-position sensor) to determine load. It's not as accurate as the throttle position sensor, but it does work and it is fully customization. If you decide to forgo the "load" feature, you just start by setting up your spark table to mimic the 009 or 010 tables available everywhere (if you do a search). Once you get that how you like it, you can start playing with load. Or not. Everything works like a perfect, German 010 that was custom re-curved by Black-Forest gnomes, just for you. Setting it up for load is where it can get pretty esoteric, but it's cool and you can watch it in real-time as you drive down the road. One you get past "freak-out", it's really fun and useful too.
The software is Windows-based, and Windows 7 is actually perfect. Also, you can use your Mac, assuming you run bootcamp (you do run bootcamp, don't you, Mitch?). It's a tiny little program.
The difference is astounding. Everybody farts around with east Asian distributors, and just lives with whatever advance the thing gives you (or not). This is customization, and you can keep your crappy (but good-looking) distributor.
It's really hard not to love it.
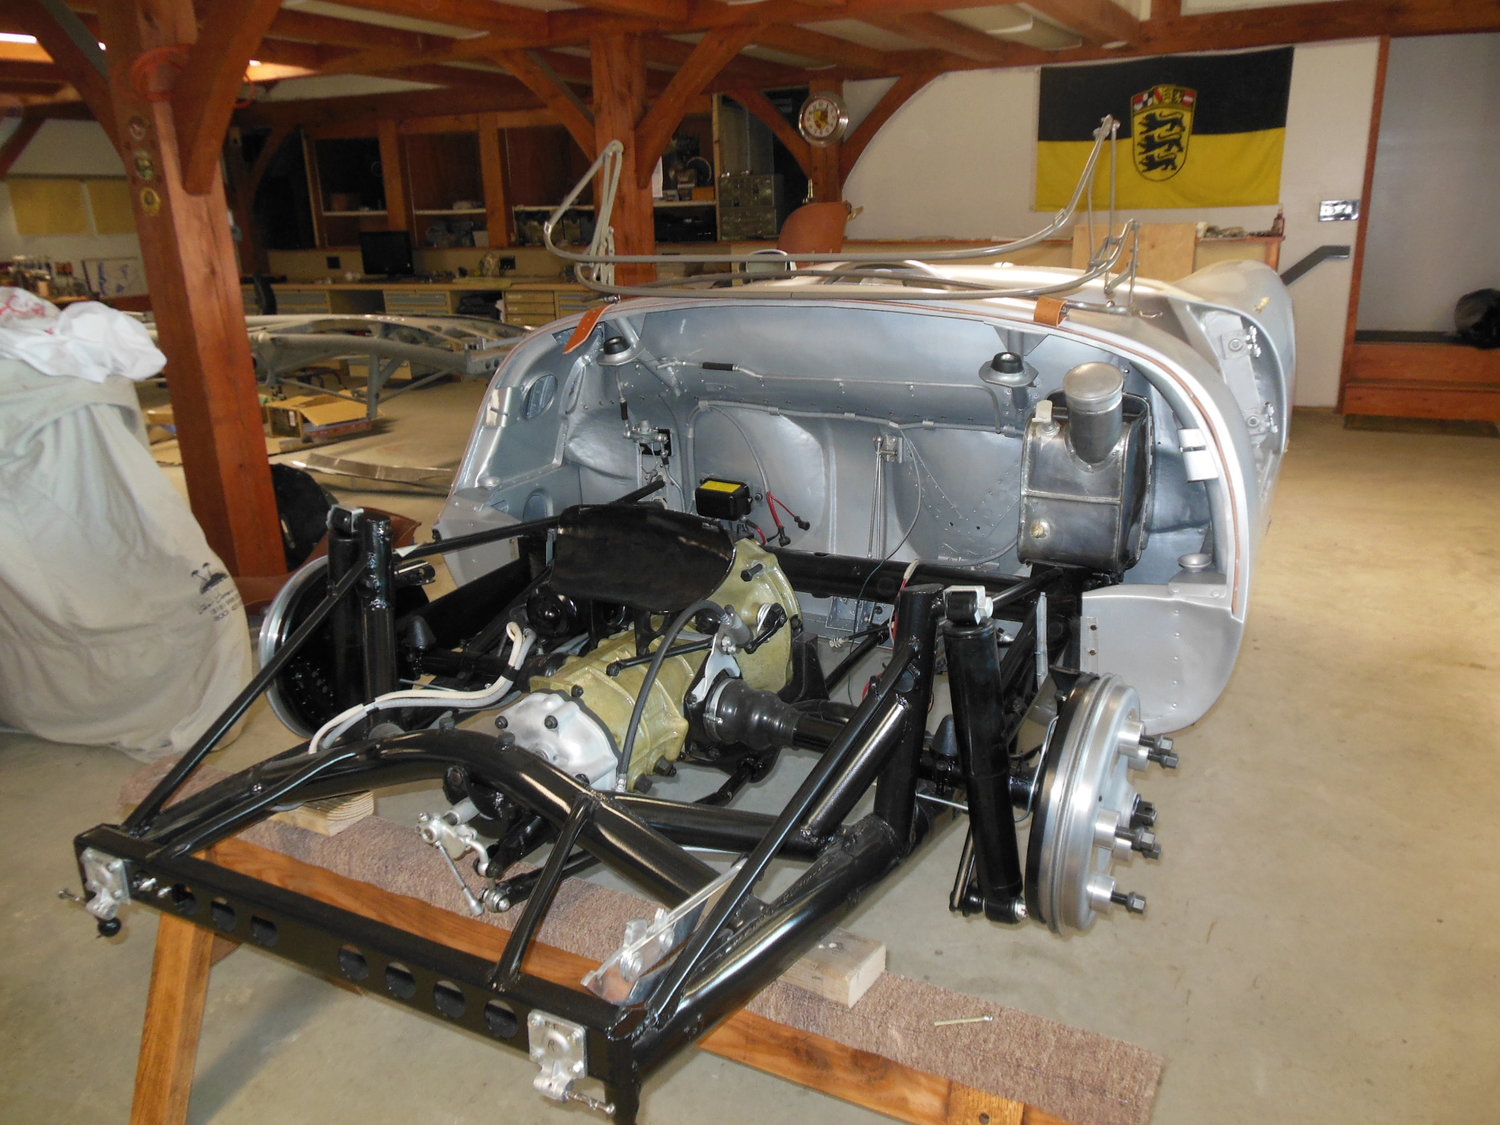
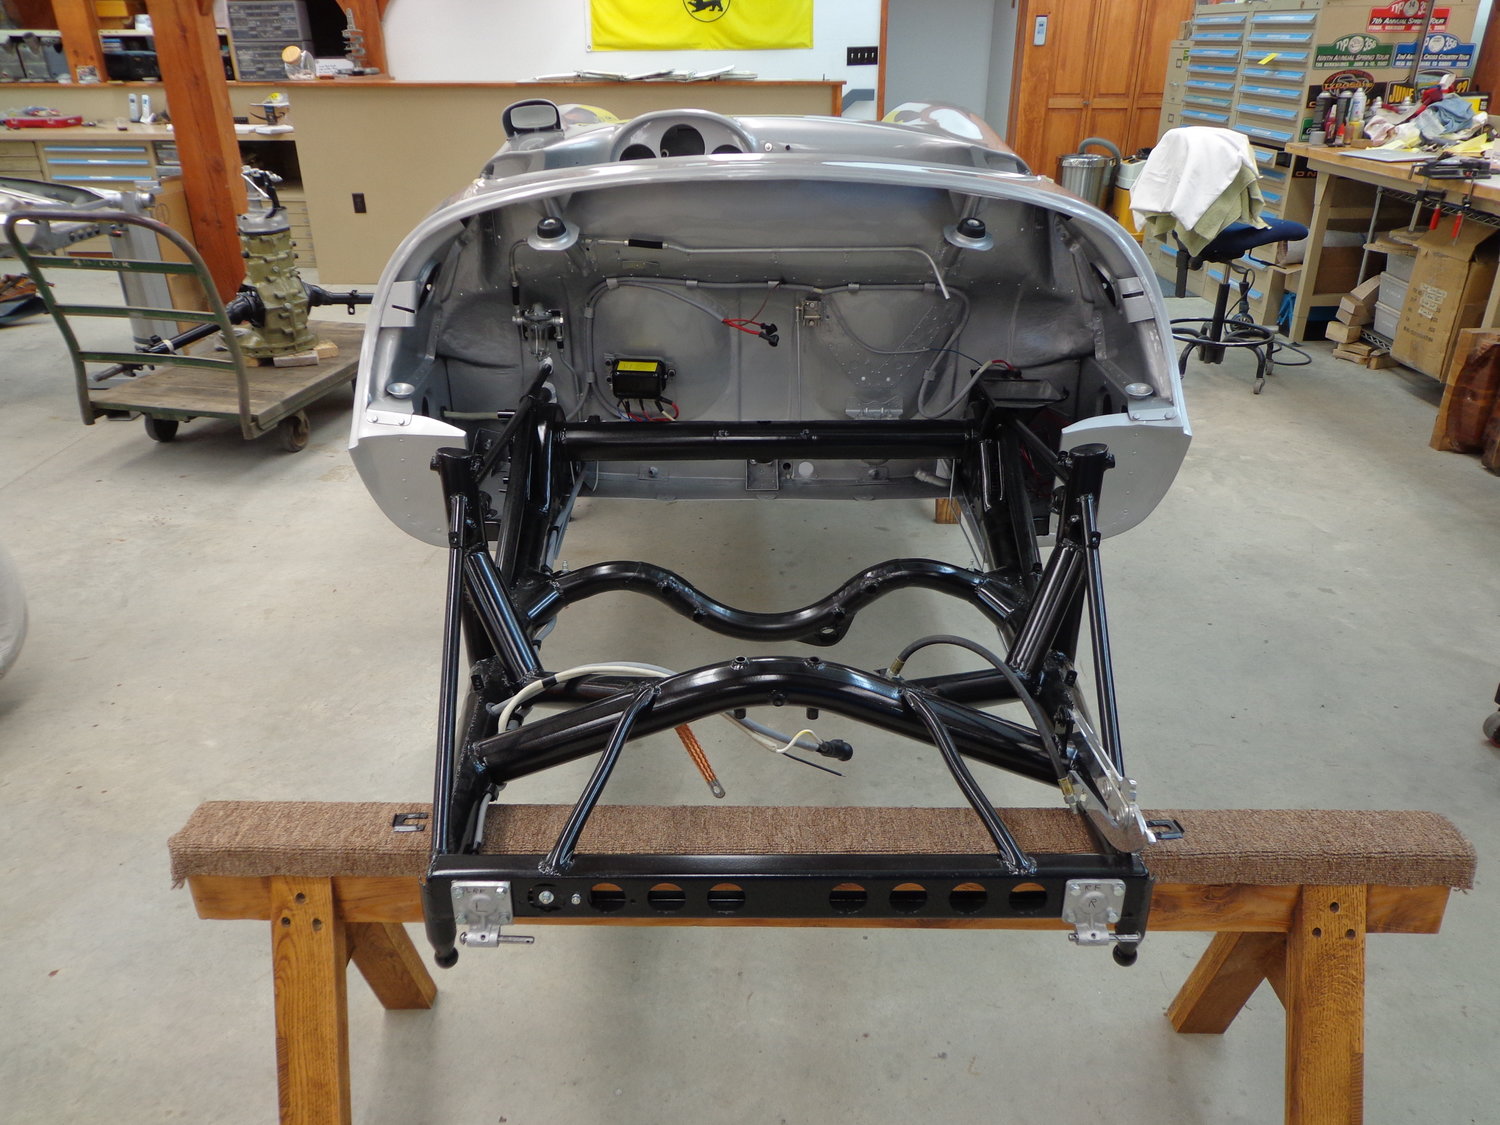
In Spyder-build news, I only got a couple hours in the garage today but it was fruitful: got my rounded-door-edge thingies hammered-out and this time they look pretty close to right.


As some of you may recall, I've tried to make this part several times before without success.
Comparison:
Attachments
Images (2)
Ed: Mucho bettero!
Mitch, buy this:
https://www.amazon.com/UGREEN-...al+adapter&psc=1
Then use the windows emulator thingie for your Mac, like Stan said.
Stan my friend: Spot on! I had no idea all the scatter was the POS Pertronix. The distributor I have is probably fine then, 009 from 2001.
Stan and Danny: Thanks for the updates. So far, the new CB Magnaspark seems to have solved whatever spark issues I may have had. But the Black Box looks like a good next step. If a Windows 7 laptop will work, that's what I'll use.
Ed: I see you're going for the plex windscreen, too. It's amazing the lengths to which some people will go just to win the Carlisle limbo contest.
DannyP posted:... I had no idea all the scatter was the POS Pertronix. The distributor I have is probably fine then, 009 from 2001.
I didn't either, until Mark at CB told me to use something else. They really are absolute trash. He suggested points, and if I put them in there, they'd probably last forever. But, I just can't do it-- too many bad memories of all the fuss.
Sacto Mitch posted:
Stan and Danny: Thanks for the updates. So far, the new CB Magnaspark seems to have solved whatever spark issues I may have had. But the Black Box looks like a good next step. If a Windows 7 laptop will work, that's what I'll use.
Ed: I see you're going for the plex windscreen, too. It's amazing the lengths to which some people will go just to win the Carlisle limbo contest.
Actually gonna install the Speedster windshield, pretty sure.*
The TR bodies came pre-drilled for the windshield endclamps, but one of the POs filled those in, so I'll have to re-drill. Easy-peasy with the Merklin Motors (TM) un-patented Windshield location device(s), but I've put it off until final paint prep gets started.
*That's it sitting on the cowl, upside-down. If someone gave me a NoMar or Lexan screen I'd have a dilemma.
Ed, I can give you measurements if needed. I'm going with it "may" be different than a Speedster.
With that car, I’d do lexan.
But Stan, Ed doesn't care what we think.
Ordered the Black Box.
I do care what you-all think. Thing is, I'm on a budget. The car came with a nice Speedster windshield and like two improved frames for it. A plexi windscreen from Fibersteel is $800.
It looks cool. But not necessarily more legit. Plenty of customer Spyders went out with full-frame glass windshields. And also:

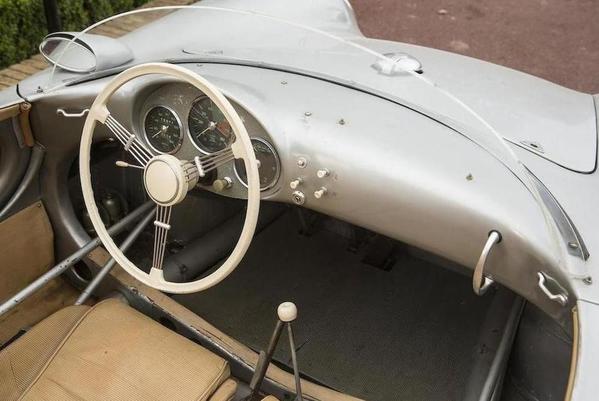
[This is 550-0051 (the car I am copying) in its post-Lemans/pre-restoration form.]
People who own these tend to say they prefer the glass screen as a practical matter. They also like wipers—which don't play so good with the plexi screen.
Finally, it has been alleged that, in some states, you need a real DOT windshield to title/register a road-going vehicle....
I gave this considerable thought, and the decision was made to install the glass screen.
That said, I also have some NoMar material I plan to do something cool with to make the windscreen more "period-cool." Stay tuned.
Attachments
Images (1)
Blog update. Firewall work.
Also:


Finally got those front-of-door curvy things done. Geez what a PITA! No wonder nobody does this. But, there they are, just a few rivets and some final smoothing and paint from final.
Attachments
Images (3)
Hey everyone, we just passed the 1-year anniversary of my ownership of this Spyder.
The anniversary of the build's start date is not until after Carlisle, but still. Looking back—and this isn't really meant as a brag, because I'm kind of amazed by it—so far, I've done pretty much exactly what I said I'd do.
I've logged every penny and hour spent and, by my count, I've clocked 656 hours.
Holy crap! That's about 100 more than I at first estimated (silently, to myself) the build would take.
Last week my wife asked how close to done I was. I figured about 85 percent. Right now I foresee a week's work (35 hours) on the wiring, about the same on body prep and paint, 20 to reassemble the car and put the engine in, and maybe 30-40 in sorting and detailing. Which, if accurate, means I'm closer to 80 percent than 85.
When my job went away last fall I thought I had a fair shot of getting this car built, titled and tagged in time for Carlisle.
As of now I think that's unlikely: I just accepted a new full-time job, so it's back to strictly nights and weekends on the Spyder now.
All that said, we've just passed a milestone, and I thank everyone again for your encouragement, advice and technical help. This build is entering the home stretch, and I am getting very psyched about it.
Congrats on the new job!
Try to maintain some balance by not letting it interfere too much with what's most important - building the Spyder.
Wonderful news about the job, Ed! I hope it works out well for you.
And don't forget, Ed, that we count on the wordsmiths among us to provide lots of . . . words.
As usual, outstanding work Ed! And I hope the job works out as well. Al
Congratulations on the new job Ed. Best of luck in both; completing the Spyder and the new job.
I certainly commend you ! I know and appreciate what it takes to do what your doing ! Many times I would go to sleep thinking about what aIl I wanted to do or how to do it. I'd wake up the next morning and lay there for a while thinking about it even more. On the freeway, driving home from work I'd be thinking about it ( That's a lot of "think time" out here in So Cal. ). I enjoyed every single moment of it too ! Thank you for sharing your project so thoroughly with us Ed,,,,,,,,,,,,,,,,,,,Bruce
Good news on the job, Ed.
They can only keep a good man down so long. ![]()
Good for you Ed on both counts!
Bittersweet on the new job, there, "Spyder Ed"....
Returning to a routine and doing something that you like, plus getting a paycheck for it is a wonderful thing.
Not having to look for employment is also a wonderful thing.
Having less time to spend puttering in the shop, and the instant gratification that gives, is somewhat less wonderful.
Life is a balance, I guess. Very glad to hear you're employed again. That means a lot!
Ed;
Congrats on your new job!
Great news Ed. You can always bring the spyder to Tour d’smo at the end of Sept. Looks to be quite a few spyders. Might even convince you to keep it.
Thanks, everyone. It's been an extra-fun spate of unemployment.
Bruce summed it up well.
I've often thought about this...

Attachments
Images (1)
Great news about the being back at work, Ed! Hope it all turns out well. ![]() @edsnova
@edsnova
I give up.......
Seduction Motorsports?
(although the door looks like a Ford F100 pickup)
That looks CG to me, and I don't mean my initials.
Gordon Nichols posted:I give up.......
Seduction Motorsports?
(although the door looks like a Ford F100 pickup)
55 Buick
I don't understand what that Buick door pic is doing in this thread. wuzzah?
It's 3rd base, Ed. Don't pay any attention........
Sorry Ed, all your "holy" work reminded me of those door panels/craftsmanship.
Well now that Ed has a job, btw congrats, you can now get a Holy Day off of the spyder project.
Made this today though. No holes (or, I hope there won't be when it's all done-done). 
Attachments
Images (1)
Common Ed, you really wanted to put a hole in there ![]() ... just kidding.
... just kidding.
And that is a...?
guessing gas tank go cart?
Oil reservoir?
It says “Oel” on the cap.
Looks like a dry sump tank, too.
Gordon Nichols posted:Oil reservoir?
It says “Oel” on the cap.
Looks like a dry sump tank, too.
Some of them say 710 on the cap. It confuses some people...
Fake dry sump tank/breather. It will function as a breather box and be positioned in the correct spot for a Spyder dry sump tank; it is scaled-down somewhat to make room for the Accusump, with which it will be cheek-by jowl.
Thus, my car will have its behind-the-passenger area of the firewall occupied by the correct(ish) looking and functioning "oil tank and breather components," as original.
[bows deeply; runs away cackling]
ooooo..... mores holes... looking good ![]()
Couple weeks ago, me boi Jimmy-da-welder took back my gas tank and the 3/16 plate I made to strengthen and shim-up the filler assembly. He was excited to use stainless this time because it leaves fewer voids, so he promised a nice smooth, no-leak finish.
Couple days ago I got it back from him and sho-nuff: smooth, shiny; great.
Now to drill out the five holes for the filler....

what the..

HEY!!
Three hours (and several bits) into it, I now have half a hole. Tried the small bits, the step bit, went to the store and bought some Milwaukee colbalt bits. Broke two of them.
Tried cutting fluid, tried without fluid; slow, very slow and not-so-slow. I tried pulsing the drill, pushing hard, not so hard and too hard. Pilot holes, straight in with the 5/32, everything in between.
I tried getting the tank up in my drill press. No-go.
I tried the internet. The consensus there, among welders and drillers, is, when welding with stainless stick: DRILL THE HOLES FIRST, THEN WELD.
Now they tell me?
Jimmy says he can drill it for me but I'm not so sure. I guess I'mma just give it back to him and cross my fingers.
Attachments
Images (2)
Yeah I could have told you stainless sucks to drill. Did you try oil?
An "OLD" trick we used on difficult to drill alloys was a blend of lard and sulphur.....
Never used it on stainless..... Just a thought....
“An "OLD" trick we used on difficult to drill alloys was a blend of lard and sulphur.....”
I think they use that at “Shultzy’s Diner”, too. At least it smells like it.
cutting fluid="oil."
You're gonna need a very thin oil to cut stainless steel weld. That stuff is beyond "wicked hahd".
Cobalt steel drill (nothing else seems to do it) and drill slowly with lots of pressure to get the drill to "bite". High speed on the drill just creates excess heat which anneals the drill tip and almost instantly dulls it while polishing the metal you're drilling so the drill can't "bite". Be very careful - it's easy to break off the drill using this technique.
Cooling and lubrication are key, too, but use a thin cutting lube, like less than 5 wt. I've had OK luck with 3-in-1 oil, but the best stuff I've found is sewing machine oil - about 1wt and clear - it drips like water. Walmart fabric department - Singer/Brother/Husqvarna all work well.
I had to drill through 1/4" stainless plate for my driving light mounts and went through two sets of Home Depot regular drills before I heard about the Cobalt Steel drills and oil from a guy who makes safety railings for sail boats. Old Navy CB who knew his stuff, but what he also said was "Always drill first and THEN weld Stainless."
@edsnova- have you tried carbide drill bits? They're expensive, but what I had to buy when drilling holes in hardened transaxle parts. Cobalt wouldn't as much as mark the side of a gear. One thing to note- they are brittle. When drilling through surface hardened gears (the hardening was a 30- .040" layer) I broke 3 bits when transitioning from the relatively soft middle to the other side. Up here a good carbide 1/8" bit is just over $20 (broke 2) and a 1/4" bit is well over $50 (only broke 1 but you can still guess how loud I yelled "F*&%K!!!!") but they're the only way to make holes in hardened steel.

The sides were cut with ceramic inserts; again, the only thing that would last.
Attachments
Images (1)

It is interesting how many old manufacturing sites all over the place have been converted to computer Data Centers in the modern era.
Why?
Because lots of places making, say, gears or castings or hot forgings had to either heat the metal up before forming it or harden the steel after forming (like Al's gears) and they did that in electric ovens. Those ovens got WICKED HOT and they got that way via electricity.
So.... Having that much electric capability in the site in the first place makes it easy to build up an electricity-eating Data Center. One of my old 492-drive storage cabinets ran on 208 volts, 3-phase at a steady-state of about 43 amps and we used a 60-amp wall plug - BIG sucker, half the size of a football. Gimmee POWAH!
Guys, I tried cobolt, dry and slow, pushing hard (broke a couple). I have a divot to show for it.
Carbide I don't have, not sure where to get since Scarie closed a few years ago. Hoping the guy who welded it can drill it. If not, I'm kinda screwed...
Desperate times, desperate measures, Ed.
Have you considered shipping the piece off to someone in Texas to have the holes done? Most folks there over the age of 12 are well-equipped to do the job for you.
What caliber holes do you need?
If Jimmy can't get it I'll get it to a machinist. Got a couple little jobs I need done.
Use an acetylene torch with very small tip. Heat drill spot to cherry red....not yellow or orange. let cool and drill with your cobalt.....Bruce
Now that's working smart instead of hard!
Bruce, thanks. I'll pass that advice on to Jimmy. He's not touched it yet; the tank was still leaning on his garage when I walked by today...
While waiting for my gas tank I'm fully all-up in the wires.

Also I got the "Black Box" from Pat Downs so I can make the bracket for that when I'm stumped about the wires...

Attachments
Images (2)
If anyone here has or knows someone who has a TR Spyder, I want (maybe need?) the supplemental wiring diagrams and instructions. My assembly manual refers to these but did not include them. Instead, I have


I believe this to be the wiring diagram for an original 550. As you can see, it is in the original German. If anyone (Anand? Looking at you) wants a copy I'll gladly scan it and send. It's not really that useful for what I'm trying to do.
Thanks all.
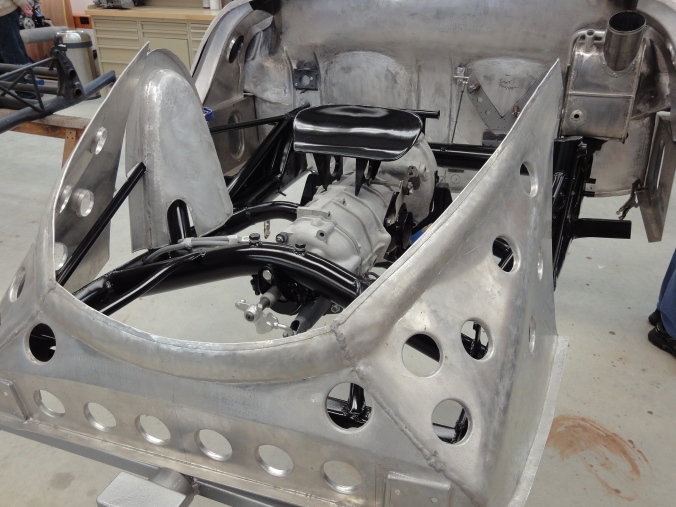
I've been away from the car for about a week (Bridget is now oil-changed, bearing-packed, washed and almost fit for Carlisle duty), and during some of the frustration gaps while slowly tracing Spyder wires I have completed the firewall bracket for the Black Box.

Here's a Spyder Factory copy of 550-0090's firewall, under construction:

And mine:

Attachments
Images (5)

No pic but momentous news: one of the Spyder club members gave me the key to the Thunder Ranch wiring harness. All color codes, saying what plugs into what. And it works! It's almost all correct, far as I could tell today in an hour or so reading the grid and checking/marking what I have.
So I should be able to get the car actually wired sooner than later.
..And now SMS informs me that the barber pole vinyl I ordered is ready to ship. Looks like I'm gonna miss having the car done for Carlisle by about a month.
"barber pole vinyl?" Please elucidate.
I would be great if you towed the Spyder to Carlisle as it would be a draw to see it " in progress" on the show field
Do you want a day or two of help on wiring and motor install? I may be able to help.
Thanks for the offers, guys.
Can't tow the car before it's titled and registered, and I don't think I'll get there in two weeks.
Also, still haven't made the tow bar system.
Also, I can't tow a trailer with Bridget. No ball hitch.
Wiring I'm pretty sure I've got a handle on, Danny.
The motor though—that might be a thing. My plan is to get the car wired and painted, bit by bit, hang the clam from the ceiling and put the back half of the Spyder on the body dolly that Alan forced on me last year, then get the engine hoist out, attach the engine to the transaxle and lower them onto the motor mounts. Then jack the car up and pull the dolly out, mount the rear wheels & hook up the lines, bleed the brakes, wire the engine stuff and start it...
then lower the clam back down, bolt it on, plug in the lights, and go for a spin.
I know I could do it all alone but, damn, having a dude whose actually built a couple of these—even just standing back, sipping a brew, pointing and laughing at me—could be a big help.
So hold that thought. Should be getting to this point in a month or two (depending on the paint situation). I'll put you up if you want to blast down here for a weekend.
Lane: go to the Google. Type into the search box: barber pole vinyl 550 spyder

Attachments
Images (1)


Attachments
Images (1)
Dude, you left a Big-A$$ed wrench lying in there.........
But the welds look nice....... You do-em?
That's a braze, and yes.
They say, if you can gas-weld(braze) you can Tig easily.


Attachments
Images (2)

reference:

Attachments
Images (2)

And that is a...?
Lane Anderson posted:And that is a...?
breather/collector?
PS- Great work Ed!


I thought that might be it, having seen yours, but I wasn't sure. Pretty amazing work, Ed, as usual.
That's a pretty big hole in the case. Of course, they made it that way.
Yeah I won't be punching a hole in the top of the case, just piping the valve cover vents to it a la Danny P's method.
It also won't fit exactly where the originals had them, since my engine has that big honkin' Type IV oil cooler in the way, and the DTM shroud covering it. But the mount looks like it will fit well on the trans bolt, and that puts the tube up tight against the oil cooler shroud, running up just behind the passenger side air cleaner, so the look should be pretty close.
It's an aluminum tube with brazed and epoxied bits—the epoxy needed after trying to braze new stuff near previous brazes. That doesn't work.
Filled it loosely with some copper wool and the aluminum turnings from making the holes in the mounting plate—artisanal aluminum wool. The top hose will go into my bogus "oil tank"
and I'll probably put a little mushroom breather filter on top of that and a second drain-back fitting on the bottom, mainly in case anyone ever dumps oil in it.
The result will be too much more breather volume than the 1914 would ever need: over a gallon by my lights. But it's mostly to get the look close to what it should be and, I think, too much breather volume doesn't hurt anything does it?
Nope.
And remember, Oh meticulous one, that the original 550 4-cam was a whopping 1,500 cc's.
If a big breather tube was good enough for Porsche and Glöckler it will be good enough for a "Tribute Car".
Yeah, don't have to worry, Ed. I don't think an engine has ever actually 'suffered' from too much breather volume.
My new deadline for Spyder is late August. I'm hoping to drive it up to Lime Rock for the Historics. I gotta get after this thing.
But today was not the day. I set out to do the 200,000-mile service on the Frontier this am (oil change, some grease for the drive shaft, this and that, plus a look at the front and rear brakes) and got stymied.
Bought 5 quarts of High Mileage Semi-synth and a new filter, pulled the truck into the garage, spilled a bunch of oil draining it (it clung to the pan and diverted away from the catch basin), ripped a hole in my knee on a screw the PO half sank into the concrete floor, cut off the screw, got the filter changed and poured in the new oil.
I then took my collection of part-full 5-quart oil containers and combinated them into one container. Mostly 10-30 semi with a bit of 5-30 and some 5-20 full synth. Had about four quarts total and I was very pleased with the prospect of using that in the truck's next oil change in about 5000 miles.
Checked the oil in the truck and saw none on the stick. Checked again and
oooh. ****. REALLY?
Yup, really. I'd forgotten to put the drain plug back in.
So that was...messy. I reckon about a full quart came over the basin. $26 of new oil into the recycle tank and on the floor. I put the drain plug in, poured the mutt mix in and set about fixing the squeal the truck makes on start-up. Figured a little more tension on the inner belt might do it.
Climbed under to get at the lower idler pulley. The center bolt did not want to loosen. Finally got it a little backed off, put the wrench on the adjuster bolt and...
Broke the head off.
Seriously??
So that was fun. I didn't have another bolt that was right, but I did scrounge up one that was longer and, by turning it through a die for about three inches, then cutting an inch off the bottom, I made it work.
Those of you who know something about mechanical things already know that my new adjuster bolt got me nowhere near fixing the incessant squeal. Because the bearing in the pulley is shot.
So I put it back like it was. Fought it to a draw.
By this time it was raining, so I backed it out of the shop and brought Bridget in.
I'd hung laundry on the line though...
So I moved on to beers.
Some days it just doesn't pay to get after things with the wrenches.
Oh my. Those kind of days just you wonder why am I doing this? Hang in there!
 This one's for you...
I feel for you Ed.... Years ago I changed out a bad oil pressure switch on a Miata, it was a blind install I had to feel for the oil pressure port but there was also a boss right next to where I needed to be on the head that happened to be the same size hole as the oil pressure switch and that was where I wrenched it into ..... Started the Miata and in an instant five quirts of oil blew out of the motor ...Clean up in isles 1 & 2 ~ I was throwing down throw rugs, blankets anything I could grab.....
Ed, someone gave me a new chain saw for a gift about 20 years ago.
It's still in the box, never used.
Every time I think about firing it up, I remember all of the days I've had over the years like the one you just described and I put it back in the box.
...So I moved on to beers...
I'm opening 1 right now to join you so you're not drinking alone. Friends don't let friends drink alone (and you know, now that we've met, that that's the kind of guy I am!![]() ). Cheers!
). Cheers!
Your buddy Yoda (uurrrpppp!)
I saw someone SawZall a rusted spring hanger, as the blade made it's way through it took out a new rear tire ( not me !)
I've head plenty of days like that recently with my wifey's coupe build. It's taken me three months to finally get a hard brake pedal. Really? Three months? It ultimately came down to replacing the entire front disc brake kit (EMPI was the first kit - yes, I know about EMPI brand, but that is what Greg gave me and what he will be getting back). Once I switched it out, I had to make two new hard lines (which I've mastered doing) and FINALLY - it worked.
There were several beers and Jameson involved the past three months...
The wiper motor works and I'm only two or three wires from sorting it to the switch. What a pia though.
Took a break from that and dry fit my windshield. Drilled the holes, cinched it up loose without the tensioning rod and started CAD-ing up the side screens.
Question: are there rubber gaskets or something to fit under the windshield posts? Looks like there ought to be and I'd rather buy than make 'em if they're not NLA. Someone chime in please.
Also, excellent news today from SMS: a UPS tracking number for my interior material. Supposedly it's coming tomorrow, a mere six months after I ordered it.
Attachments
Images (2)
Motor: Low High Part and Ground...tap the wires quickly with low amp setting from a battery charger and see how it moves
From memory ..I think,
52a low 53b high 53 to 12v hot ( for park ) 31b 12v in 31 ground
Windshield posts, in the past I made rubber gaskets, now I just squeeze a ring of black latex caulk around the post hole in the body, secure the post and wipe away the excess caulk
I recognize those side curtains templates from Merklin Motor Works:~)
Here's what VS does:

Stoddard has this for six bucks (per).
That may be the cheapest thing you can order from Stoddard. Using it would allow you to casually slip into conversation the fact that some of the parts for your build are sourced from Stoddard.
Something to think about.
Attachments
Images (1)
Fender welt works to.
I think Greg from Vintage motorcars uses some edge trim for the windshield posts, same stuff he uses for the license light, headrest/fairing, and engine grilles. It's about a 5/16" or 3/8" U shape.
Thanks, guys.
Alan: my wiper motor has no markings for 52a, etc. Just wires that went into a plug you're supposed to plug into the one on you Super beetle. hence the hassle. I got high and low power, and the ground, and I have to ground the body again. There's also a blue wire that kind of goes off somewhere. probably for a washer motor? And then two in the bundle that don't seem to do anything. I can ground them, leave them loose, twist them together or touch them to the + battery terminal. Nothing happens whatever I do with them...
But I'll sort it. It's just a dang wiper!
Per the template: I just made those. I should have looked in my pile of Merklin Magic (TM).
New blog to catch up on a lot of not-posting.
Alan is right, Low, High, Park, and ground. I'll get the colors for you.
Beetles didn't have a washer motor, remember? Hose from spare tire to washer reservoir. Washer "switch" is actually a valve!

This is basic half but this is what I do with wiper motors when there are no terminal numbers .
Using the lowest amp setting on a battery charger I clamp charger negative to the wiper motor housing .....stay with me.
Then I very quickly tap against one wire at a time until I get movement, if I do then go to another wire until I find the one that moves then stops ( mark that as your constant 12v for the park position. Now go back to find two wires that will energize the motor..One will move it faster than the other ( mark low and high wires) REmove the black off the motor housing. Lastly keep your red from the battery charger to either the high or low wire and then take the battery charger black and tap that against one of the couple remaining wires until you get motor movement ( this is your ground wire)........ It's now beer thirty ~
I have received five yards of "Barberpole" vinyl from SMS. Just under six months after I ordered it.
This is the stuff that was in Spyders in the day. Called my upholsterer for a long-delayed appointment & hope to get the seats, seat heaters and material over to him this week if possible.
Also handed off my gas tank to a machinist buddy. He couldn't drill the stainless welds either so he plans to cut the whole thing out and mill a plug/flange to fit the hole. So, fingers crossed that'll get it.
Cut my shorty Troy-inspired cruisin'/Ralleye side windows tonight.

I've got the hardware to make them fit and now just have to get the gaskets from McMaster Carr. Thinking this should do it. But would like advice.
I've got more Lexan to make the taller side windows but I'll wait until I have a top before I cut those.
I'll finish up the wiper system this weekend I think. Gonna go with the super skinny early wipers to make them look more like they might have come with the car.
Attachments
Images (1)
Other inspiration btw:

Attachments
Images (1)

Sorry I haven't been updating. The lift broke last week. Got a seal kit for the hydraulic cylinder and just pulled that heavy bugger out of the lift.
Meanwhile I got my gas tank filler sorted, I think. The guy I sold Bridget's old engine to a few years ago thinks I gave him such a great deal that he owes me some work. And he's a machinist. I said "naw, man" but he insisted and so I felt cornered into letting him solve my problem.
(BTW this is the guy who built the fake Lambo I posted here a few weeks ago. He also made parts for police and Coast Guard helicopters).
I think we're ready for final welding on this. Then I can finally Por-15 the tank and be done with that little adventure.


Attachments
Images (6)
That filler looks REALLY NICE!
Yeah. Nicest thing on the car, so far!
I assume that that flange is designed to accept your fuel gauge ? If so, I'm sure you have already thought about making the fuel sender float lever a little longer ?...Bruce
The sender goes in the stock location, Bruce. The new flange is for the filler neck and cap. Same bolt pattern, six inches higher up on the tank—closer to the spot Ferry intended.


Anand, love it. Who is the vinyl vender?
SMS in Oregon, @Marty Grzynkowicz
they've got the original tooling, I’m told!

aaaaand... I shot decaf out my nose.
Yep, that's what I'm shooting for, Anand. I hop you don't mind if I steal those pics for my upholsterer.
In other news, I got my lift cylinder out and apart, and I'm pretty pissed off. I noticed something odd last night when I set the thing in the vices:

That's the spot the fluid has been leaking from, right at the top of the tube. The hole faces up so it's out of sight, about a quarter inch from the bottom of the ramp. You can't see it without removing the cylinder.
I know what you're thinking. You're thinking, "Hey. Ed, that's just a threaded hole. Shouldn't there be some kind of one-way check valve screwed into it?" At least, that's what I was thinking.
I set that thought aside while figuring out how to get the thing apart. Managed that feat about a half hour ago, and


Wow. Kinda gunky innit? Let's clean off that gunk and see what we have here....


Rust. How about that? Kind of surprising given how young this thing is, and it's never been wet and...oh but wait. It's had a hole in it the whole time I've owned it. Plenty opportunity for some lovely condensation—to say nothing of the shop dust I've been making—to get in there.
I checked the innerwebs and guess what? Turns out there is supposed to be a pressure relief valve. Something like this.
I know what you're thinking though. You're thinking "well, that rust isn't gonna hurt nothing. Now, if the cylinder walls were pitted, THEN you'd have some problems." Right?
So why don't we shine a light in this ol' tube here and see, shall we?

Yep.
So now I've got something of a dilemma. I could rinse the cylinder out with a mild acid, make a big copper wool Q-tip out of PVC and clean it with that, flush it out with water, hose it down with WD 40, put new seals on it and see what I got.
OR I could raise holy Hell with Derek Weaver on Monday because this **** is bullshit.
What would youse guys do?
Attachments
Images (7)
Sorry, Ed, I don't remember the details- did you buy it new? If you did I think you should be on the phone first thing tomorrow morning...
Ed;
Who is the manufacture again?
Ed,
I would give the manufacturer a chance to make it right before I mustered my righteous indignation. Keep that powder dry in case you need it later on. Your pics present a compelling case.
Thanks guys. Yeah, Derek Weaver, Direct Lift Pro Park 8, purchased new just about two years ago. They were good on my first call. The unit shipped missing a one or two of the big hanger bolts for the ramps. I was able to assemble it with the almost-as-long bolts that shipped with the steel "crate" they used to ship it, and swapping those out for the right ones a week later was painless.
When it leaked the first time a few months ago I called them and was told it could be normal. A little juice often gets past the seals when you first assemble it, yadda yadda. I wanted good news so I cleared it (raise it to the max with no load) and carried on.
The bad leaks a couple weeks ago were much worse than the first one, and the ramps weren't very high. That's when I called again. This time they're like "you need new seals." I was all like "Fair enough, you should give them to me." They answered, "your warranty on the hydraulics is one year."
So I paid $110 or something for the seal kit, grudgingly, thinking why should the seals fail so quickly on a little-used lift that seldom has much weight on it?
And now I know.
The old seals are very clearly abraided flat where they ran along the now rusted bottom of the tube.
So yeah DW gets a pleasant call tomorrow and they will be given the opportunity to send me, at no charge, a new cylinder.
But if they decline I'm not sure what I can do. It's maybe a $600-$800 part retail, I guess (so far I can't find the exact one for sale), so there's no way I win with a lawsuit.
I suppose I could just clean it out best I can, buy a proper one-way pressure relief valve (also not apparently available on the DW site), muddle on and bad-mouth the company forever but that's not a real palatable option either.
Guess we'll see how they do.
Ed,
In your case, Maryland Small Claims Court would be a viable option, with its $5000 limitations. You may want to mention to the maker that you hope you can avoid the above, but you will exercise all legal options if you can't work out a deal that is satisfactory to you.
Suing a corp. has some specific conditions, but nothing you can't overcome. PM me for more info if needed.
I find a lot of companies with the proper picture proof and a bit of persistent will come good for you. Patients and persistance is all you need... You can say the same thing nicely and persistently ![]()
I have an old brake cylinder hone - fits on a hand egg beater hand drill or slow speed drill.
Yeah, like my wise old aunt used to say, you catch more flies with honey and intimations of looming legal action than with vinegar.
Thanks, all. Jim, as a function of my current job I visit four different courthouses every weekday. I know I could file but I'd hate to have to; never yet sued anyone or been sued and I like it that way. I will be contacting you however if this goes wrong. Ray: yes, me too. I've written many a persuasive letter over the years, and so far almost everyone I've had to contact has been reasonable. Greg: thanks very much for your kind offer. Don't dig that thing out just yet; instead please use the time to attach parts to your Speedster and wait for my contact.
I just emailed DW my illustrated story. I'll follow-up by phone tomorrow and hopefully we can sort it.
P.S.: Mitch: your barberpole vinyl sport coat is art. Thank you for classing up my build thread with it.
Ed, thanks for a million little details that most of us probably never even suspected about the 550.
Barber....whaaa?
Mitch, nice photoshop!
Ed, that sucks about your lift. Mine has two cylinders(Harbor Freight). I hope mine doesn't do that!
Update from Derek Weaver: The hole is as it should be: a single-action cylinder needs to let air in when it relaxes, so on one-way valve would work. They say they're going to forward my issue to the mfg anyway to see if they'll treat it as warranty.
I'm gonna start making my giant copper wool Q-tip though & see about @WOLFGANG's hone.
@edsnova Let me know if you need any more info -- I'll send you as many pictures as you'll tolerate!
@chines1 has done a really nice job with these seats. We've put a slightly thicker cushion like the speedster on the bottom (it isn't as thick as it looks in this photo). Carey's in house upholsterer, Bill, is unreal. He's got an original Pfaff sewing machine too. It's pretty cool.


Attachments
Images (2)
Arjani, thanks. I wonder how they made the back panel on it. My guy suggested using carpet & I figured that's fine, but what've you got going?
All: Derek Weaver says Direct Lift (the mfg) is not gonna give me anything: "If you would like to replace your cylinder the part # is
YG02-9100G 633.40
Freight to zip 21085 is 87.63
"If you don't replace the cylinder, I would check locally to see if you could have the cylinder honed before rebuilding it."
So, I'm bagged for $700+ after two year's light use of a $2,200 item. Not too cool.
Best I can figure is I should have stored the lift at max-up during the winter, so the tube would be filled with oil instead of air and water condensate. I'm gonna review my owner's manual and look around the inter tubes to see how common my complaint is.
Meanwhile we'll see if my local lift guy thinks a hone job is in his wheelhouse, and how many smakeroos that might be.
Interesting. So that's gotta be hand-stitched to finish, yeah?
Update: Jimmy brought my tank to me after work. Now I just gotta POR 15 it this weekend & we'll be all done.


--Well, that's not quite true. The filler cap will need some attention and fettling, and I've still got to file away a little more 'glass around the hole. But still.
Attachments
Images (3)
Sure a lot of messing around to get some things right and be pleasing to the eye when finished ! Good job ! Sr. Ed
Update: The lift broke and I ended up honing out the hydraulic cylinder before replacing the seals, plugging the breather port on top and tapping a new port underneath which is now plumbed back into the oil tank so that any future leaks just return to the source and any air getting into the tube is from the tank, five feet off the floor, instead of two inches from the concrete. PITA, as they say, but it seems to work now.
Gas tank is sealed with POR 15, the few pinholes in the exterior welds (which did not leak) were epoxied, and the tank is primed and painted matte black for now
Interesting fix, does it drain by gravity to the tank. Any pictures, of that cylinder fix.. ![]()
Yes.
Here's the cylinder back in, with the hydraulic line reattached.

Here's the new drain line on the other end. It's 180 degrees and about two inches inboard from the old one, which was drilled into the rough iron "cap" that's welded to the end of the pipe and carries the big holding pin (not visible) that anchors the unit to the ramp.
I tried to do this one the same way at first, but trying to drill an L-shaped hole into that stuff cost me a few drill bits. After the second one broke off below the hole I just called it a day, filled it with epoxy and started over.
I tapped the new hole just at the outside edge of that weldment, and had to dig around for adaptors to get the elbow with that quarter-inch hose to screw in with a low profile so the ramp won't land on it when it goes to the floor.
strung the hose to a spot near the main hose and drilled a hole, added a grommet, and...
Taped (and then zip-tied) the two hoses together, and drilled another little hole in the top of the oil tank. The drain hose extends in like an inch or so. You don't want it down in the oil, or the cylinder will suck oil into the "air" side when the lift is lowered.
Lift is back as good as new. Better, probably—except there's some pitting inside the cylinder I couldn't do anything much about.

Decided to get after the front inner fenders today. Smoothed out the "lip" where the body meets it and skimmed the rough fiberglass mesh and chopped areas.


Another skim coat or two, a bit of sandpaper and this part will be ready to prime. Still pondering whether to close off the inners around the shock mounts like Arjani did. Leaning toward not.

Attachments
Images (8)
So here is a pro tip I discovered serendipitously that you-all probably already know—but maybe not?
If you want the tail sides of pop rivets to look like regular rivets, just hit them with the flapper wheel on your grinder. Et voila:

Attachments
Images (1)
Final stuff on the firewall today: wire harness clips and fuel line clips.

Again, comparing:
Scrubbed-out the tub pretty good and hit all the bare metal with some etching primer:

Attachments
Images (2)
Ed,
I'm impressed , mentioned the Spyder to my painter today. PM when paint is in the near future . BTW black in not on the menu ~


Attachments
Images (3)
If that's the color you're going with, Ed, I'm on board. Are you painting it yourself, then?
Tip on the e-brake mount:
After you figure out the angle you want the lever to sit at, drill a hole through the clamp and the mount for a set-screw. There is no way that the clamp will squeeze tight enough to stop the lever from rotating. Ask me how I know LOL!
Thanks for the tip, Danny. Will do.
Lane: I'm gonna paint some of it—mostly insides and underneaths—and then look at it very carefully and consider my options. The smart money is on me getting a real painter to do it in the places people are likely to notice.
Next up: inside of the wheel wells.
I have some truck bed liner.
Pretty sure originals were smooth in the wheel wells and body color.
Yep. Plan to do the 2k liner smooth, if/as possible, then paint it blue afterwards. We'll see how it lays down.
...Ed, Today, used a good quality black chip guard rattle can in the trunk of a speedster , it came out great and could be painted over.
Stuff I got is branded "Custom Coat." It's a urethane 2-part and the hardener is from UPol. It's got some texture and I plan to at least get it inside the tops of the fenders to keep any rock chips from spider cracking it. There will be some in the frunk too and inside the body voids along both sides behind the seats but in front of the clam shell.
We'll see how it lays down then figure how much to put where.
It's also gonna be tinted silver, the idea being that anywhere that is not covered with French Blue paint will reflect light in a manner similar to aluminum.
Inside of front fender (per Spyder Factory):
 Looks to me like a little roughness in there is "period-correct."
Fuel tank is very big and made of hammered steel.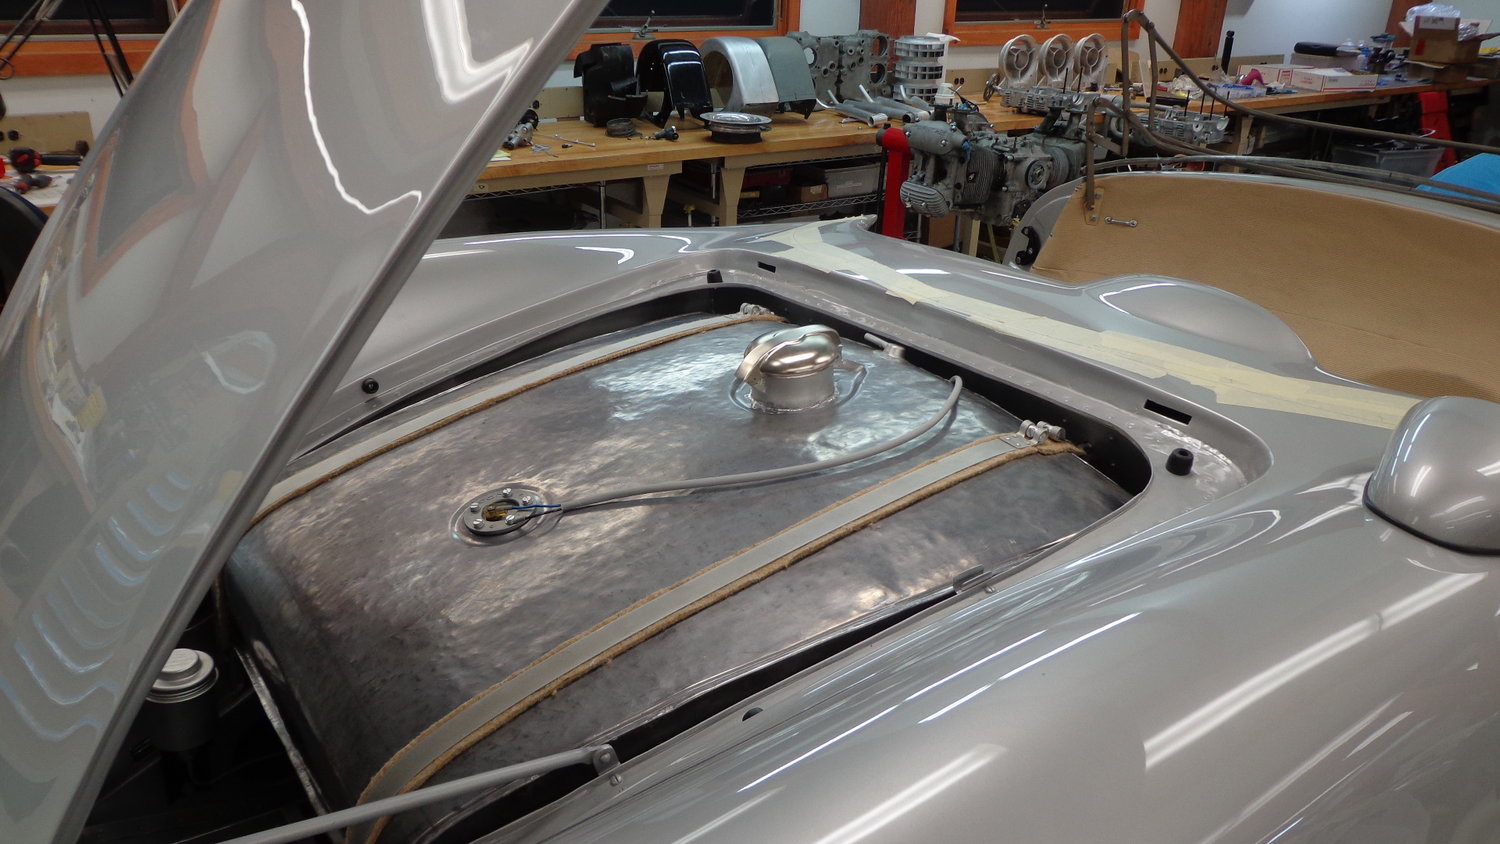 Hammer-tone paint is a start...
 ...but we'll see if there's something that can be made to make it look better.

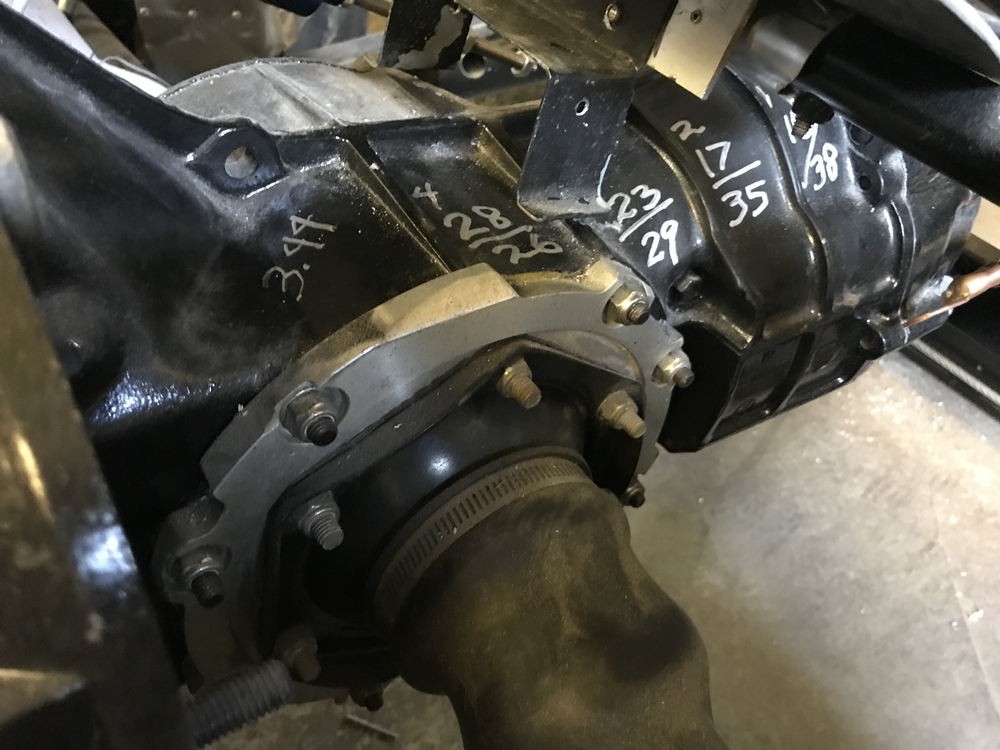
I like how they painted the gear ratios on the trans so the pit crew would always know what was what. That's an easy one!
Attachments
Images (3)
Spraying primer tomorrow in the fender wells, and then maybe truck bed liner if things go OK. Will post after.
Broke out the old-school spray gun for the primer and bed liner. Got it done but, in retrospect, a modern ultra-cheep HPLV gun from Harbor Freight or somewhere probably would have worked better. The #30 tip on the '60s-era Devilbiss seemed a bit miserly with the coverage....
But anyway.


It's hard to see the silver color of the bed liner in some of these pics, and the texture is very slight—it's a bit like 120-grit sandpaper.


 My rough finish is very apparent in the driver's fender well, where these wheel marks look like hammer marks. You can't even see the silver in this shot, let alone the roughness of the coating, but my tastefully-sloppy body work shines right through!

(again, for reference, Spyder Factory's meticulous high-buck all-aluminum recreation):
As this product is a 2-part urethane, I believe it can be top-coated with my body-color paint directly, but will double-check before trying that.
All-in-all a good learning day
Attachments
Images (8)
Honestly, once you get a few miles on it, nobody will notice a dang thing. Road grime, tar, and rock chips will even it all out. Looks OK to me.


Are those the 16's?
I don't think the Vintage 190s come in 16.
15s.
There are no Vintage 203s as of yet.
I see what you did there!
edsnova posted:15s.
There are no Vintage 203s as of yet.
Ed Ericson wins the Internet today.
This is going to be one fine piece of art.
I just gotta take a day, and drop in on Ol' Ed and get up close and personal with this build. Plus check out his cool but rusty lift. Before it gets cold . . .
Still fettling those last couple of inner panels. Remade one of them today, testing to see if the clam latches can still be installed with them in place. drilling for wires and such to go through.
I also re-bent my middle fuel line to go inside the frame rail instead of outside. Turns out that's the correct routing on the original car.

These will be clamped to the tubing.
Kelly, come on by. I'll beer ya.
Attachments
Images (1)
Wires now.


Gotta string them through the rocker boxes before riveting those in. Started with the grommets.


Got the passenger side—no wires—already done. This side will be all but hidden behind the Accusump, but I will touch it up before final assembly.

Attachments
Images (7)
The dreaded wiring...................
Should you run into wiring questions give me a call ...I am in my WV mountain campsite office this week.
Attachments
Images (1)
I actually don't mind wiring in new stuff.
From figuring out what needs to be done electrically, through laying it out to be neat and unobtrusive, to the actual soldering and connecting, it can all be kind of satisfying and almost therapeutic in a way. Especially if it all lights up as intended when you finally throw the switch.
It's untangling and making sense of the mess that someone else has created that can bring tears to a grown man.
Hey Alan...... Looks like you left the garage door open.... ![]()
Ed.... I know you will have it wired up in no time...... I would like to suggest that you bond in extra ground points under the dash and paint over/seal them ..... The car is looking GOOOOD......
Ed, are you using cloth wire tape to wrap the wires .... it works great and is easy to peel off if you need to access the wires, provided of course you leave areas where the tape is cut.
Thanks, guys. This is a complete wire harness from Thunder Ranch which came with the kit. It's supposedly tested good but also has some wonky switch gear I'll need to change out and of course the gauges I have are a little different and then there's the Accusump and some other details. So it's sort of half way between DIY and sorting-out the PO's mess.
Ray I'm wrapping these with a nylon mesh loom that sort of snaps around the wire bundle and then stays put. Easily removable and similar to the OG stuff, though it's the wrong material and black instead of off-white—which I think will look better on my firewall and lashed to my frame rails anyway so I'm leaving it that color.
Also, zip ties.
Once I get the back end roughed-in I'll get under the dash, and yeah, there will be redundant grounds and grounding lugs in the car. The - side of the battery is getting its own wire all the way back.
With the wires in I'll move on to final body work, placing the mirror, cinching up the windshield and testing the wipers, drilling for the emblems, block sanding, before taking it all apart for paint.
(There are one or two more WTF detail projects I'm planning to do before final-final reassembly, but both could as easily be done after paint, so...)
Sacto has nailed it wrt wiring. Back in school us MEs had to take some EE classes and labs, and I was the only one on my team that could take the wiring sketches for the lab that we dreamed up, and actually hook the shyt up right. As to the Speedster, I have lived the nightmare of having to deal with what JPS scrabbled together under my dash. Wires are either white or red, and that's about it. One time, Dealing with reworking my tach so it actually functioned like a tach, when putting all back, I switched the alternator light wire with the instrument illumination wire. Was a pretty big mystery for a while trying to figure out why the dashlights would dim and brighten when running at night and the battery would run down when driving during the day. You figure it out.
Noticed just the slightest bit of slop in the homemade pedal action and the copper pipe bearing/bushings still had the tiny bit of swage on the end from the tubing cutter, which made me think they'd tend to get sloppier over time. So I bought these nylon bearings from McMaster-Carr and spent some of the weekend re-bushing my pedal set to make them better.


Did some similar cleanup on the gas pedal action. Re-painted the left two, added a lil grease and popped the covers on, then installed them in the car.
Ready for final adjustments.


Now they're smoove, baby! Back in the car so I can make the floating floor pattern and knock that chore off my to-do list.
Attachments
Images (8)
Nice!
Love that rats' nest in upper left of pic. Some more serious problems await you . . .
Hope those plastic bushings hold up. Keep 'em greased, lithium based is the ticket, I think.
Floating floor pattern #1.

Attachments
Images (1)
Looking good!
Thanks! It's close. Might need to shift the pattern about 3/8 to the left.
Frazoo (re the plastic bushing/bearings) These are McMaster-Carr PN 1281N19 rated at 110 pounds at 40 rpm "dynamic radial load capacity," which I have no idea what that means, but 110 pounds sounded like enough for this application.
I bought them to fill the very small gap between the ID of my copper pipe bush and the OD of the bolt/shaft that the pedal rides on, and they do that very nicely. They look a lot like the ones I pulled out of my '67 Nova's pedal set when I changed over from the Powerglide to a manual transmission, and those were vintage 1967 when I looked at them in 1982 and put them back (with a little grease), and they were still working fine in the car when I sold it in 2003.
The EMPI pedal set I scavenged to make these features a steel-on-steel pivot hinge—no bearing or bushing and no grease fitting. I thought my copper idea (plus grease) was an improvement on that, and the new nylon bushings would improve it still more.
And that's about all I know about that.... so:
If you or anyone here knows something relevant to this install and application about the forces a driver puts on brake and clutch pedals, please chime in publicly or privately. I'm keen to learn new things, and if it's necessary, I'd much rather re-do this now than hear gripes two years from now from some dude who paid me a lot of money.
Re "rats nest:" That's a fresh wire harness with most (not all) of the wires already labeled. But you're right, it's still going to be a pita.
Well, my first thought was “Why not bronze bushings, drilled for grease fittings? They would last Fo-Evah!
But then you wrote that Chevy used Nylon bushings on their pedal pivots and those worked OK, so what the hey? I remember some REALLY beefy clutch pedal effort in a lot of those old Chebys and if they survived, then your Spyder (oops....Can I call it that?) should be just fine.
Rave On, Spydah Man!
Oh, and don’t listen to ALB’s potential advice on that floating floor thingie-jingie. He’ll try tah get’cha tah drill it fullah holes, fah sure.
(Sorry, Al...)
Gordon Nichols posted:Well, my first thought was “Why not bronze bushings, drilled for grease fittings? They would last Fo-Evah!
That was my first thought as well.
But then I thought, “you know, he’s out there building a car, and I struggle to wax mine”, so I let it pass.
Floating floor.


Attachments
Images (3)
Nicely done, Ed! Isn't it great having access to nice equipment?
And @Gordon Nichols- if you can- why not drill it full of holes?![]()
Stan wrote: But then I thought, “you know, he’s out there building a car, and I struggle to wax mine”, so I let it pass. ...and that made me laugh, in a good way:~)
Upholsterer says the seats are coming along.

Meanwhile I've got the floating floor mostly assembled. That's just 1/4-inch birch ply so I stained it, painted the edges then sealed it on all sides with Pelucid

before gluing and screwing the purlins to it. They're seasoned, treated pine so all done shrinking. They got a coat of Pelucid as well, and then one of Minwax Helmsman's spar urethane. I also put a reinforcement "plate" of additional 1/4-inch plywood under the driver's heel.


Attachments
Images (4)

Hey!
Where’d ya get the rubber floor mat material?
Looks superb!
Nicely done on the floating floor!
I made some mats for my car with that same ribbed rubber flooring. I got mine from Lowes.
Amazon.
Rubber-Cal 03_167_W_FR_04 Fine Rib Corrugated Rubber Floor Mats, 1/8" Thick x 3' x 4' Runners, Black
(I know it's not exactly correct; the original cars had vinyl down there, basically the same as the barber pole stuff on most of the seats. But this is pretty close and it's made to have feet and shoes on it alla time so).
Installed. I still gotta rivet in a couple of little tabs on the front firewall for this to slide under, and I plan to drill a couple holes through the rear corners, tap through the floor with rivet-nuts and use black, allen-head furniture bolts to cinch it down. But...later.


It's not a perfect replica, but not a bad likeness—if I do say so my own self—for an amateur making stuff out of junk. Here's 550-0056's pedals (courtesy Type 550.com)

And mine:

Attachments
Images (4)


Very nice.
Ed your pedals look awesome compared to the others ![]()
Looks excellent Ed!
Wonderful work, Ed.