Hello to all,

Over this weekend I went for a drive and noticed that when I let-off- the-gas, the accelerator pedal was not coming up (sticking), and went into "cruise control mode", although I have NO cruise control installed. I had to pop the peddle a few times with my foot until it came out the whole way. When I got home, I found two issues; 1). I did some further investigation and found out that the top of the throttle cable is rubbing on the top of the brass coupler when it comes out of the fan shroud cover (see pic). You can actually see where the cable is getting worn on the top. 2), the throttle springs on my carbs need changing out. Regarding Issue 1; it looks like I'm going to have to extend the throttle linkage lever by at least an inch to have it line up correctly to get the correct angle that I need to stop the cable from rubbing. Any ideas on how to go about correcting this? Possibly by putting some new springs (correcting issue 2) in this will clear the problem of the cable sticking, but I will continue to have the cable rubbing issue which is not good. Please give me your thoughts and opinions regarding this situation......Thanks

Attachments

Images (1)
  • Accelerator2
Original Post

Replies sorted oldest to newest

.

Larry, this could be a few things, but since it's a straight mechanical linkage (and not sensors, actuators, wiring, and computers), it should be pretty straightforward to sort out.

The hex bar linkage you've got is infamous for having too much mechanical resistance. I've got one in my car that's been trouble-free for eight years, but I keep an eye on it and feed it when it's hungry.

If you push down on the arm that the cable is connected to (in the direction the cable pulls), the whole linkage - hex bar, down rods, and the carbs themselves - should move easily, with not much pressure, and snap back easily, too, with no binding.

If they do, the problem may be at the gas pedal or somewhere in the tunnel, but it's probably not that. If they don't, it's something either in the carbs themselves (unlikely) or the hexbar linkage.

Follow the main hex-shaped crossbar out to the ends and you'll see it pivots in some fittings. These need to be lubed often and kept clean. Try spraying some tri-flow or other light oil in those joints. Also check the down rods that connect the hex bar to the carbs. The fittings at both ends of those rods need to be clean and move freely. Lube as needed.

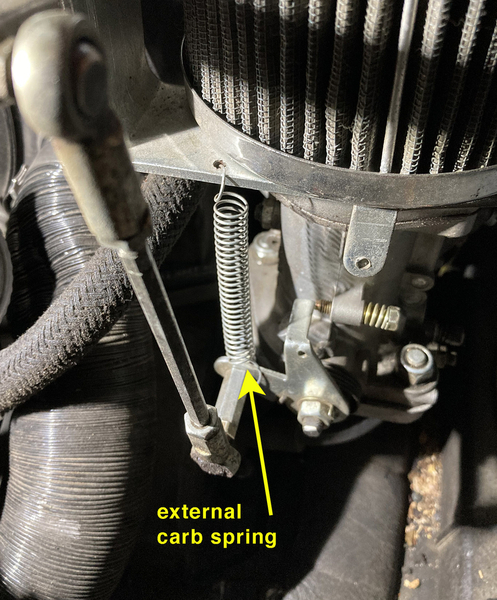
With that done, look at the carbs. Even with a clean and properly adjusted linkage, sometimes there's more resistance than the springs on the carbs can overcome, so many of us have added external springs to help them return to idle, as in this photo:

CarbSpring

It's possible you have these external springs, but one, or both, have broken or slipped out of their attachment points. If you don't have them, you may need to add them. But if everything was OK before and now it's not, it's likely the linkage needs cleaning, lube, or adjustment.

Check these things over and let us know what you find.

.

Attachments

Images (1)
  • CarbSpring
Last edited by Sacto Mitch

Airkewld offers a throttle cable tube with a roller on the end just for mitigating off-angle issues like yours.  Here's a link to their product:

https://www.airkewld.com/Bille...ttle-Tube-p/8013.htm

I have a coil spring between the fan shroud tube and the throttle arm on the hex linkage so it pushes the throttle/hex arm back out when you release the gas pedal, pulling everything back to zero.  It is just a spring from my local ACE hardware store:

linkage return spring

I also seem to have a cable approach angle similar to yours but with enough oomph to the spring it has never been a problem.

Attachments

Images (1)
  • linkage return spring

I was going to suggest the cable roller that Gordon linked to. And also extra springs on the carbs as Mitch said.

It's just good insurance, you won't feel the extra pressure under your foot.

If you disconnect the cable, you can usually figure out where the hang-up is from. It's either the carbs, the linkage, or the cable.

Then address it. Either way, that does need to be dealt with. It's a safety issue.

Gordon, where did you find a "Bosch blue coil blue" distributor cap?

Last edited by DannyP

Hello to all,

Over this weekend I went for a drive and noticed that when I let-off- the-gas, the accelerator pedal was not coming up (sticking), and went into "cruise control mode", although I have NO cruise control installed. I had to pop the peddle a few times with my foot until it came out the whole way. When I got home, I found two issues; 1). I did some further investigation and found out that the top of the throttle cable is rubbing on the top of the brass coupler when it comes out of the fan shroud cover (see pic). You can actually see where the cable is getting worn on the top. 2), the throttle springs on my carbs need changing out. Regarding Issue 1; it looks like I'm going to have to extend the throttle linkage lever by at least an inch to have it line up correctly to get the correct angle that I need to stop the cable from rubbing. Any ideas on how to go about correcting this? Possibly by putting some new springs (correcting issue 2) in this will clear the problem of the cable sticking, but I will continue to have the cable rubbing issue which is not good. Please give me your thoughts and opinions regarding this situation......Thanks

As far as the cable rubbing slightly where it comes out of the fan shroud, that is normal for everyone with the hex bar setup. Keep the cable lubricated where it comes out of the shroud and you'll be okay.

If you're looking for an upgrade consider a the Vintage Speed throttle linkage setup. Just ge the one designed for your particular set of carburetors.

https://store.vintagespeed.com...st-Linkage-c33931546

When I installed my new, thicker, Thing shroud, I faced a similar problem to your angle. I was just about to order a roller-end tube when I realized that I could move my cable lever one flat on the hex bar and it would almost line up. (My old should was not only thinner, with a Type 1 doghouse, but the hole was in a different position, too)

I can’t tell for certain from your picture but I’m doubtful you could do that.

Then I found a perfectly sized teflon spacer at Ace that slipped into the tube and I was set.

@dlearl476 posted:

IMO, putting an external spring on your carb is a band aid. Proper replacement return springs are $6.95 x 4.

0E359E12-4F49-4C13-9A81-ABA48195E081

If your throttles aren’t closing with new springs in there, you’ve got a serious issue with your linkage. Mine snap back so enthusiastically, I’d break a nail if I got my finger caught anywhere near it.

Sorry, but it isn't a band aid at all.

Race cars(Formula Vees in particular) REQUIRE 2 extra springs BESIDES the one that is already on the carburetor. And that is on a single Solex 28 PICT.

It's OK though Dave. That's why I commented about it being a safety issue. Yes, the carb and linkage SHOULD freely snap back. The extra springs are like buying insurance, they're there just in case.

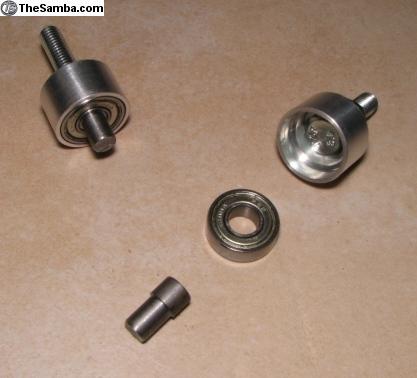
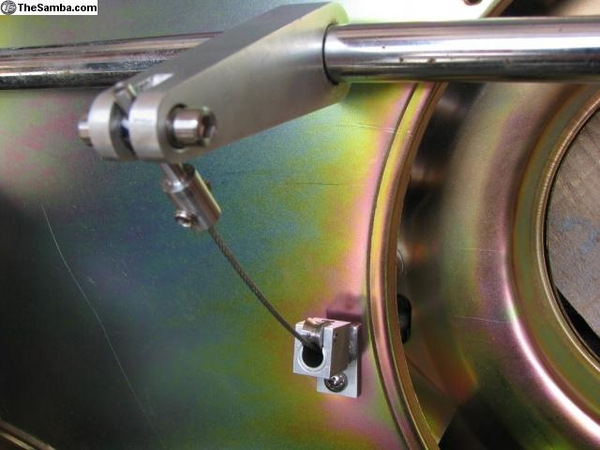
in addition to the great recommendations offered above,  a neat upgrade to you CB performance linkage  is this nifty ball bearing upgrade kit.  https://www.thesamba.com/vw/cl...detail.php?id=786740

i can’t recall, but a member here used to sell a great version of these.

it’s a plug and play installation…. Just need to cut the linkage bar the specified  amount from each side… read the attached details.

D3DE885C-CE34-4152-A177-CA67ABDF1CC1B9A41F9C-7686-437B-AFEA-7FF601B97A11

also, the manufacturer of the part sold by Airkweld…  I purchased mine from him directly.
https://www.thesamba.com/vw/cl...detail.php?id=786740

F3202B72-732B-493B-B51C-0AACE160D022

on the carb spring front, find ones that are not too strong… mine caused a lot of tension, which I did not like feeling on the gas pedal.  I tinkered with the springs ( one on each carb) until I had a the silky smooth pedal feel a like.

B624A9C2-7546-425E-8C88-6B566A70AA0E


— trick that keeps my linkage working properly is keeping the system clean and well lubricated,

Hope this helps,

cheers,

Attachments

Images (4)
  • D3DE885C-CE34-4152-A177-CA67ABDF1CC1
  • B9A41F9C-7686-437B-AFEA-7FF601B97A11
  • B624A9C2-7546-425E-8C88-6B566A70AA0E
  • F3202B72-732B-493B-B51C-0AACE160D022
Last edited by Lfepardo

@DannyP wrote: "Gordon, where did you find a "Bosch blue coil blue" distributor cap?"

I don't know.  I have a couple of spares kicking around in the attic, but they no longer fit my distributor (the original MagnaSpark used a Bosch 009, while the MagnaSpark II uses something closer to a Mallory or MSD).  

The Blue ones supposedly have beefier embedded tabs inside to handle the "brute strength" of the blue coil (which is, IIRC, about 40K volts) without pitting the tabs, or something like that.  If you want one I can dig around in the attic and find one for you.

@Lfepardo I think I was the guy selling those hex bar upgrade kits.  Mine are 5/16" Heim joints that get attached to the carburetor air cleaner bottom plates after the existing hex bar end tabs are removed.  The price of the American Heim joints I was sourcing shot up dramatically a few years back, getting the kit up over the $50 range so I stopped making them.  I might have one kit left but haven't checked parts cost in a while.  Somewhere on here I think I provided a parts list and sources.  If not, I can certainly provide that to the SOC.

@Gordon Nichols Maybe I'll take you up on that. I think it's really cool that the color matches the coil. As you know, I don't have a distributor on my Spyder.

BUT, I have been looking really hard at Formula Vee, which basically requires a 009(running from 4k to 6.5k is all that matters). What is cool is that they finally allow a points eliminator(Pertronix or the like). They also allow disc brakes FINALLY. But they do stick with a link-pin front end and a swing trans.

Used Vees run from peanuts to 15k for a race-winning setup. Looks like fun, expensive fun. Compared to other forms of wheel-to-wheel racing it's cheap though.

I really like the Challenge Cup Series. It's a standard FV but with 15 x 6 EMPI aluminum wheels and a 200 treadwear Yokohama spec tire(195/50R15). A set of tires lasts at least a season for about $600. As opposed to a set of tires each race WEEKEND for Hoosier slicks!

FYI, that hexbar kit Luis posted is a bearing kit, and does not use rod ends like I did(and you did).

Last edited by DannyP
@LI-Rick posted:

Does anyone here use the SyncLink cable linkage. If so, your real world impressions.

When I had Pat Downs build my motor I debated between the Sync-Link and the Vintage Speed. Teby had the Sync-Link and didn't like it, neither did Pat so I went with he Vintage Speed unit. It has worked flawlessly but many on here have the Sync-Link and love it as well.

Hello to all,

Over this weekend I went for a drive and noticed that when I let-off- the-gas, the accelerator pedal was not coming up (sticking), and went into "cruise control mode", although I have NO cruise control installed. I had to pop the peddle a few times with my foot until it came out the whole way. When I got home, I found two issues; 1). I did some further investigation and found out that the top of the throttle cable is rubbing on the top of the brass coupler when it comes out of the fan shroud cover (see pic). You can actually see where the cable is getting worn on the top. 2), the throttle springs on my carbs need changing out. Regarding Issue 1; it looks like I'm going to have to extend the throttle linkage lever by at least an inch to have it line up correctly to get the correct angle that I need to stop the cable from rubbing. Any ideas on how to go about correcting this? Possibly by putting some new springs (correcting issue 2) in this will clear the problem of the cable sticking, but I will continue to have the cable rubbing issue which is not good. Please give me your thoughts and opinions regarding this situation......Thanks
Airkewld offers a throttle cable tube with a roller on the end just for mitigating off-angle issues like yours.  Here's a link to their product:

https://www.airkewld.com/Bille...ttle-Tube-p/8013.htm

I have a coil spring between the fan shroud tube and the throttle arm on the hex linkage so it pushes the throttle/hex arm back out when you release the gas pedal, pulling everything back to zero.  It is just a spring from my local ACE hardware store:

linkage return spring

I also seem to have a cable approach angle similar to yours but with enough oomph to the spring it has never been a problem.

Hello to all,

Thanks for all the great tips and links to follow. From all of your suggestions the path that I am going to go with is;

  1. Replace/add springs - I do not have the "coil spring" mentioned by Gordon. I will need to measure and go to ACE and pick one up, along with the one's that are on the carburetors.
  2. Roller Throttle Tube - This is the neatest thing; it corrects the angle problem and seems straight forward to install and the cost seems reasonable.
  3. Ball bearing upgrade kit - I would like to get some additional information on where I can purchase the ball bearing upgrade kit. lfepardo mentioned it above but I couldn't find any links that goes to it. Does anyone have any info/links on these?
  4. Clean and Lubricate - all moving linkage parts

Again, thanks for all the great suggestions and will let everyone know how things turn out after all the modifications have been made.

- @larry scislowicz ,  sorry I attached the wrong link above for the Hex bar bearing kit.  Correct one- https://www.thesamba.com/vw/cl...etail.php?id=2390952

- as @Gordon Nichols mentions above, prices of parts have skyrocketed last couple of years.  His heim joint upgrade is great.  Gordon’s note above reminded me that I purchased two I believe over the years… I will need to check my spares box, I may have one still available.  

- the VintageSpeed set up is pretty neat as well.  
https://store.vintagespeed.com...st-Linkage-c33931546

http://vwparts.aircooled.net/V...-p/155-001-02idf.htm

@Stan Galat  you are right. Looks very similar.

Last edited by Lfepardo

I checked in my shop’s attic and I have one hex bar Heim joint upgrade kit left.  Tomorrow morning I’ll send you the installation instructions so you’ll know what is involved in doing the upgrade and I’ll look back to see what I was charging for price when I last shipped them out.  After that, if you are still interested we can talk about payment and delivery.    gn

@Carlos G !!  (and others)

I've written rework instructions so that anyone will know what they need and then do the rework in an afternoon, provided you have some rudimentary tools (nothing fancy).

The parts are readily available, and the Aurora MM-5 Heim bearings I prefer are on Amazon (for less than I was paying at Tek Bearing).  The last ones that I bought were made in Canada.  Avoid any and all of those listed for under $10 bucks each - They're pretty bad quality and will bind up in short order.  They're also a bit sloppy - something you're trying to avoid.

I've attached the rework instructions, with parts list, to this post so you can see what you need and it has a source link to the bearings.  Everything else is available at your local ACE Hardware store.  

I used the male threaded bearing, making it adjustable in height, but the female version works well if your bar height is similar to the height of the bearings (there is a set of dimensions listed that you'll need to make to know what to buy).  

The spacer tubes are cut from a length of bath sink water delivery tube (copper inside, chrome plated) that is 5/16" ID - Cut them straight on the ends and don't crush them because the dowel pins must slide through them.

The 3/8" springs may need to be "unwound" a tad to open them up to slide over the spacers.  7/16" ID X 1-1/2" long springs might be a better choice.

That's it!  Order everything from Amazon and it'll be delivered within a week.  

Good Luck!  Gordon

Attachments

Images (1)
  • hex parts
Files (1)

QA1 or FK rod ends are also great quality in my experience.

Carlos, that bit about hexbar height is important, you want it to stay the same as it is now. I don't remember if your linkage is on the crank pulley or transmission side of the fan shroud. I don't remember which fan shroud you have either.

I used 5/16-18 bolts in the hexbar. Get bolts that have an inch of threads and at least an inch of smooth shank. These are a nice tight fit into 5/16" I.D. heim joints. I tapped the hole and screwed them in with red loctite, then cut the heads off. In my car I didn't need any copper tubing spacers, it all depends on which linkage you have and how it works out. I also used female heim joints, this got the hexbar at exactly the same height as it was before I cut the ears off the carb bases.

I used a couple very light and short springs, I bought a spring variety assortment pack at Home Depot for like 5 bucks. Some extra carb return springs were in there as well.

I ended up leaving the bar as long as possible so there was only a touch of play when the engine is cold, the springs keep it centered when the engine expands at running temperature.

"The original, since 2006" and still keeping synch after 45,000 miles.

Last edited by DannyP

You know, I went back and found when I originally started making up hex bar kits and was shocked - Shocked, I say! - to find that it started back in 2006 with @DannyP and @RS-60 mark getting hit in the head by Heim bearing Cosmic Rays at the same time, even though they live 3,000 miles apart!  They came up with very similar designs for their respective Spyders (which we all know are a little weird to start with) and I figured, "Wha' the hey?" and tried it on my Speedster and then modified it a little bit to put my own spin on it (and use locally available parts) and that's what's been going out in the kits.

I also found that, even back then, there were a couple of DIY kits on The Samba that were selling for over $100 bucks ( Seriously? ) so I thought that my kit of quality parts either sourced from industrial suppliers or Aircraft Spruce at $50 bucks was a steal.  

Regarding the centering springs, I went with slightly heavier ones because I noticed that when the gas pedal is pressed, the entire hex bar shifts to one side.  Quite a bit.  That's why the spacers are in there - To limit the sideways shift and they should, ideally, have a gap between the spacer and Heim bearing thrust surface (or thrust washer, if you use one between them) of 1/8" - 3/16" per side when the engine is cold.  That gap will grow a few thousandths when the engine warms up and everything will be happy.  So you can see, with all of the different sizes of engines out there, that those spacers might want to be a slightly different length than the 3/4" versions in my kit (although that length seems to be fine for all of the kits I've shipped) and I tell you how to adjust that.

Anyway, now you have the info to DIY a hex bar upgrade.  Good Luck!

For some reason not made known to me, the price of the Aurora bearings at Northeast Industrial Automation almost doubled over a couple of years when I was making kits - and I was buying full boxes of 20 at a whack.  I just saw the MM-5 at about $15 bucks (single) on Amazon and back down under $10 on Aircraft Spruce:

https://www.aircraftspruce.com....php?clickkey=179496

I'm kind-of surprised at the price spread but I trust Aircraft Spruce for quality stuff and bought from them in the past, too, in quantity and was more than satisfied with their quality - WAY better than getting something from ACE Hardware!

Hello to all,

Project update.....well I have completed installing the upgrade kit supplied by Gordon Nichols. Everything went well and the linkage is working "smooth as silk" SAS, but I am embarrassed to say I lost the "barrel clamp" that attaches the throttle cable to the throttle cable arm, see attached. Does anyone have a spare that they are willing to sell or point me in the direction of where to buy one? It is unbelievable that I can't find it and was so meticulous in keeping everything separated. I will go back out to the garage and check again along with going thru the trash can to see if it got into one of the paper towels that I threw away. Appreciate everyone's help on this...... 

Attachments

Images (1)
  • Barrel Clamp Missing

.

Larry, there's not much point in looking for this again in the garage.

Once dropped, they enter what physicists call an 'unfindable' state. They become invisible under normal light. The only way to make them appear again is to purchase a new one.

I think this is what you're looking for, if you can't find one at a local hardware store.

The science behind why this happens is not fully understood but it's referred to in the literature as the 'Anderson Effect'.

.

@Sacto Mitch posted:

.

Larry, there's not much point in looking for this again in the garage.

Once dropped, they enter what physicists call an 'unfindable' state. They become invisible under normal light. The only way to make them appear again is to purchase a new one.

I think this is what you're looking for, if you can't find one at a local hardware store.

The science behind why this happens is not fully understood but it's referred to in the literature as the 'Anderson Effect'.

.

Yes...it is truly a mystery.....and yes it looks like this one will do it!....Thanks much!

@Sacto Mitch posted:

.

Larry, there's not much point in looking for this again in the garage.

Once dropped, they enter what physicists call an 'unfindable' state. They become invisible under normal light. The only way to make them appear again is to purchase a new one.

I think this is what you're looking for, if you can't find one at a local hardware store.

The science behind why this happens is not fully understood but it's referred to in the literature as the 'Anderson Effect'.

.

Mitch is right. They only way to find the old one is to buy a new one. And the time it takes to find it is inversely proportional to the cost + shipping of the replacement.

Murphy’s Law Sec 27 paragraph (b)

Just about any ACE Hardware store should have them in the fastener aisle, too.  Take along the photo of the CB Performance one to show them.  They are also popular on a number of older yard power equipment soma lawn and garden power equipment repair place will have them - Home Depot, too.

Thanks, will check them out....kit worked out really well and it didn't hurt having a friend who had a complete machine shop to do the heavy lifting and cutting .....

Nah… 5.75$ for first class mail on their web site… but I’m sure if you call and ask for snail mail in a regular 50cent envelope they would be happy to ship less… my experience w/ CB has always been awesome.   Great shop and nice people always pick up the phone.

factor in a run to the local Home Depot, and the 4.5$ per gallon of super unleaded and net-net it’s not cheaper driving to the store.

Last edited by Lfepardo

I'm that way, too.  I hang out at Hot Rod Charlie's way too much just for that reason, and there's another guy in the next town with one of the best machine shops around (as a business) and he also restores Stanley Steamer cars.  

It's good to have friends.

Glad the rest of the Hex Bar upgrade went easily for you.  Sounds like you're a candidate for the "Brass Thingie Award".

Brass Thingie

Attachments

Images (1)
  • Brass Thingie

Luis, my experience with CB has been great as well.

But, it seems that CA stores are simply not in a hurry to ship stuff, and that is pretty much all vendors there with the exception of JayCee. Add to that the 3000 mile trip my parts have to take and...

I'm sure you get stuff a LOT quicker when you live on the west coast.

I'm that way, too.  I hang out at Hot Rod Charlie's way too much just for that reason, and there's another guy in the next town with one of the best machine shops around (as a business) and he also restores Stanley Steamer cars.  

It's good to have friends.

Glad the rest of the Hex Bar upgrade went easily for you.  Sounds like you're a candidate for the "Brass Thingie Award".

Brass Thingie

Ain't that the truth!.....along with a little bit of "Jack" (Daniels of course)....

Hello to all,

Got my new barrel clamp in today (from Southern Cal Imports, $2.29 for part, $11.72 for shipping), installed it and now all is well. As I mentioned before, with Godon's Kit installed along with new springs, oiling, and of course a thorough engine compartment cleaning, the throttle is now running as "Smooth as Silk". I do have to mention that I did not install the Rotor Throttle Tube, as I would have had to take out the swaged in tube that was already there and didn't want to get into all that work at this time.  This will be a project left for another day. (See photo)

Thanks' again to everyone for all you help!! Project is now COMPLETE.

Attachments

Images (1)
  • Updated Linkage 12-10-21
Post Content
×
×
×
×
Link copied to your clipboard.
×
×