Have you ever just wanted to take some hole saws and Dremel bits and cut up your dashboard? No, neither have I, but... 

Dashboard update: I'm getting the dashboard prepped for painting so all of the switches, gauges and A/C vents have to be fitted. I rebuilt the old 912 VDO gauges and bought a couple of new VDOs that I wanted to add.  Marianne says that the gauges need to have aluminum bezels (just like the old turbo) and 45 years of marriage prove that I can listen well when it is necessary. All of the switches had been left on the body outside for 14 years so I replaced all of those. I'm going for a retro mild outlaw look and found some nice vintage style switches that I like a lot (from mr-dash on eBay). These switches fit the original holes perfectly. I picked up a new Bosch 356 style ignition switch (644 613 101 06) from oempartsforexport on eBay (nice quality). I'm using the A/C vents that came with the universal kit I got from Coldmaster. 

The hard parts were the ignition switch, the new gauges and the A/C vents. I'll give some details on each in followup posts in case anyone is interested, but I thought I'd just cut to the chase and post a picture of the final layout. The dash will be painted the same color as the rest of the car and the jury is still out on the question of dash padding.

Switches from left to right: headlights, hazard, wipers, ignition, A/C on/off & fan speed

Gauges: combo fuel/oil temp, tachometer, speedometer, oil pressure, chronometer (clock :-)

dash1

Attachments

Images (1)
  • dash1
Last edited by Michael Pickett

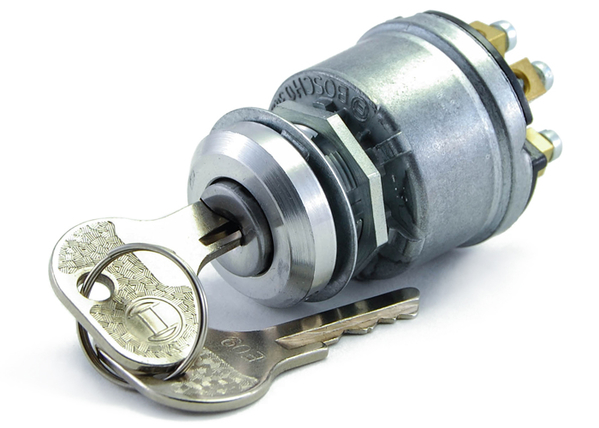
Hard part: Bosch ignition switch 644 613 101 06

This switch is great. The keys are large and give you enough torque to easily go through the switch positions.  Positions are: ACC, off, on and start. Interestingly, you can't just turn all the way right to engage the starter. You have to push the key in while turning right to start. Nice safety for banging up the starter and flywheel while the engine is running.

So why was it hard? The old switch just used a round hole and you torqued the bezel down to keep it from spinning. This new switch uses the same diameter hole, but there are six threaded protrusions that engage the dashboard to keep the switch from spinning when you turn the key. You have to cut out six little gaps so the new switch can fit into the dash. 

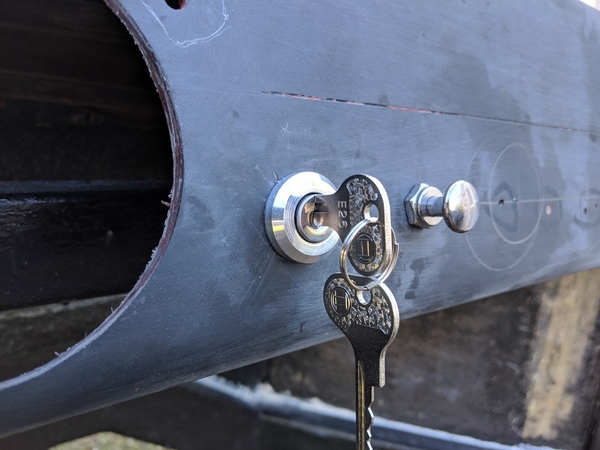
Tip: the key is set up with the wide part at the bottom and the teeth at the top. That means it looks best when the switch is installed upside down. Many cars have the ignition key teeth on the bottom. I think this one is best set up with the teeth upwards.

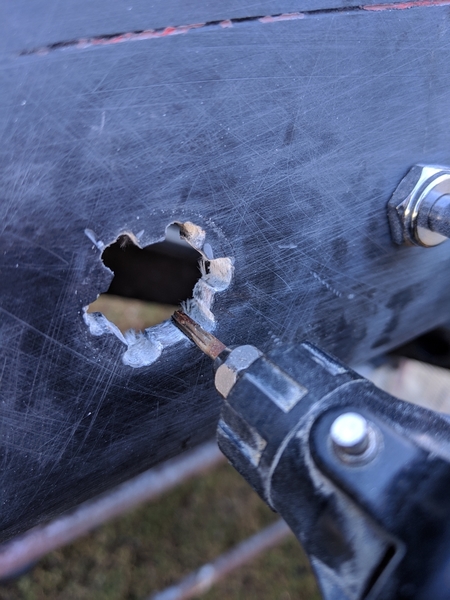
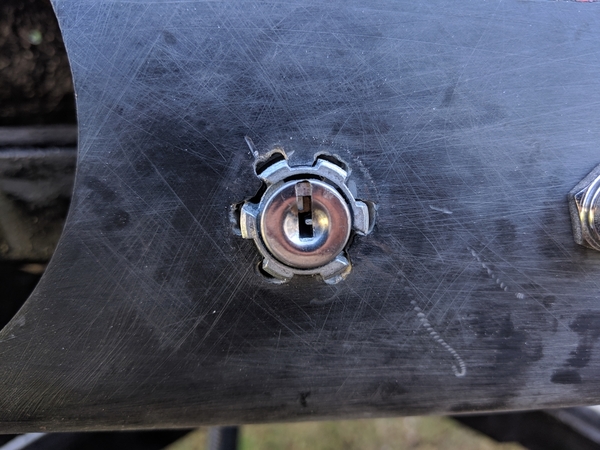
I placed the switch over the old hole and used a pencil mark the areas that needed to be cut out. I used a Dremel tool with a small cutting bit to work my way around the perimeter and periodically tried to insert the switch from the front. I could see where it needed more relief and marked those spots with pencil and then used the Dremel again. Towards the end, I started putting the switch in from behind the dash and focussed on keeping the key slot vertical (and oriented so the key would be teeth up).origIGN

Original ignition switch hole

IGNdremel

Making the cutouts to fit the new switch

IGNSwitch

The new switch

IGNsw1

And it finally fits. Note the orientation of the key slot

IGNsw2

Nearly ready to start the engine (if the body was attached to the chassis :-)

Attachments

Images (5)
  • IGNdremel
  • IGNsw1
  • IGNsw2
  • origIGN
  • IGNSwitch

Scary part: installing two small VDO gauges

I don't like making holes in the dashboard. It just seems like it's easy to make a mistake that will take a while to fix or you'll just have to live with it. But, I wanted two gauges to the right side of the ignition switch, so back into thick of it.

The hard part is making sure that you've got the vertical and horizontal spacing in way that will look good. Truth be told, that's why gauge 2 is a clock. I wanted an oil pressure gauge, but just one gauge looked wrong to me. I set the spacing by holding the aluminum bezels in the places that looked right to me and then getting another opinion from Marianne. When she and I were both happy, I circled the rings with a pencil, and then bisected the circles vertically and horizontally to mark the centers. I tried using a center punch to make a drilling indentation, but the gelcoat usually chips off in a funny direction leaving an imperfect place to start. I found that starting the hole at the cross marks with a small drill bit worked best (didn't wander or chip). On these small VDO gauges, a 2" hole saw is a good way to start. Once the hole is made, you'll need to make it very slightly larger for the gauges to slide it. I used a Dremel tool with a small cutting bit to run around the edges of the hole. The gauges protruded different amounts from the dash, so I put an o-ring around the oil pressure gauge to even things up.

g0

2" hole sawing

g3

Needs to be just a little bit bigger

g4

One down, double checking spacing for second gauge

g1

Pilot hole for second gauge drilled

g6

Second one installed

dash1

Coming together


Mike

Attachments

Images (6)
  • dash1
  • g0
  • g1
  • g3
  • g4
  • g6

Final tough dashboard thing: A/C vents

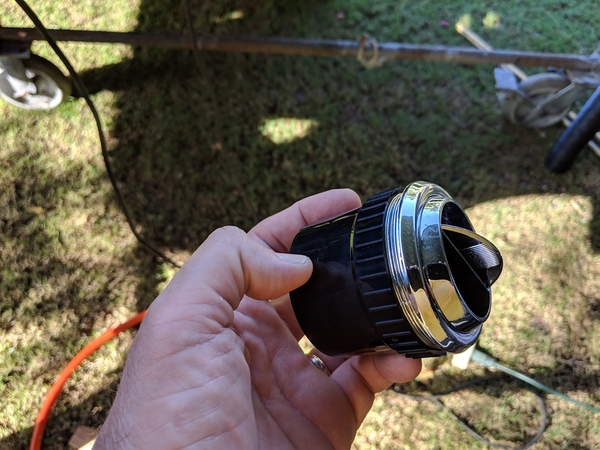
Why so tough: I'm putting two vents into the dash (two will go underneath aimed towards our feet). I wanted the vents on the outside edges of the dash and unfortunately, the dash curves there. Also, the vents were set up for a dash thickness of around 1/8" where the IM fiberglass is around 1/4" thick in the dash area. You have to cut a relief around the back of the hole in the dash so that the vent attachment pipe can screw on. Did I mention that this is all happening on a curved surface...

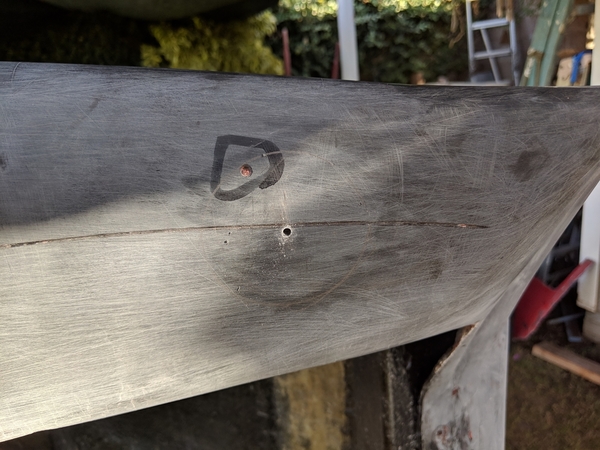
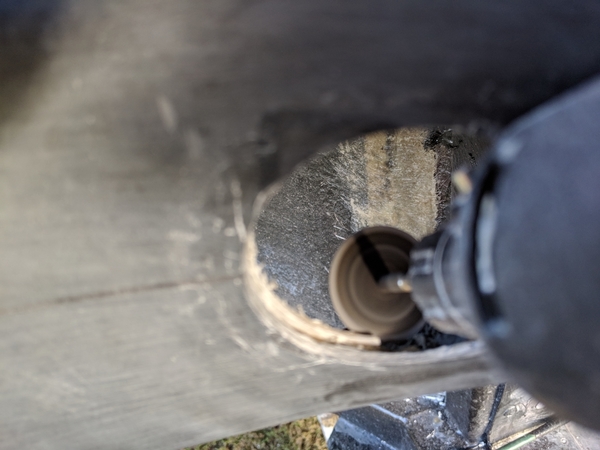
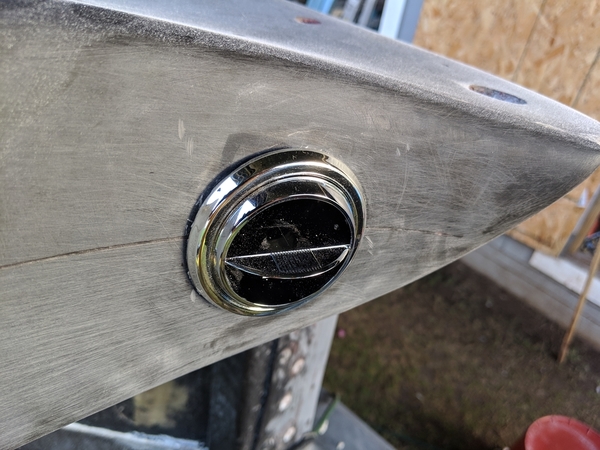
The vents are set up for 2-1/2" holes so a hole saw of that dimension was procured (thanks, Marianne).  The ends of the dash are very different from each other in dimensions and curvature. In the end, I set up the driver's side the way I thought looked best considering the adjacent headlight switch and gauges and drew a 2-1/2" circle in pencil there. I then eyeballed the passenger side location trying to achieve visual symmetry. Like usual, once I had some test markings on the passenger side, I had Marianne take a look while I was holding the vent in place. Once we were both happy, I marked it. I found the centers on the holes, used a small drill to start the center and then used the hole saw to make the holes. Since I was cutting on a curved surface, I tried to drill evenly into the curves (meaning the vent would be pointing slightly towards the center of the car). This reduced but did not eliminate the problem of the vent seating flat on the curved surface.

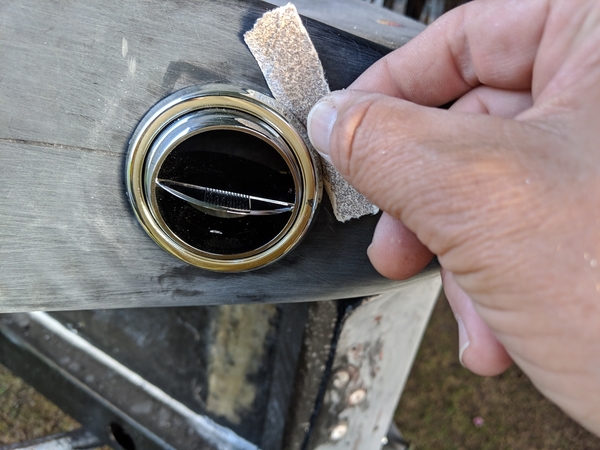
I inserted the vent into the opening and then used a small strip of sandpaper to cut down the places where the vent touched the face of the dash. Once those were well marked, I used a thin Dremel disk to trim away material from the back of the vent edges until it sat close to the curved surface of the dash.

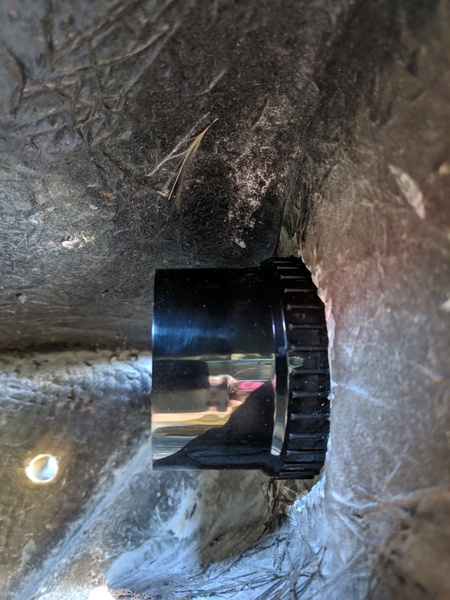
The dash thickness had to be reduced from the back to allow the threads on the vent pipe to engage with the threads on the vent opening. I used both a Dremel grinding wheel as well as a cutting wheel, just running it around the edges and removing an approximately additional 1/4" outwards from the edge of the hole and leaving the dash approximately 1/8" thick in that perimeter. The vent pipe could then be tightened onto the vent holding it in place. Of the two tools, the thin cutting wheel seemed to be the most efficient. 

Holes will be made in the top fender corners to allow the cold air hoses to get to the dashboard vents.IMG_20190101_153830IMG_20190101_154300IMG_20190101_154500IMG_20190101_164906

Marking the back of the vent where material needed to be removed so that it would fit the curvature of the dash

MVIMG_20190101_160211

Trimming the back side of the vent to fit the dash

IMG_20190101_165954

Thinning out the back of the dash

IMG_20190101_165816

I cut a circle around the perimeter and then chipped away the rear part using the cutting wheel

IMG_20190101_170509IMG_20190101_170523_1MVIMG_20190101_170501

Simple, slightly retro appearance and functionality were the goals

Mike

Attachments

Images (10)
  • IMG_20190101_153830
  • IMG_20190101_154300
  • IMG_20190101_154500
  • IMG_20190101_164906
  • IMG_20190101_165816
  • IMG_20190101_165954
  • IMG_20190101_170509
  • IMG_20190101_170523_1
  • MVIMG_20190101_160211
  • MVIMG_20190101_170501
Last edited by Michael Pickett

Nice job Mike!

Great photo of the install.  I will be doing this shortly in my brand new coupe dash. Gauges, switches and AC.  Waiting to receive the gauges from Greg at Vintage. I may end up adding a skirt under for the AC vents as I may not have room or good area. checkout/follow my post as I'd love to get your feedback as I progress.  I hope to post and update this weekend.

I cringed a little seeing that Dremel so close to the knees.  One slip would be painful.  

Making great progress and look forward to following! 

Stephen

AllnuttS posted:

Nice job Mike!

Great photo of the install.  I will be doing this shortly in my brand new coupe dash. Gauges, switches and AC.  Waiting to receive the gauges from Greg at Vintage. I may end up adding a skirt under for the AC vents as I may not have room or good area. checkout/follow my post as I'd love to get your feedback as I progress.  I hope to post and update this weekend.

I cringed a little seeing that Dremel so close to the knees.  One slip would be painful.  

Making great progress and look forward to following! 

Stephen

Yep, Greg and Anna are great folks. I'm looking forward to catching up on your progress!

Mike

Gordon Nichols posted:

Free-handing with a Dremel.  

Seems like half of my life.

Nice work, Mike!

Thanks, Gordon. When I was younger, I was a bit obsessive about getting things exactly right. One summer I was helping my uncle build houses and he said (cue thick Appalachian accent) "Mike, we ain't building no piano here." Translation "Get a move on, some things don't have to be perfect, just functional." Great lesson in why free handing with a Dremel is a great skill for me to acquire. It sure ain't gonna be no piano, but I'm having loads of fun!

Mike, 

I came from the High Tech revolution of the 1980’s (Data General, “Soul of a new machine” era - Maybe you’ve read the book?) when some doofus (Tom West, whom I refused to ever work for) quoted that “Not everything worth doing is worth doing well”.

Some people read that and thought that it was OK to do something sub-par to “get by”.  I looked at it and thought, “Well, OK, not everything needs or deserves to be perfect, it just has to work really well within our budget!”

There is a big difference, there.  

YOU, my friend, know the difference, and know that some things need to both look and work well, while others just have to work well (even though “looking well”, waaaay up in there under the covers, may only matter to YOU, not me).

This reminds me of Stan Ostergard, a guy and neighbor when I was growing up who tried, mightily, to teach me how to be a good machinist.  The best thing he taught me was to make things that “look like somebody cared” about how they looked and worked.  I don’t think that Stan thought of me as being his best pupil (THAT was probably my older brother) but trust me, Stan, I was listening and you did, INDEED, register in my little, 13-year-old mind.  Thank you, Stan, for showing me that everything was worth it.  Somewhere along the line, Mike learned that, too.

Give it Hell, Mike!

Gordon Nichols posted:

Mike, 

I came from the High Tech revolution of the 1980’s (Data General, “Soul of a new machine” era - Maybe you’ve read the book?) when some doofus (Tom West, whom I refused to ever work for) quoted that “Not everything worth doing is worth doing well”.

Some people read that and thought that it was OK to do something sub-par to “get by”.  I looked at it and thought, “Well, OK, not everything needs or deserves to be perfect, it just has to work really well within our budget!”

There is a big difference, there.  

YOU, my friend, know the difference, and know that some things need to both look and work well, while others just have to work well (even though “looking well”, waaaay up in there under the covers, may only matter to YOU, not me).

This reminds me of Stan Ostergard, a guy and neighbor when I was growing up who tried, mightily, to teach me how to be a good machinist.  The best thing he taught me was to make things that “look like somebody cared” about how they looked and worked.  I don’t think that Stan thought of me as being his best pupil (THAT was probably my older brother) but trust me, Stan, I was listening and you did, INDEED, register in my little, 13-year-old mind.  Thank you, Stan, for showing me that everything was worth it.  Somewhere along the line, Mike learned that, too.

Give it Hell, Mike!

Gordon,

Yep, Tracy Kidder. I was really excited to read that book back in the 80's. I was always a techie although I took a decade detour as a teacher and researcher in the field of mental health. I changed careers after building a Z80 based computer in '82 and coding an assembler based text to speech synthesizer. On to 12 years building clinical applications (yep, make an error and patients die) and then 20 years in technology administration. Retirement is wonderful because nobody is going to die if I don't respond quickly enough and thousands of users won't be annoyed if I make a bad decision. Now I just have to make Marianne and myself happy. What joy!

I suspect we share the same approaches to many problems and many of the same values. School of hard knocks, eh? While I was in college, I had to work to support me and my 19 year old wife splitting my time being an research electronics tech and a machinist assistant. I was in heaven!

Thanks so much for your comments, encouragement and help on the board. A true inspiration!

Mike

Gents:  Great comments and literary references regarding the quality work displayed above.  I'll add my brief comment too.  First great looking work! Second, my inspiration to craftsman like work on my home, cabinet making and life in general comes from a book I read decades ago. "Zen and the art of motorcycle mechanics."  The other great line that rings true when I am getting my hands greasy in the garage is from "How to keep your Volkswagen alive" by John Muir.  He states several times, "As you work, keep every part remorselessly clean."  And he says that, "A mechanics work is reflected in remorseless detail." 

Great stuff and I have been busy in my garage.  I hope my work reflects the above stated sentiments! 

Safety Jim posted:

Gents:  Great comments and literary references regarding the quality work displayed above.  I'll add my brief comment too.  First great looking work! Second, my inspiration to craftsman like work on my home, cabinet making and life in general comes from a book I read decades ago. "Zen and the art of motorcycle mechanics."  The other great line that rings true when I am getting my hands greasy in the garage is from "How to keep your Volkswagen alive" by John Muir.  He states several times, "As you work, keep every part remorselessly clean."  And he says that, "A mechanics work is reflected in remorseless detail." 

Great stuff and I have been busy in my garage.  I hope my work reflects the above stated sentiments! 

Thanks! I enjoyed Zen and the Art..., too. Great story and great lessons on life. I also appreciate the "remorseless" quotes. I rented clean room space in Chuck Miller's MillerSports building for a year while I was building the 3.3 flat 6 turbo engine. Chuck is kind of gruff and he looked over my shoulder periodically to say "why the hell did you do (fill in the blank) that way?" I'd tear it out and do it again :-)

Good luck with your work in the garage. Of course we'll expect pics!

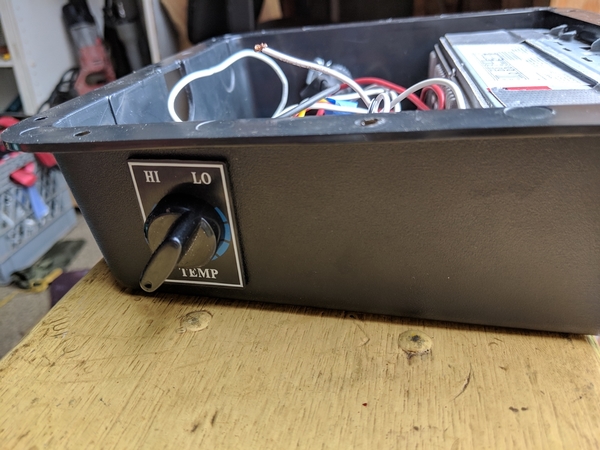
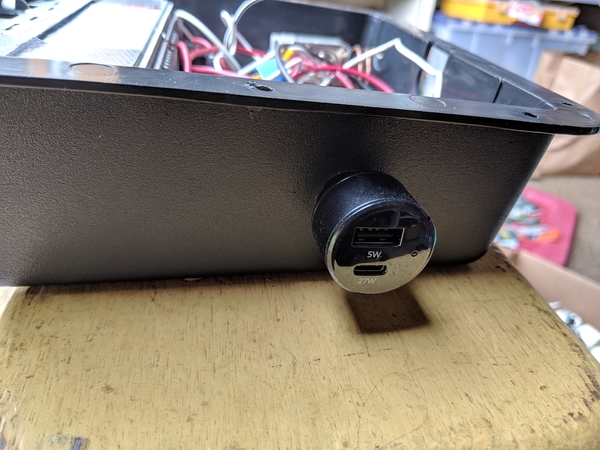
Here's a few update pics. I finished up the A/C vent system putting a set of underdash vents that can be aimed at your legs. I've been finishing up the radio system and using the back of the radio box to mount the temperature control for the A/C as well as a USB rapid charger system. Finally, as I think more about painting, I've ordered a Fuji Mini-Mite 4 HVLP system and started building a temporary paint shed in the backyard.

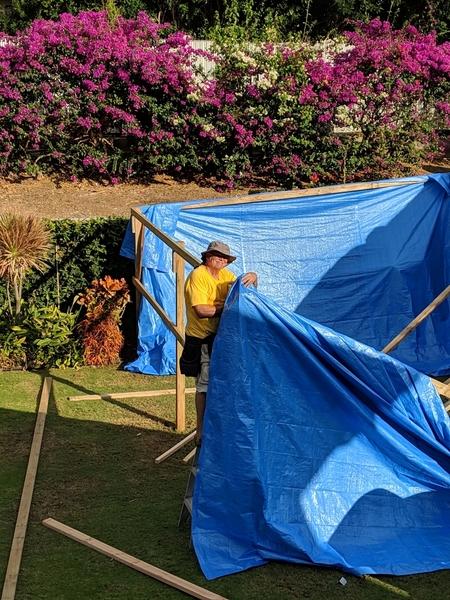
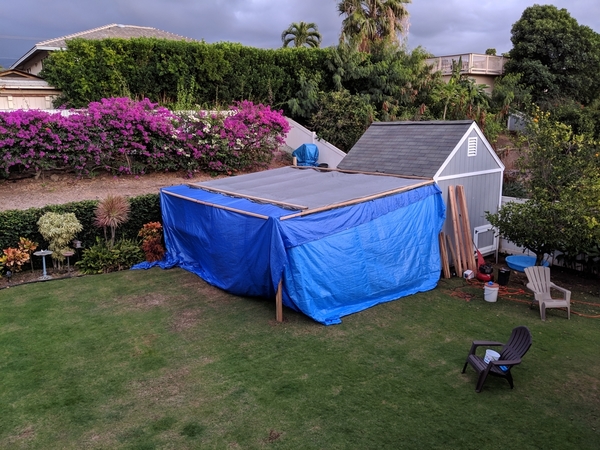
painttentStarting a 20' x 16' extension to the shed to use to paint the speedster. Wood frame and tarps to seal out most of the things in the air. The last paint job I did was the 911 turbo in our Rhode Island garage. This will give me lots more room and Marianne can run the laundry without steaming up my stuff. Yep, there may be a few bugs and dust motes, but a little extra elbow grease will fix it up just fine. Plus, great view, eh? A 10,000 ft volcano on the other side of the bougainvillea and the Pacific Ocean 3 blocks down the hill if I get frustrated. 

radio

Radios, like air conditioning have always been an essential part of the Speedster experience... This is my choice: a $30 "value" radio. But, it has bluetooth connectivity to  your phone and I can put thousands of my favorite jazz and blues tunes on that little SD card under the volume control. Cheap and sounds perfectly fine to me.

radio2

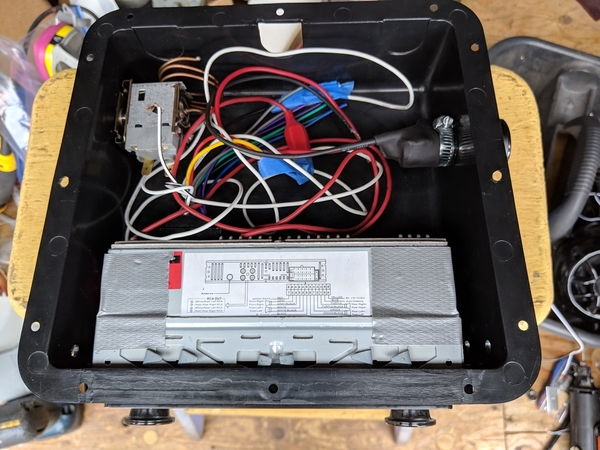
The radio itself is very small leaving lots of room for other goodies in the underdash radio box. Anything I didn't want to put on the dashboard goes here!

radio3The A/C temp control will probably never be used since we like to run it at full cool with the top down. I put the 3 speed fan control on a push pull switch on the dash and hid this switch under the dash since I doubt we'll ever touch it.

radio4

We both have smartphones that get a lot of use. We've always been frustrated with slow charging in our cars just when you're waiting for Google Maps to give you the next turn. This is a cheap Amazon sourced fast charger with 5 watts on the regular USB and 27 watts on the USB-C. 

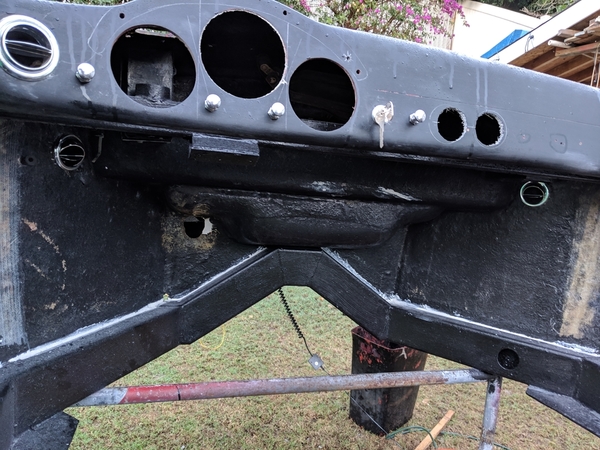
underdash

Under the dash, the second set of A/C vents are hidden. You can aim them at your waist or your feet. 

Mike

Attachments

Images (6)
  • painttent
  • radio
  • radio2
  • radio3
  • radio4
  • underdash

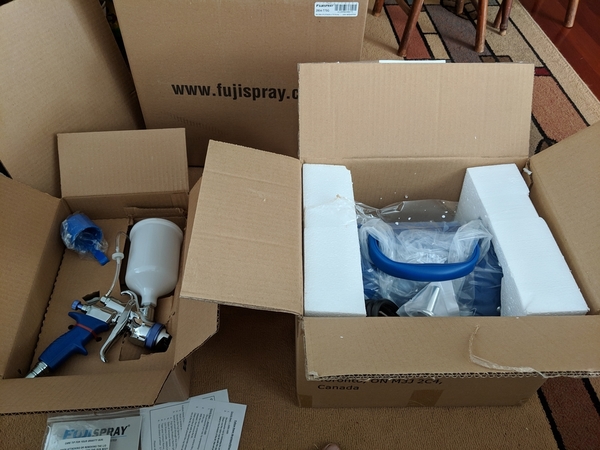
Unboxing of the Fuji Mini-Mite 4 painting system and progress on the temporary paint shed. It should be finished in the next couple of days. Still have a little bit of fiberglassing and a lot of sanding before the epoxy coat goes on. By the way, except for the base coat, I'm using all SPI products. I've been impressed how helpful and responsive they are. I talked to their rep in California on Thursday and their Maui contact (House of Clear) dropped off two boxes full of products yesterday!IMG_20190111_170024

IMG_20190111_171252

This replaces the 60 gallon dual cylinder air compressor I bought for my Rhode Island painting adventure. It is supposed to be much better in terms of HVLP volume and moisture control.

IMG_20190111_160622

I wanted to attach the front and rear walls before stretching the 30' x 40' tarp across the top. All walls except the rear will be rolled up while I finish the prep work and a floor tarp will be installed when it's time to shoot.

MVIMG_20190111_180919

Our granddaughter is not too sure about me trying on a bunny suit. I don't know why, but I always buy one size too small. Gets a little tight when I'm leaning down 😉

Mike

Attachments

Images (4)
  • IMG_20190111_170024
  • MVIMG_20190111_180919
  • IMG_20190111_160622
  • IMG_20190111_171252
Last edited by Michael Pickett

That will do the trick, Mike! I've painted a couple of cars in the middle of a warehouse, 8 ft. step ladders in 3 corners, plastic wrapped around 2 sides with water sprinkled on the floor to keep the dust down. Yours looks pretty spiffy. Bummer about the beer fridge, though; these things always come with conditions... Al

ALB posted:

That will do the trick, Mike! I've painted a couple of cars in the middle of a warehouse, 8 ft. step ladders in 3 corners, plastic wrapped around 2 sides with water sprinkled on the floor to keep the dust down. Yours looks pretty spiffy. Bummer about the beer fridge, though; these things always come with conditions... Al

Al, good to know. The thing I fight out here are the trade winds. It is not unusual for them to get funneled down the valley between the mountains and roar through this area at 30 mph. I'm looking for the right balance between sturdy and temporary. 

Hi everyone, I thought I'd post a short build update. Winter has arrived in Maui. It didn't get above 74* F today and the wind was gusting up to 30 mph.  I know, get out the tiny violins, but my blood has definitely thinned since we moved from Rhode Island.

I've been sorting out the wiring harness (Henry had built a new one for the previous owner) and modifying it to accommodate the additional gauges, AC controls, swapping the speedo and the combo positions and moving the wiper controls. My granddaughter was a great help during this stage :-) Now let's see was it the red wire or the blue wire that I need to cut...

wiring1

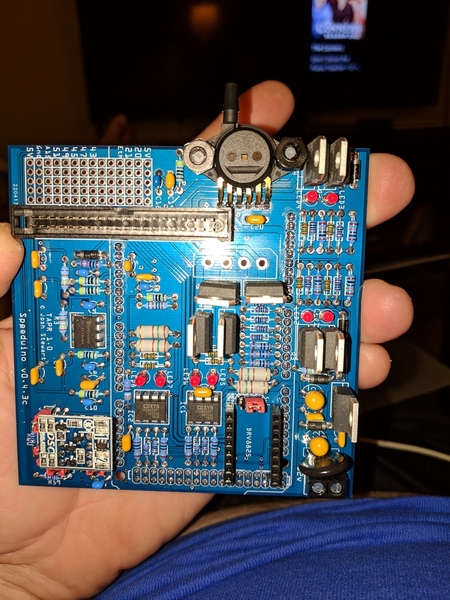
The engine will need electronic ignition to free up the distributor space for the AC compressor. The speeduino ECU will provide the brains and configuration controls. I've done several boosted Megasquirt ECU installations and decided to go with a lower cost unit. Everything I've read suggests that it should be fine for ignition and be capable of fuel injection/boost control if I ever decide that it's needed (unlikely). I splurged and bought a fully constructed system rather than a kit. I cheaped out on the crank trigger wheel (modified a stock Mustang wheel), the crank sensor (China built Saab 9-3) and the coil pack (China built VW Golf pack with integrated igniters). The total for  the conversion should be under $300. If anyone is interested in details, let me know.

speeduino

Speeduino ECU. This mounts on top of a MEGA 2560 Arduino CPU

crankwheel

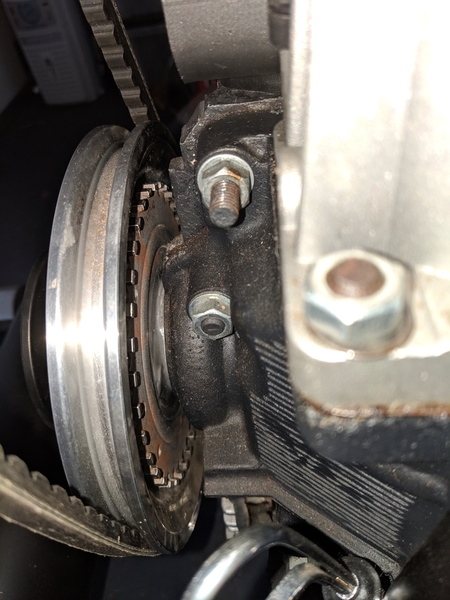
Mustang crankshaft position trigger wheel modified to fit behind the VW pulley

ac pulley

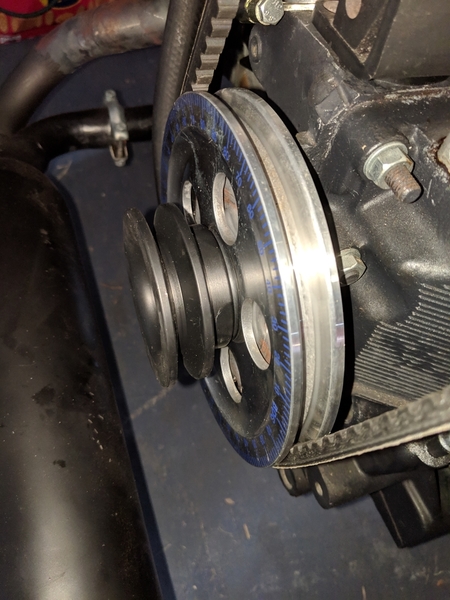
Front view with AC pulley installed

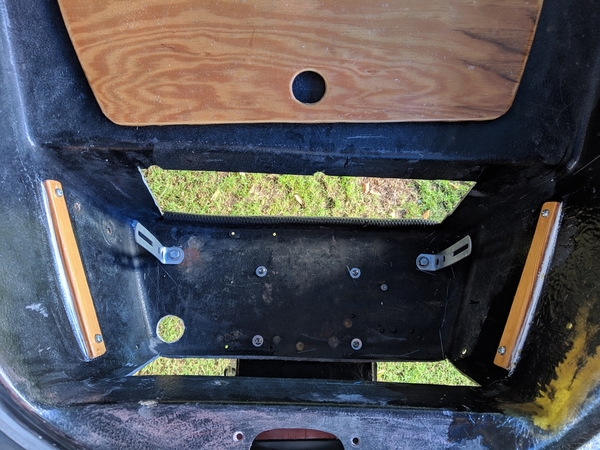
Finally, the top for the battery box has been built. It's made from 1/4" plywood reinforced with a couple of layers of fiberglass. A couple of fiberglass coated wood strips support the lid. I'll eventually paint the top and supports to match the trunk. The outcome is reminiscent of the smuggler's box in the older air cooled 911s. It hides the air conditioning evaporator and gives the trunk a flat floor.

smugglers box1

View into battery box modified to hold AC evaporator unit. Side bars support lid for boxsmugglers box2

Fiberglass reinforced lid that creates flat floor for trunk and protects AC. Some fiberglass patching can be seen on the right side where a previous fender bender created a stress crack. Lid will be painted to match trunk.

Coming up next will be fabricating supports for the shoulder harnesses. I've been researching the approaches used in the past and have about 50 lbs of steel and a welder to play with. My hope is to NOT put 50 lbs of steel behind the seat, but I didn't want to run out... More later,

Mike

Attachments

Images (6)
  • wiring1
  • ac pulley
  • crankwheel
  • smugglers box1
  • smugglers box2
  • speeduino

I had a chance to read this entire thread, it's entertaining and well written. You have a unique approach to doing each task and that's commendable to say the least.  If you have concerns with installing the windshield feel free to furnish me two (2) round trip tickets from Pittsburg and I'll gladly do the install for you . Do keep an accurate eye on temp AND humidity when you paint cover the grass ( source   of humidity) in the Blue Lagoon Palace just before painting. ......….Impressive work Mike !

Last edited by Alan Merklin
Alan Merklin posted:

I had a chance to read this entire thread, it's entertaining and well written. You have a unique approach to doing each task and that's commendable to say the least.  If you have concerns with installing the windshield feel free to furnish me two (2) round trip tickets from Pittsburg and I'll gladly do the install for you . Do keep an accurate eye on temp AND humidity when you paint cover the grass ( source   of humidity) in the Blue Lagoon Palace just before painting. ......….Impressive work Mike !

You are too kind, Alan. I'd love to have you here for the whole build, I've followed your work! However, all of my spare change goes towards animal crackers and toys for the granddaughter :-) Sometimes I need to divert her from helping Poppie... I know your West Virginia Winters can be tough, stay warm!

Mike

Post Content
×
×
×
×
Link copied to your clipboard.
×
×