Awesome, awesome, AWESOME!
I had Pearl out last evening and drove by the country mill ponds of the old Waskanusett mills in, where else? Millbury. Foliage is starting to turn, here.
Must be similar to Wailea, right? ![]()
Awesome, awesome, AWESOME!
I had Pearl out last evening and drove by the country mill ponds of the old Waskanusett mills in, where else? Millbury. Foliage is starting to turn, here.
Must be similar to Wailea, right? ![]()
@Michael Pickett - I just completed reading the entire thread. Great job Brah'! I'm looking forward to seeing your build progression updates!
Put a little icing under the cake today by installing the oil filter, oil cooler and thermostat. I decided I liked the cooler in front of the rear wheel instead of behind it, but for the most part I followed the wisdom of the usual suspects on this board (thanks!).
Now onto carpet and reinstalling seats and seatbelts.
Just watch out for thermal tiles falling off during re-entry.
That car is gonna look SO DIFFERENT once the carpet is in.
I was shocked at the improvement when I put the vinyl dash pad on mine, too. I'll try to find some before and after shots for yah.
Do the door as well ![]() ... Marty had to do them on the second round
... Marty had to do them on the second round ![]()
Do you do much nightime driving? If you do get better lighting for the back. Just saying.
BTW looking awesome.
Here’s my are you sure list do you have enough extra wires running from the front to the back extra speaker wires do you want to roll or switch on your clutch pedal and your brake pedal screwed to the floor for a break and possibly a clutch switch that needs to activate a cruise control and it goes on here’s my are you sure list do you have enough extra wires running from the front to the back extra speaker wires do you want to roller switch on your clutch pedal and your brake pedal screw to the floor for a break and possibly a clutch switch that needs to activate a cruise control how did it go signed ![]()
The IM site has many cars on the way of you need picts
IaM-Ray posted:Do the door as well
I agree with Ray you definitely want to do the doors while you have access. It keeps the heat out and gives a nice thud when closing.
Joe Fortino posted:IaM-Ray posted:Do the door as well
I agree with Ray you definitely want to do the doors while you have access. It keeps the heat out and gives a nice thud when closing.
I did the sound deadening material in my doors AND filled them with speaker batting material. Completely eliminated the hollow door sound.
I'm using a different material inside the doors and between the package area seat back and the engine. It's 3/8" thick heavy rubber mat like they put under the workout machines in the gym. I got it from Amazon and it's called Rubber-Cal recycled floor mat. It's really heavy. I tried a piece out on the driver's floorboard but it was a little bit too thick for the way I've got my seat tracks set up.

Mike
Here on Jay Leno is Chuck's car... neat dash a combination of 550 and Speedster. no leather top. @Michael Pickett link here link

IaM-Ray posted:Here on Jay Leno is Chuck's car... neat dash a combination of 550 and Speedster. no leather top. @Michael Pickett link here link
Cool, Ray! But wait, that means my chance of getting an invitation to show my car to Jay Leno may be in jeopardy...
Mike, that is exactly the same stuff I used all over the inside of my car. Even against the firewall! I glued it in with DAP contact cement and it stuck well, but after 20 years the stuff in the doors is starting to separate. I bought all of mine from Home Depot as “shop floor anti-fatigue mat”. Comes off a YUGE! roll and priced by the foot, easily cut to shape and gentle massage with a heat gun will force it to take an acute shape. Go easy on the heat as it is like closed-celled foam and will go from pliable to melted blob in half a heartbeat.
Actually most people are using tar paper rolls by COFAX or equivalent from the Orange store, and heating it up with a heat gun and then rolling it with a roller on the inside of the doors....
Henry at IM used this on my doors.
I have aluminum pieces like that on my CMC.
Michael McKelvey posted:I have aluminum pieces like that on my CMC.
Thanks, Michael. Probably not just an IM thing, then.
Well, CMC cars were based on the IM cars that were built in California.
Mike:
Speedster with no dash pad:
Same Speedster with color matched dash pad:
I know....... "WOW!", right?
That dash looks very good Gordon and yes much more with the finishing touches of leather I have to admit.
Sigh, so now I have to develop dashboard upholstering skills, too. I knew it was a mistake to buy the materials. Thanks, Gordon :-)
The dash is pretty easy. Seeing what you have done to this point, you should not have an issue. 😊
James posted:The dash is pretty easy. Seeing what you have done to this point, you should not have an issue. 😊
Thanks, James. My secret super power is to be able to get something right after only 3 or 4 desperate attempts. :-)
I think I did that in a one-shot. The material is vinyl and while I did it in a garage (no sun to warm the material) it stretched into place with no wrinkles or puckers. Even the rubber bumpers covered well. The material is folded neatly and stapled to the back of bumpers with ordinary paper staples, not construction staples. Both bumpers have PEM nuts inserted from the cockpit side before the vinyl goes on and then after upholstered they are pulled to the dash with 10/32 screws.
mppickett posted:James posted:The dash is pretty easy. Seeing what you have done to this point, you should not have an issue. 😊
Thanks, James. My secret super power is to be able to get something right after only 3 or 4 desperate attempts. :-)
You are still 2 or 3 attempts closer than me, but I don't get desperate until the 4th or 5th, and then I ask help here.
Fitting the windshield to the cowl. Evidently IMs, CMCs and Fiberfabs all have a gap between the windshield and the cowl in the middle area. Some past remedies include Bondo (and painting), grinding the glass to fit, and tipping the windshield forward with shims under the rear post area.
I decided to reshape the rubber seal so that it matched the curves better. Essentially, I used a very sharp razor to shave material from the areas where the windshield rested on the cowl until it was a better fit.
I took the posts off so they wouldn't get in the way and marked the cowl so I could repeatedly put the windshield back where it would be mounted. I would look under the seal and see where it was in contact with the cowl and mark the glass over the area I wanted to shave (using a china pencil). Then I would remove the windshield and use the razor to remove rubber from the area that had been in contact. Rinse and repeat.
After about an hour I had a much better fit that would work well with the trim piece and should be easy to seal using Dr. Clock's recommended DAP black acrylic/silicone caulk.
I suspect there's a lot of individual variation between cars and brands of under windshield rubber. It like it because it lets the glass float with less tension than I used when I did my first fitting. Some pics: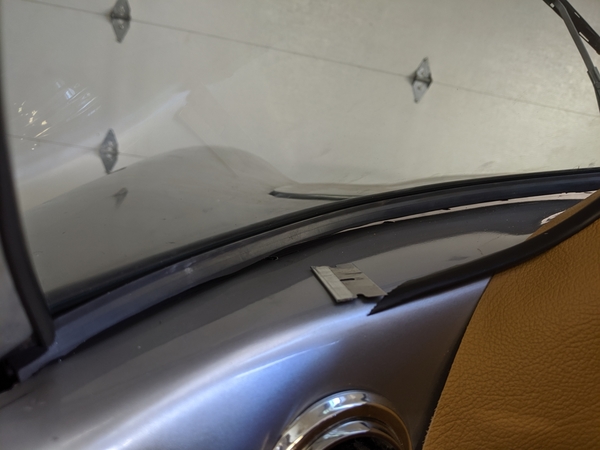
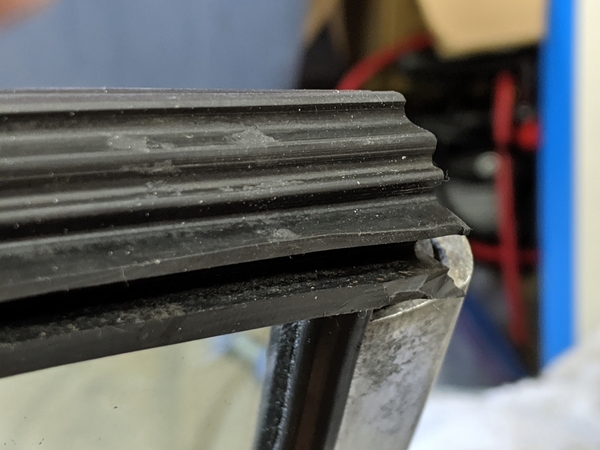
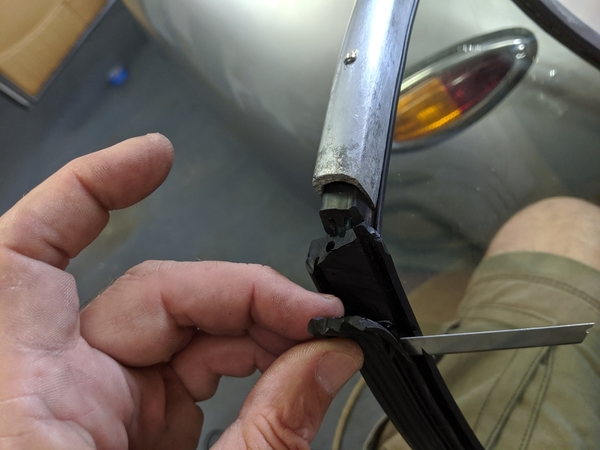
Leave enough rubber so the windshield can float in the frame and on the cowl.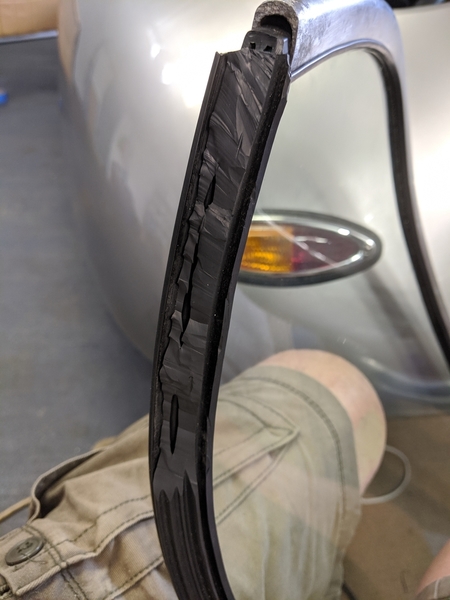
An hour's worth of rubber shavings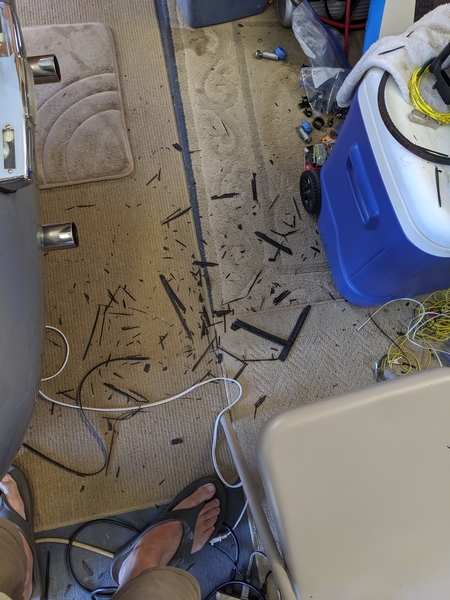
Marks on glass show where rubber makes contact. Check both front and rear of seal while tipping the windshield back (like the tension rod would do).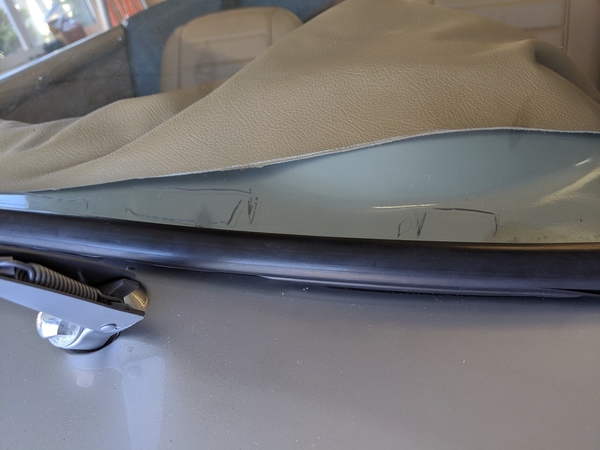
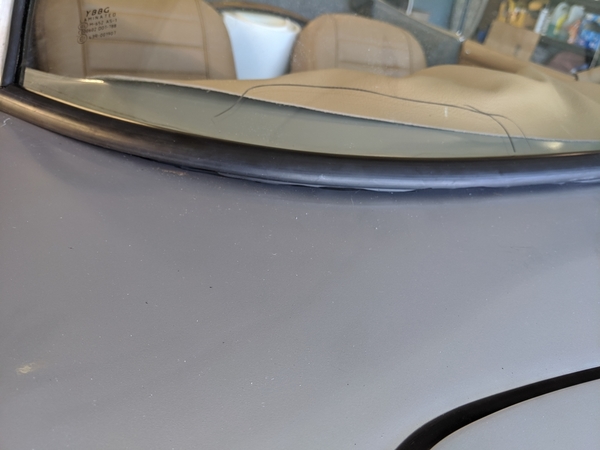
On my CMC I have no gap in the middle. I have the bottom rubber against the back of the aluminum strip instead of fitting over it.
I think the rotation of the end posts affects the fit in the middle.
Maybe if you are happy with your end result it doesn't matter how mine fits.
As per Michael M. I too set the glass behind the aluminum base trim instead of setting the bottom rubber over the trim. Then the flat black latex caulk for a finished look. Mike P..... I am amazed with your many talents ~
Thanks, Michael and Alan. Just making I understand what you're saying about the aluminum base strip. I was planning on putting down a line of caulk, riveting the strip on top, putting down a line of caulk on top of the rivet area of the strip and pushing the windshield bottom rubber up against the back of the aluminum base strip. Then I'll do the small caulk bead under the front bottom of the aluminum strip. Right?
I know some folks have tried to put the top of the strip into the slot in the bottom rubber, but my understanding is that it is unlikely to work out. Am I on the right track?
Thanks,
Mike
You'll need to make a cardboard mock up of the windshield post w/o the " 7/16" pipe stem " and side that down along the frame to give you the exact post hole position. I then measure and install the base rubber to the windshield bottom, tap it on with a rubber mallet . Then the U channel rubber on the top of the glass using electrical tape every 6" to hold it in place the U channel rubber putts to the base rubber... Set the windshield top frame over than ..I use a rubber mallet to tap it securely in place and set that aside. I then run a 1/4 - 5 1/6 bead of caulk along the sliced area base aluminum strip and set the windshield assemble in place. Caulk 1/8 out from the hole in the fiberglass and attach the posts to the frame and lightly snug it down , then do the center rod snug that too but gently. Now go back and tighten the posts while you apply downward pressure with your hand on the top of the frame tighten until reasonably sung and re do the center post . Go back to the post again and apply light pressure to snug it up and the same for the center post. . Clean excess caulk with a damp paper towel . I then tape the aluminum base molding creating 1/8" gap at the base to fiberglass then run caulk in that with your finger giving it one last swipe with a slightly damp paper towel...promptly remove the tape . Lift the electrical tape away from the glass, stretch and cut it even it will disappear into the upper frame. after it sets up you may have to do a small amount of tough up caulk .
Great instructions, Alan. Thanks!
Alan Merklin posted:Set the windshield top frame over ...
Speaking of the aluminum top frame, is there a best practice for bending the two lips needed for the cabrio top latches? Thanks,
Mike
On my CMC the lips were not bent out for the latches either. I thought the CMC top frame was a little crude in the corners so I replaced it with a frame from Vintage Speedsters.
“Speaking of the aluminum top frame, is there a best practice for bending the two lips needed for the cabrio top latches?”
I don’t know if it is a best practice, but it requires three pair of electrical pliers.
Decide where you want your latch(es) to be and how wide you want the lip to be. Mark the inside lip of the top frame where the ends of the lips will be. Apply a couple of layers of electrical tape to the jaws of the electrical pliers and then attach a pair of electrical pliers to the frame at the ends of the proposed lip. Using the third pair of electrical pliers, attach to the lip area and while your assistant is holding the frame steady with their pliers, gently bend the lip up in small increments across the width for an even gap of 1/8” - 3/16”
Done.
You don't need to do the lips, if you clearance the U rubber away at that location the clips do fit in.
Gordon, I asked my assistant about wielding electrical pliers on the frame and she suggested that I could just use my third hand instead...
Alan, since I'm stuck with only two hand and have recent familiarity with trimming rubber seals, I'll give it a try your way. Thanks everyone!
Access to this requires a premium membership.
Supporting members have donated about $4.00 a month ($49.00 US per year) paid annually.
AUTO RENEW: You membership will auto-renew after 12 months. If you prefer not to auto-renew, you can cancel your premium membership at any time and it will remain in effect until the end of the 12 months. To cancel, sign in at SpeedsterOwners.com and navigate to: (Your User Name) > Premium Membership.
PLEASE NOTE: Your credit card will receive a charge from CROWDSTACK PAY, the payment processor, not SpeedsterOwners.com.