Hello everyone,

I’ve started a new build Speedster, while I’m waiting for parts I thought I would post about my build. I think my build is going to take a while, I live in Calgary, Canada, getting hold of parts is not that easy.
I hope my post will help someone else in the future when they eventually take the plunge.

Here is where I am at.

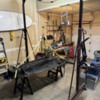
IMG_0182

As you can see, lots to do. The pan has been shortened by the good folk at Legacy Speed and Body:

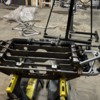
IMG_0183

The pan is from a 1969 built, 1970 registered beetle with IRS, it’s in pretty good condition, will only find out any hidden gems when it is sand blasted, for now though it looks okay. I haven’t got the shell yet, I used the instructions and measurements from the Fiberfab build manual I also got in contact with Vintage motorcars and asked if the dimensions from Fiberfab would fit one of their bodies, they confirmed that it would. I will be buying a shell from them eventually.

I decided to go with Subaru EJ25 engine. I just want to point out that there are a lot of dishonest people out there selling “good used engines”. My particular engine is an EJ251, that apparently had less than 100k km’s on the clock. When I stripped it down, here is what I found in the oil pan:

IMG_0038

Yes, you are looking at the no3 con rod bearing. In case you are not aware, these engines are prone to what is called rod knock, which appears to be caused by oil starvation. The no 3 con rod was also bent.
I was in a bit of a dilemma, I could buy a Japanese Domestic model engine and swap the manifolds, the timing gears and some of the sensors are different in North American Subarus, but it was still a risk as who was to say the engine didn’t suffer the same issue. I could buy a new engine, would probably cost around 10k, Outfront motorsports have a good selection and a good reputation.
In the end I decided to go with rebuilding the engine myself, I would learn lots about the engine as I am building, if it goes wrong, it’s my own fault.

I took the engine case halves to a machine shop, this in itself turns out to be frought with danger. I had the cylinders bored out to 0.020 oversize compared against DNJ 0.020 oversize pistons which I provided, also had the deck skimmed.The engine was filthy, It came out of a ca. 2000 subaru Forrester. I asked the machine shop to hot tank and clean the halves, I thought they would be immaculate when I picked them up, how wrong I was. They had cleaned them, but had then painted them silver, but over all the dirt and corrosion and helpfully had also painted all the mating sufaces for oil and water pumps etc. When I got them home, I bought a load of different sized rifle cleaning brushes and rods and set about scrubbing the engine inside and out, I then cleaned the bores with ATF until no dirt showed. My advice would be to get the block Vapor Honed before you take it to the machine shop.
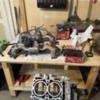
I have ordered a new crankshaft and connecting rods and bearings, FYI Naturally Aspirated subaru con rods are slightly longer than those in a turbo engine. You can see the bearings and pistons on the table, went with King standard size bearings.

Here is one half of the block after cleaning.

IMG_0181

I’ll continue in the next post.
Attachments

Images (4)
  • IMG_0182
  • IMG_0183
  • IMG_0038
  • IMG_0181
Original Post

Replies sorted oldest to newest

Wow! Here's to better luck going forward, Vic!

As you know, these cars take only 40 hours to build. So I'd say you're about half done.

Really sorry for the engine trouble. It was just such a concern that led me to buy a whole semi-operable Legacy when I started my engine swap. Still had bad head gaskets, but at least I knew the bottom end wasn't toasted.

You'll have an as-new engine when done. Might as well go for the Delta cams too, eh?

I also had a bit of a suprise when I went to measure the piston ring gaps, I bought DNJ 0.020 oversize rings, when I fitted them into a cylinder to measure the gap, they were all too big. I thought I must  be going crazy, the gaps on all 3 rings are different, but the gaps I measured were all slightly too big, for example the top ring should be between around .008 and 0.014, mine measured 0.018. Inthen rechecked the bore, these came in at pretty much bang on 100 mm. After not having much luck talking to anyone at DNJ, I have now ordered a set of 0.040 oversize rings and a ring grinder, the rings haven’t arrived yet but my intention is to file the rings to the correct size.

I have had to buy quite a few bits for the engine, some things are probably not required, for example, I am buying new bolts as I go along. I think I will be all in for about 5-6k when I am done with the engine. Don’t understimate the cost of rebuilding one of these engines, I did, but am fully committed now because of what I have spent.
more to come on engine fun and games, I haven’t started on the heads yet!

Here is one of the heads, these will be getting vapor honed.IMG_0184

I haven’t sourced a tramsmission yet, but will be going with a 5 speed subaru unit. Subaru gears have a reverse pinion, I’ve looked at how to fit it, it looks okay. I’ll be sure to post my progress with that.

On to suspension.

I have purchased Mendeola front and rear suspension:

IMG_0165IMG_0168

The front unit is weld on, the back is mainly bolt on, there are 2 brackets that need to be welded for the sway bar. I have recently finished a hobbyist welding course at SAIT, but these will still be going to Legacy Speed and Body to be fitted. I don’t want to be doing a 100 km’s down the road and the suspension comes off the front end!

For those who have read all the reviews about Coolrydes customs and have been nervous about ordering from them, let me fill you in on my experience. Firstly, Kevin seems like a pretty stand up guy and was helpful. I was a bit nervous about bank transferring the funds as I have never met him personally, but it was okay. It took about a month to 5 weeks for the parts to arrive. I had to pay 600 USD for shipping and a further 800 for customs, I had to source a customs broker as Kevin couldn’t do it. When the parts arrived, the spindles for the front beam were missing, I messaged Kevin, who informed me that they no longer provide spindles. The ad clearly stated that spindles were provided. Based on this info, I scrapped my torsion beam as I needed the space in my garage, another 400 US to source another set of spindles, great! All in all the experince with Coolrydes was good and I will be ordering their Cool stop brakes later this year.

That’s it for now, I’ll keep you posted 👍

Attachments

Images (3)
  • IMG_0184
  • IMG_0165
  • IMG_0168
@edsnova posted:

Wow! Here's to better luck going forward, Vic!

As you know, these cars take only 40 hours to build. So I'd say you're about half done.

Really sorry for the engine trouble. It was just such a concern that led me to buy a whole semi-operable Legacy when I started my engine swap. Still had bad head gaskets, but at least I knew the bottom end wasn't toasted.

You'll have an as-new engine when done. Might as well go for the Delta cams too, eh?

Thanks Ed, I did consider buying a second hand Subaru, I just couldn’t seem to find one that had less than 200k on the clock. Considering the amount I have spent on the engine already, given my time again, I would probably hold out for one, at least I would also have the transmission and wiring loom (I’m not looking forward to sorting through that birds nest)

Refreshing to read that someone is actually building a speedster, that was commonplace years ago. Mendeola front and rear suspension is a great addition ~

Hey, I'm building one too! Are there not many people on here with builds in progress?

Vic, congrats on your project (or condolences depending how you want to look at it lol). Looks like you have a pretty sweet build going.  You will have multiple lessons in frustration but the pride that comes along with it is second to none. Every time I walk in my garage and see the progress I've made keeps me going to keep at it

@Vic7672 posted:

Hello everyone,

I’ve started a new build Speedster, while I’m waiting for parts I thought I would post about my build. I think my build is going to take a while, I live in Calgary, Canada, getting hold of parts is not that easy.
I hope my post will help someone else in the future when they eventually take the plunge.

Here is where I am at.

IMG_0182

As you can see, lots to do. The pan has been shortened by the good folk at Legacy Speed and Body:

IMG_0183

The pan is from a 1969 built, 1970 registered beetle with IRS, it’s in pretty good condition, will only find out any hidden gems when it is sand blasted, for now though it looks okay. I haven’t got the shell yet, I used the instructions and measurements from the Fiberfab build manual I also got in contact with Vintage motorcars and asked if the dimensions from Fiberfab would fit one of their bodies, they confirmed that it would. I will be buying a shell from them eventually.

I decided to go with Subaru EJ25 engine. I just want to point out that there are a lot of dishonest people out there selling “good used engines”. My particular engine is an EJ251, that apparently had less than 100k km’s on the clock. When I stripped it down, here is what I found in the oil pan:

IMG_0038

Yes, you are looking at the no3 con rod bearing. In case you are not aware, these engines are prone to what is called rod knock, which appears to be caused by oil starvation. The no 3 con rod was also bent.
I was in a bit of a dilemma, I could buy a Japanese Domestic model engine and swap the manifolds, the timing gears and some of the sensors are different in North American Subarus, but it was still a risk as who was to say the engine didn’t suffer the same issue. I could buy a new engine, would probably cost around 10k, Outfront motorsports have a good selection and a good reputation.
In the end I decided to go with rebuilding the engine myself, I would learn lots about the engine as I am building, if it goes wrong, it’s my own fault.

I took the engine case halves to a machine shop, this in itself turns out to be frought with danger. I had the cylinders bored out to 0.020 oversize compared against DNJ 0.020 oversize pistons which I provided, also had the deck skimmed.The engine was filthy, It came out of a ca. 2000 subaru Forrester. I asked the machine shop to hot tank and clean the halves, I thought they would be immaculate when I picked them up, how wrong I was. They had cleaned them, but had then painted them silver, but over all the dirt and corrosion and helpfully had also painted all the mating sufaces for oil and water pumps etc. When I got them home, I bought a load of different sized rifle cleaning brushes and rods and set about scrubbing the engine inside and out, I then cleaned the bores with ATF until no dirt showed. My advice would be to get the block Vapor Honed before you take it to the machine shop.
I have ordered a new crankshaft and connecting rods and bearings, FYI Naturally Aspirated subaru con rods are slightly longer than those in a turbo engine. You can see the bearings and pistons on the table, went with King standard size bearings.

Here is one half of the block after cleaning.

IMG_0181

I’ll continue in the next post.
Please check the overall width of the EJ25 engine vs. the available space between the frame rails on your build. An EJ25 would not fit in that space on my older 1979 IM pan based Speedster. The cure was to build up a Frakenmotor which did fit ok.

David, thanks for the heads up, unfortunately this is one of the downsides to not having the body at the start of the build. I have researched it, but ultimately I’m hoping it will fit. I have researched that people have used the heads from an EJ22 (with manifold, etc). To be fair, with the way my luck is going, I should pepare for the worst and source some EJ22 heads 😂

@JoeyLegos posted:

Hey, I'm building one too! Are there not many people on here with builds in progress?

Vic, congrats on your project (or condolences depending how you want to look at it lol). Looks like you have a pretty sweet build going.  You will have multiple lessons in frustration but the pride that comes along with it is second to none. Every time I walk in my garage and see the progress I've made keeps me going to keep at it

Thanks Joey, got any pictures for inspiration?

@Vic7672 posted:

I do occasionally question myself, but for me the journey is a big part of this, there has been lots of learning so far, along with frustrations ( and no doubt more to come!) but, I’ll get there in the end.

That's how it was for me.  I needed a distraction from too much involvement at work and building a car was the answer, for me, so it became the journey.  It also allowed me to apply a lot of stuff I had learned at work (as a computer Geek), too.  

Work got even busier and I managed to stretch the build time out from "40 hours" (yeah, right...) to seven friggin years!!!  OK, so I used it as therapy from my job, but even I got discouraged after a while - Anyone would!

The fact that I had a (more-or-less) working car at the end was pretty much a bonus that turned into another journey.  I came across this bunch of knuckleheads after I built the car, but better late than never and I met a lot of them at the Carlisle show!  This site has been a tremendous resource, for sure, for all of us.

I did it a bit different from you, in that I had the CMC body delivered first, and then could use that (and the CMC build manual, however cheesy it was) for measurements to make sure everything was going to fit.  Even then, you found out in the end that the CMC body isn't straight or square or anything like that, so you make a bunch of adjustments and screw around with things till everything more-or-less fits and move on.  Don't be discouraged, though, as I've heard that Vintage bodies and their kits are better than average.  You'll still have to make adjustments, but that's OK - We all do.

Gordon - The "Speedstah Guy" from Massachusetts

Last edited by Gordon Nichols
@Vic7672 posted:

Thanks Joey, got any pictures for inspiration?

Well there's not a whole lot to see lol. I've only had it less than 2 months. The first month was just kind of going through everything, planning the build, buying parts, trying to find a donor, etc.

The last month I've stripped the donor down to the bare pan (still need to shorten it), started putting together the body, dropped the engine off to have it built, and took the seats to be upholstered.

I found a pretty much complete CMC kit that was sitting untouched in some guys garage for the last 38 years. All the parts, carpet, etc were still sealed in bags unopened. It was literally a time capsule. It came with the original paperwork and parts list and everything.  I'm making progress, but man, nothing lines up, the instructions are just enough to give you a bare minimum idea of how things go together, the body is curvy so trying to measure anything is a pita, just doing one door handle/latch assembly took me 2 whole days. It's been quite the undertaking to say the least.  But this has been my dream car since I was about 10 years old so I'm working through it!20240320_173127Screenshot_20240301_184032_Gallery

Attachments

Images (2)
  • 20240320_173127
  • Screenshot_20240301_184032_Gallery
@Vic7672 posted:

David, thanks for the heads up, unfortunately this is one of the downsides to not having the body at the start of the build. I have researched it, but ultimately I’m hoping it will fit. I have researched that people have used the heads from an EJ22 (with manifold, etc). To be fair, with the way my luck is going, I should pepare for the worst and source some EJ22 heads 😂

If you are going with a Vintage Motorcars body shell, I'm thinking it will come with the sub frame bonded in from the start, no ? If that is the case, they should be able to provide you with the inside rear frame rails dimensions. I used a Saab rad up front and 24 sq. in. of intake was all it needed. I also ran 1 1/4" aluminum tubing fore and aft for the  most part of the coolant run and that worked well. You might want to google Tom Shiels in Hamilton, On. He has some coolant accessories and can make up a wiring harness if you need one. Cometic makes gaskets to put 2.2 heads on the 2.5. You'll need timing pulleys and a belt from the 2.2.

Last edited by David Stroud IM Roadster D

Please check the overall width of the EJ25 engine vs. the available space between the frame rails on your build. An EJ25 would not fit in that space on my older 1979 IM pan based Speedster. The cure was to build up a Frakenmotor which did fit ok.

My Ej25 fit fine in my Vintage Motorcars body. There is plenty of room back there. If you're planing to use a Subaru motor, I can tell you you'll be happy with the power and slight maintenance they need. The older I get the less I want to crawl around under the cars. Maybe it's time for a lift !! Wonder if she will notice ................. ??

DaveIMG_1943IMG_2579

Attachments

Images (2)
  • IMG_1943
  • IMG_2579

If you are going with a Vintage Motorcars body shell, I'm thinking it will come with the sub frame bonded in from the start, no ? If that is the case, they should be able to provide you with the inside rear frame rails dimensions. I used a Saab rad up front and 24 sq. in. of intake was all it needed. I also ran 1 1/4" aluminum tubing fore and aft for the  most part of the coolant run and that worked well. You might want to google Tom Shiels in Hamilton, On. He has some coolant accessories and can make up a wiring harness if you need one. Cometic makes gaskets to put 2.2 heads on the 2.5. You'll need timing pulleys and a belt from the 2.2.

This is great info, thank you. I haven’t had a proper look at how I’m going to fit the radiator, I’ve done some research but there is not that much info out there.

With a subarugears tranny you have to make sure you get axles of the proper length!!! And dished stub axles That is very important. I cannot emphasize that enough.

With a Mandeola front you might have a fitting issue for a rad I think I would wait to see the body and pan set up before moving on the rad…. Just saying.


Btw small cars does harnesses as well for engines

Last edited by IaM-Ray
@IaM-Ray posted:

With a subarugears tranny you have to make sure you get axles of the proper length!!! And dished stub axles That is very important. I cannot emphasize that enough.

With a Mandeola front you might have a fitting issue for a rad I think I would wait to see the body and pan set up before moving on the rad…. Just saying.


Btw small cars does harnesses as well for engines

Thanks for this, the more info the better. I was going to get the body before looking at the rad and cooling hoses.

A while back, whike researching, I found this picture (thank you for whoever took it), that gave me an idea of hiw the radiator might mount.

IMG_2650Thanks for the steer on Small Cars, I’ll check it out.

Attachments

Images (1)
  • IMG_2650
@Vic7672 posted:

Thanks Dave, it does look like you have a fair amount of room in there, your engine looks a little non conventional. What modifications have you made to it?

Hi Vic7672 The engine was built by John at Outfront Motors in Buena Park, CA. I used his stroker kit ( Callies crankshaft) with STI rods and CP forged pistons that he recommended. I can't remember the heads he used but they were ported better than stock. The whole assembly was balanced also. Lots of other billet parts he makes in-house. I'm very happy with it and love the power of the 2.6L.

@edsnova posted:

+1 on Tom Shiels. He did my car's engine and ECU harness and, while I am now having trouble with the wires 10 years later, I can guarantee my problem ain't nothing he touched.

10 years ago, eh ? Doesn't seem like that long ago....I think I was doing my Soob conversion about the same time and we compared notes many times and I remember many good exchanges. Time waits for no one. Get 'er done while you can I guess.

Last edited by David Stroud IM Roadster D

Hello everyone,

Very quick update, still waiting on a crankshaft, can’t do a whole lot until it arrives. Piston rings arrived this week, I quickly fitted the no 1 ring into one of the bores, there is no gap which is good news.IMG_0191

I’m going to hang on for a bit to file the rings, the temperature in my garage is around 5-6 degrees centigrade, I don’t think this is an ideal temperature for accurate measurements.
In the mean time I’ve been scrubbing the inlet manifold with various cleaners, apparently (according to people on youtube) Simple Green is the “absolute best” cleaner for engine parts etc.

IMG_0190

So far, I’m not convinced. I can’t say it’s any better than Gunk degreaser, or brake cleaner. I’ll keep scrubbing, I’ll let you know what I think.

Contacted Derek at Legacy Speed and Body, hopefully will get the pan in this month to have the suspension welded on. Photos to follow.

That’s it for now, thanks everyone.

Attachments

Images (2)
  • IMG_0191
  • IMG_0190

Oven cleaner is probably worth a try out in the open for a few hours then wash off. Also you could use a powerwasher after the chemicals have time to work.  Some products use clay and a polish wheel to shine it up… where Bruce the polish guy


BTW the cleaners in dishwashers are quite powerful either a strong base or acid and so is the water temp so it is amazing what it can do to parts.  Same as Al’s formula of baking Tremclad Rust paint for durability…. I guess for his holiness as well.

Last edited by IaM-Ray

While brake cleaner works well on a lot of baked on grime, it can eat away at and discolor some softer aluminum parts, leaving them hazy (ask me how I know).  Same goes for EZ-Off Oven Cleaner - It is good, but can etch aluminum parts.

I have had good luck with Gunk Engine Degreaser and/or brake cleaner, but I’m still a bit old school and sometimes resort to just plain gasoline and a stiff brush when none of the neighbors are looking.

@Vic7672 posted:

Hello everyone,


In the mean time I’ve been scrubbing the inlet manifold with various cleaners, apparently (according to people on youtube) Simple Green is the “absolute best” cleaner for engine parts etc.

IMG_0190

So far, I’m not convinced. I can’t say it’s any better than Gunk degreaser, or brake cleaner. I’ll keep scrubbing, I’ll let you know what I think.

Contacted Derek at Legacy Speed and Body, hopefully will get the pan in this month to have the suspension welded on. Photos to follow.

That’s it for now, thanks everyone.

Vic, what's your end game with that part? You're going to powder coat? Polish to a near-chrome finish? Or just clean it to its "as-cast" condition?

Here's why I ask:

If you just want it "clean" and you intend to leave it stock/raw, don't kill yourself. Once installed in a car that's actually being driven it's going to get dirty anyway. Nature of the beast.

If you want to get it powdered, then for sure keep scrubbing. Your powder coater will appreciate it.

If you want that super shiny polished aluminum look, stop cleaning and start flapper-wheeling it. Start with the casting flash. The crud that's currently on it will help move things along.

@Vic7672 posted:

Thanks for the suggestions everyone, I’m going to get the manifold and the valve covers powder coated. I thought I would scrub them as best I can before dropping them in, I might get the powder coaters to sandblast them before coating, realistically it all comes down to cost, photos to follow.

I’ve used 3 different powder coat shops over the years. Every one of them blasts everything before it gets coated. It’s part of the process.

@LI-Rick posted:

I’ve used 3 different powder coat shops over the years. Every one of them blasts everything before it gets coated. It’s part of the process.

Same here, with one caveat -- when I powder my own stuff with an Eastwood gun and powder I always blast. Sometimes the results are fantastic, other times I have issues.

Commercial powdercoat company A always blasted and the pieces and they always looked great (before they burned down). Powdercoat company B was a metal fab shop with a large powdercoat booth, and he did a phosphate wash. It didn't work as consistently -- sometimes it was great, sometimes.... not so much. Powdercoat company C always blasts and the pieces always look great.

Add Reply

Post Content
×
×
×
×
Link copied to your clipboard.
×
×