

I am totally unfamiliar with what it is....Is it a motion reverser for a hood gidget to attach to a slip-slide to the fornacrcatator ?...........Bruce
The key thing, in this application, is that I did not have to weld on any of it.
I could gas weld it for ya..... Jus’ sayin......
And did you know you can “learn” how to weld on YouTube? ![]()
Basically what I'm trying to do, Gordo.
You Tube and practice, except, instead of a nice 4x4-foot piece of quarter-inch plate, I've been using

and
Attachments
Images (1)
Yup, that works. My son learned from a couple of friends and from Youtube. To practice, he built a car hauler for his track car and later that became my hauler for Pearl. You can see how the welds got nicer looking as he went along and by the time he finished he was really good.
Car Hauler, Bridget, 1/4" plate - Whatever'll take a bead.....And just DO IT!
Been fighting the car the last couple days. The throttle linkage works, but I don't like the bend in the cable. Should have bought a foot shorter.

While I'm at it, an ignition question: Anyone here ever use CB Performance's "Black Box" device? Kind of looks like a deal for those of us with plain 009s who'd rather not convert to crankfire or go with the full MSD or Mallory kit.
Not really digging the serial cable interface, but that's a minor issue, I think, if the software generally works.
—which is always the question, isn't it?
Attachments
Images (1)
edsnova posted:Been fighting the car the last couple days. The throttle linkage works, but I don't like the bend in the cable. Should have bought a foot shorter.
While I'm at it, an ignition question: Anyone here ever use CB Performance's "Black Box" device? Kind of looks like a deal for those of us with plain 009s who'd rather not convert to crankfire or go with the full MSD or Mallory kit.
Not really digging the serial cable interface, but that's a minor issue, I think, if the software generally works.
—which is always the question, isn't it?
@Teby S has the CB Performance "black box" and as far as I know he likes it. If he were to complain about it I'd certainly here from him about it. Maybe he'll come on and tell us about it.
I run a CB black box converted to drive two coils for my twin-spark. Don’t use a Pertronics module, and it’s the shizzle, as they (used to) say.
The serial-port interface is pretty old-school (rectified with a cheap adapter cable from Amazon), and the software is not beautiful looking— but once everything is set up, it works great.
I have no idea why it isn’t more popular. It’s 200 bucks and it works great.
These are the best endorsements I could hope for.
The engine I bought came with a 009 and Pertronix. Everything I hear and read suggests it's not the optimal setup, particularly in the low & mid-range throttle response department. Originally was thinking Megajolt/IDIS (along with a bunch of really stupid experimental junk to make the engine look more "Fuhrmannesque"), but that's all out the window since the fan shroud project is on indefinite hold.
I wanted to make a better spark map, so the next likely suspect was Mallory or Pat's Magnaspark, but this box looks like it has what I want and nothing I don't need.
Also...it'd look real nice mounted on the firewall, just to the right and below the fuel pressure regulator, right in the spot where the voltage regulator was on original 550s...
Thanks for the quick responses.
Stan Galat posted:
...I have no idea why it isn’t more popular. It’s 200 bucks and it works great...
Could be a lot of folks think you need to be a rocket scientist to set it up and program it.
And, then, you still need a distributor and you have to fiddle with that to lock out the mechanical advance.
So, just how tricky is it to get it working and find the best curve?
You need to connect a laptop, no?
It's got a serial port, so you need to buy a USB to Serial adapter, AND make sure your laptop has correct drivers for same, then It;s a slam-dunk. I recommend the FTDI chipset cable, drivers are easy to find.
I found all this out in the XP era when everything was supposed to be plug and play and just, well, wasn't.
Same stuff I went through with Megajolt though, exactly the same.
Ed, I believe that Stan's distributor is LOCKED out, as in no advance weights and springs. Easy enough to do yourself but check with him on that.
Stan, are you using points to trigger the box?
DannyP posted:...It's got a serial port, so you need to buy a USB to Serial adapter, AND make sure your laptop has correct drivers for same, then It;s a slam-dunk. I recommend the FTDI chipset cable, drivers are easy to find...
So, PC laptop only, I guess. No way with a Mac? I gave up on PC's years ago - my most recent PC laptop is Windows 7. Would that work?
DannyP posted:
...Ed, I believe that Stan's distributor is LOCKED out, as in no advance weights and springs. Easy enough to do yourself but check with him on that...
Yeah, I thought that was the whole point of the black box - control the advance curve entirely in software and cut out any possibility of sloppy advance hardware mucking things up.
I notice there's also an input on the box for manifold vacuum pressure, to fine tune the curve for engine load and throttle position. It looks like there's a plate that installs between the carb and the manifold. Do you HAVE to use that to make it work? Do you sacrifice a lot if you choose not to?
Mitch, I don't know about Mac, the only Apple product I have is an Ipod Nano. As long as the software will run on MAC, I can't see why it wouldn't work.
You don't need the plate between carb and manifold. There is one vacuum takeoff on a Weber IDF, you could use 1 or possibly a T and both vacuum takeoffs if you want, but I'm not 100% sure that will give you a good manifold vacuum signal. I think it is a vacuum port designed for a distributor, but which distributor IDK. There is a very small slotted brass screw in the vacuum port as a plug.
If you've got an old vacuum gauge, hook a long hose up and go for a drive and look at your light throttle conditions to see if you get a decent vacuum. If you don't, keep reading. I bought one at Autozone/Advance for $25-30. It also measures fuel pressure up to 10 psi or so.
If the Weber vacuum takeoffs don't work you could drill and tap each runner for a pipe thread fitting and run 4 hoses together, usually to a reservoir about the size of a pack of cigarettes is a good volume I've heard.
The vacuum advance gives you more advance at light throttle settings and can increase your mileage, if that's what you're looking for.
Instead of all that vacuum hose nonsense, I just made a bracket for a Ford Escort TPS and did it that way.
Thanks, Danny.
Problem with Macs is that they haven't had serial ports since the Eisenhower administration. (OK, I wax hyperbolic.)
So, if there's no USB option, Macs are out, I guess. There may still be some kind of hardware solution for Mac that emulates a serial connection via USB, but I haven't heard of such a thing in years. Next question is does CBP supply software that will load on a Mac? Anyone? Bueller?
And, again, can you run the Black Box at all without some kind of vacuum feed? If so, does it seriously compromise performance to do so? In other words, if you get the box, should you assume you'll need to hook up a vacuum feed, too?
PC only, I think.
Yes, the distributor is locked out-- it has to be to work with the "Black Box". I removed the weights and spot-welded the advance plates, but CB sends a little plastic washed that will accomplish the same thing. My twin-spark distributor is just an 009, locked out, with some adapter hardware to get an early '80s Datsun twin-spark 4-cylinder cap and rotor to work.
I've got nothing against the Chinese copy distributors... if you lock them out anyhow. At that point, it's a tab and a shaft.
DO NOT USE A PERTRONIX points replacement module! They're horrible. Mine cost me a full year of tuning. Lots of the spark-scatter you see with a generic 009 is the module. I'm using a Compu-tronix (yeah, I know Pertronix owns them now, but the modules are better). Points would be fine as well, since it's just being used to generate a signal for the Black-Box.
The spark table can be as easy or as complicated as you want it to be. The Black Box has provision for a vacuum signal (instead of a throttle-position sensor) to determine load. It's not as accurate as the throttle position sensor, but it does work and it is fully customization. If you decide to forgo the "load" feature, you just start by setting up your spark table to mimic the 009 or 010 tables available everywhere (if you do a search). Once you get that how you like it, you can start playing with load. Or not. Everything works like a perfect, German 010 that was custom re-curved by Black-Forest gnomes, just for you. Setting it up for load is where it can get pretty esoteric, but it's cool and you can watch it in real-time as you drive down the road. One you get past "freak-out", it's really fun and useful too.
The software is Windows-based, and Windows 7 is actually perfect. Also, you can use your Mac, assuming you run bootcamp (you do run bootcamp, don't you, Mitch?). It's a tiny little program.
The difference is astounding. Everybody farts around with east Asian distributors, and just lives with whatever advance the thing gives you (or not). This is customization, and you can keep your crappy (but good-looking) distributor.
It's really hard not to love it.
In Spyder-build news, I only got a couple hours in the garage today but it was fruitful: got my rounded-door-edge thingies hammered-out and this time they look pretty close to right.


As some of you may recall, I've tried to make this part several times before without success.
Comparison:
Attachments
Images (2)
Ed: Mucho bettero!
Mitch, buy this:
https://www.amazon.com/UGREEN-...al+adapter&psc=1
Then use the windows emulator thingie for your Mac, like Stan said.
Stan my friend: Spot on! I had no idea all the scatter was the POS Pertronix. The distributor I have is probably fine then, 009 from 2001.
Stan and Danny: Thanks for the updates. So far, the new CB Magnaspark seems to have solved whatever spark issues I may have had. But the Black Box looks like a good next step. If a Windows 7 laptop will work, that's what I'll use.
Ed: I see you're going for the plex windscreen, too. It's amazing the lengths to which some people will go just to win the Carlisle limbo contest.
DannyP posted:... I had no idea all the scatter was the POS Pertronix. The distributor I have is probably fine then, 009 from 2001.
I didn't either, until Mark at CB told me to use something else. They really are absolute trash. He suggested points, and if I put them in there, they'd probably last forever. But, I just can't do it-- too many bad memories of all the fuss.
Sacto Mitch posted:
Stan and Danny: Thanks for the updates. So far, the new CB Magnaspark seems to have solved whatever spark issues I may have had. But the Black Box looks like a good next step. If a Windows 7 laptop will work, that's what I'll use.
Ed: I see you're going for the plex windscreen, too. It's amazing the lengths to which some people will go just to win the Carlisle limbo contest.
Actually gonna install the Speedster windshield, pretty sure.*
The TR bodies came pre-drilled for the windshield endclamps, but one of the POs filled those in, so I'll have to re-drill. Easy-peasy with the Merklin Motors (TM) un-patented Windshield location device(s), but I've put it off until final paint prep gets started.
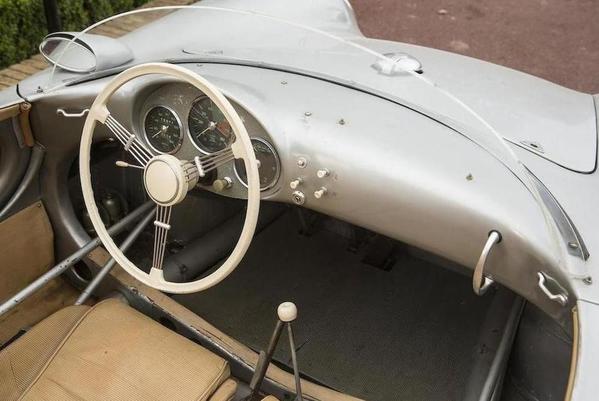
*That's it sitting on the cowl, upside-down. If someone gave me a NoMar or Lexan screen I'd have a dilemma.
Ed, I can give you measurements if needed. I'm going with it "may" be different than a Speedster.
With that car, I’d do lexan.
But Stan, Ed doesn't care what we think.
Ordered the Black Box.
I do care what you-all think. Thing is, I'm on a budget. The car came with a nice Speedster windshield and like two improved frames for it. A plexi windscreen from Fibersteel is $800.
It looks cool. But not necessarily more legit. Plenty of customer Spyders went out with full-frame glass windshields. And also:

[This is 550-0051 (the car I am copying) in its post-Lemans/pre-restoration form.]
People who own these tend to say they prefer the glass screen as a practical matter. They also like wipers—which don't play so good with the plexi screen.
Finally, it has been alleged that, in some states, you need a real DOT windshield to title/register a road-going vehicle....
I gave this considerable thought, and the decision was made to install the glass screen.
That said, I also have some NoMar material I plan to do something cool with to make the windscreen more "period-cool." Stay tuned.
Attachments
Images (1)
Blog update. Firewall work.
Also:


Finally got those front-of-door curvy things done. Geez what a PITA! No wonder nobody does this. But, there they are, just a few rivets and some final smoothing and paint from final.
Attachments
Images (3)
Hey everyone, we just passed the 1-year anniversary of my ownership of this Spyder.
The anniversary of the build's start date is not until after Carlisle, but still. Looking back—and this isn't really meant as a brag, because I'm kind of amazed by it—so far, I've done pretty much exactly what I said I'd do.
I've logged every penny and hour spent and, by my count, I've clocked 656 hours.
Holy crap! That's about 100 more than I at first estimated (silently, to myself) the build would take.
Last week my wife asked how close to done I was. I figured about 85 percent. Right now I foresee a week's work (35 hours) on the wiring, about the same on body prep and paint, 20 to reassemble the car and put the engine in, and maybe 30-40 in sorting and detailing. Which, if accurate, means I'm closer to 80 percent than 85.
When my job went away last fall I thought I had a fair shot of getting this car built, titled and tagged in time for Carlisle.
As of now I think that's unlikely: I just accepted a new full-time job, so it's back to strictly nights and weekends on the Spyder now.
All that said, we've just passed a milestone, and I thank everyone again for your encouragement, advice and technical help. This build is entering the home stretch, and I am getting very psyched about it.
Congrats on the new job!
Try to maintain some balance by not letting it interfere too much with what's most important - building the Spyder.
Wonderful news about the job, Ed! I hope it works out well for you.
And don't forget, Ed, that we count on the wordsmiths among us to provide lots of . . . words.
As usual, outstanding work Ed! And I hope the job works out as well. Al
Congratulations on the new job Ed. Best of luck in both; completing the Spyder and the new job.
I certainly commend you ! I know and appreciate what it takes to do what your doing ! Many times I would go to sleep thinking about what aIl I wanted to do or how to do it. I'd wake up the next morning and lay there for a while thinking about it even more. On the freeway, driving home from work I'd be thinking about it ( That's a lot of "think time" out here in So Cal. ). I enjoyed every single moment of it too ! Thank you for sharing your project so thoroughly with us Ed,,,,,,,,,,,,,,,,,,,Bruce
Good news on the job, Ed.
They can only keep a good man down so long. ![]()
Good for you Ed on both counts!
Bittersweet on the new job, there, "Spyder Ed"....
Returning to a routine and doing something that you like, plus getting a paycheck for it is a wonderful thing.
Not having to look for employment is also a wonderful thing.
Having less time to spend puttering in the shop, and the instant gratification that gives, is somewhat less wonderful.
Life is a balance, I guess. Very glad to hear you're employed again. That means a lot!
Ed;
Congrats on your new job!
Great news Ed. You can always bring the spyder to Tour d’smo at the end of Sept. Looks to be quite a few spyders. Might even convince you to keep it.
Thanks, everyone. It's been an extra-fun spate of unemployment.
Bruce summed it up well.
I've often thought about this...

Attachments
Images (1)
Great news about the being back at work, Ed! Hope it all turns out well. ![]() @edsnova
@edsnova
I give up.......
Seduction Motorsports?
(although the door looks like a Ford F100 pickup)
That looks CG to me, and I don't mean my initials.
Gordon Nichols posted:I give up.......
Seduction Motorsports?
(although the door looks like a Ford F100 pickup)
55 Buick
I don't understand what that Buick door pic is doing in this thread. wuzzah?
It's 3rd base, Ed. Don't pay any attention........
Sorry Ed, all your "holy" work reminded me of those door panels/craftsmanship.
Well now that Ed has a job, btw congrats, you can now get a Holy Day off of the spyder project.
Made this today though. No holes (or, I hope there won't be when it's all done-done). 
Attachments
Images (1)
Common Ed, you really wanted to put a hole in there ![]() ... just kidding.
... just kidding.
And that is a...?
guessing gas tank go cart?
Oil reservoir?
It says “Oel” on the cap.
Looks like a dry sump tank, too.
Gordon Nichols posted:Oil reservoir?
It says “Oel” on the cap.
Looks like a dry sump tank, too.
Some of them say 710 on the cap. It confuses some people...
Fake dry sump tank/breather. It will function as a breather box and be positioned in the correct spot for a Spyder dry sump tank; it is scaled-down somewhat to make room for the Accusump, with which it will be cheek-by jowl.
Thus, my car will have its behind-the-passenger area of the firewall occupied by the correct(ish) looking and functioning "oil tank and breather components," as original.
[bows deeply; runs away cackling]
ooooo..... mores holes... looking good ![]()
Couple weeks ago, me boi Jimmy-da-welder took back my gas tank and the 3/16 plate I made to strengthen and shim-up the filler assembly. He was excited to use stainless this time because it leaves fewer voids, so he promised a nice smooth, no-leak finish.
Couple days ago I got it back from him and sho-nuff: smooth, shiny; great.
Now to drill out the five holes for the filler....

what the..

HEY!!
Three hours (and several bits) into it, I now have half a hole. Tried the small bits, the step bit, went to the store and bought some Milwaukee colbalt bits. Broke two of them.
Tried cutting fluid, tried without fluid; slow, very slow and not-so-slow. I tried pulsing the drill, pushing hard, not so hard and too hard. Pilot holes, straight in with the 5/32, everything in between.
I tried getting the tank up in my drill press. No-go.
I tried the internet. The consensus there, among welders and drillers, is, when welding with stainless stick: DRILL THE HOLES FIRST, THEN WELD.
Now they tell me?
Jimmy says he can drill it for me but I'm not so sure. I guess I'mma just give it back to him and cross my fingers.
Attachments
Images (2)
Yeah I could have told you stainless sucks to drill. Did you try oil?
An "OLD" trick we used on difficult to drill alloys was a blend of lard and sulphur.....
Never used it on stainless..... Just a thought....
“An "OLD" trick we used on difficult to drill alloys was a blend of lard and sulphur.....”
I think they use that at “Shultzy’s Diner”, too. At least it smells like it.
cutting fluid="oil."
You're gonna need a very thin oil to cut stainless steel weld. That stuff is beyond "wicked hahd".
Cobalt steel drill (nothing else seems to do it) and drill slowly with lots of pressure to get the drill to "bite". High speed on the drill just creates excess heat which anneals the drill tip and almost instantly dulls it while polishing the metal you're drilling so the drill can't "bite". Be very careful - it's easy to break off the drill using this technique.
Cooling and lubrication are key, too, but use a thin cutting lube, like less than 5 wt. I've had OK luck with 3-in-1 oil, but the best stuff I've found is sewing machine oil - about 1wt and clear - it drips like water. Walmart fabric department - Singer/Brother/Husqvarna all work well.
I had to drill through 1/4" stainless plate for my driving light mounts and went through two sets of Home Depot regular drills before I heard about the Cobalt Steel drills and oil from a guy who makes safety railings for sail boats. Old Navy CB who knew his stuff, but what he also said was "Always drill first and THEN weld Stainless."
@edsnova- have you tried carbide drill bits? They're expensive, but what I had to buy when drilling holes in hardened transaxle parts. Cobalt wouldn't as much as mark the side of a gear. One thing to note- they are brittle. When drilling through surface hardened gears (the hardening was a 30- .040" layer) I broke 3 bits when transitioning from the relatively soft middle to the other side. Up here a good carbide 1/8" bit is just over $20 (broke 2) and a 1/4" bit is well over $50 (only broke 1 but you can still guess how loud I yelled "F*&%K!!!!") but they're the only way to make holes in hardened steel.

The sides were cut with ceramic inserts; again, the only thing that would last.
Attachments
Images (1)

It is interesting how many old manufacturing sites all over the place have been converted to computer Data Centers in the modern era.
Why?
Because lots of places making, say, gears or castings or hot forgings had to either heat the metal up before forming it or harden the steel after forming (like Al's gears) and they did that in electric ovens. Those ovens got WICKED HOT and they got that way via electricity.
So.... Having that much electric capability in the site in the first place makes it easy to build up an electricity-eating Data Center. One of my old 492-drive storage cabinets ran on 208 volts, 3-phase at a steady-state of about 43 amps and we used a 60-amp wall plug - BIG sucker, half the size of a football. Gimmee POWAH!
Guys, I tried cobolt, dry and slow, pushing hard (broke a couple). I have a divot to show for it.
Carbide I don't have, not sure where to get since Scarie closed a few years ago. Hoping the guy who welded it can drill it. If not, I'm kinda screwed...
Desperate times, desperate measures, Ed.
Have you considered shipping the piece off to someone in Texas to have the holes done? Most folks there over the age of 12 are well-equipped to do the job for you.
What caliber holes do you need?
If Jimmy can't get it I'll get it to a machinist. Got a couple little jobs I need done.
Use an acetylene torch with very small tip. Heat drill spot to cherry red....not yellow or orange. let cool and drill with your cobalt.....Bruce
Now that's working smart instead of hard!
Bruce, thanks. I'll pass that advice on to Jimmy. He's not touched it yet; the tank was still leaning on his garage when I walked by today...
While waiting for my gas tank I'm fully all-up in the wires.

Also I got the "Black Box" from Pat Downs so I can make the bracket for that when I'm stumped about the wires...

Attachments
Images (2)
If anyone here has or knows someone who has a TR Spyder, I want (maybe need?) the supplemental wiring diagrams and instructions. My assembly manual refers to these but did not include them. Instead, I have


I believe this to be the wiring diagram for an original 550. As you can see, it is in the original German. If anyone (Anand? Looking at you) wants a copy I'll gladly scan it and send. It's not really that useful for what I'm trying to do.
Thanks all.
I've been away from the car for about a week (Bridget is now oil-changed, bearing-packed, washed and almost fit for Carlisle duty), and during some of the frustration gaps while slowly tracing Spyder wires I have completed the firewall bracket for the Black Box.

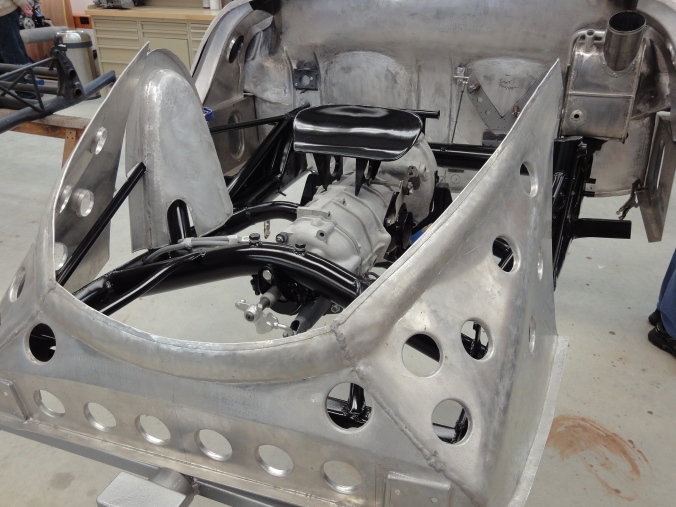
Here's a Spyder Factory copy of 550-0090's firewall, under construction:

And mine:

Attachments
Images (5)

No pic but momentous news: one of the Spyder club members gave me the key to the Thunder Ranch wiring harness. All color codes, saying what plugs into what. And it works! It's almost all correct, far as I could tell today in an hour or so reading the grid and checking/marking what I have.
So I should be able to get the car actually wired sooner than later.
..And now SMS informs me that the barber pole vinyl I ordered is ready to ship. Looks like I'm gonna miss having the car done for Carlisle by about a month.
"barber pole vinyl?" Please elucidate.
I would be great if you towed the Spyder to Carlisle as it would be a draw to see it " in progress" on the show field
Do you want a day or two of help on wiring and motor install? I may be able to help.
Thanks for the offers, guys.
Can't tow the car before it's titled and registered, and I don't think I'll get there in two weeks.
Also, still haven't made the tow bar system.
Also, I can't tow a trailer with Bridget. No ball hitch.
Wiring I'm pretty sure I've got a handle on, Danny.
The motor though—that might be a thing. My plan is to get the car wired and painted, bit by bit, hang the clam from the ceiling and put the back half of the Spyder on the body dolly that Alan forced on me last year, then get the engine hoist out, attach the engine to the transaxle and lower them onto the motor mounts. Then jack the car up and pull the dolly out, mount the rear wheels & hook up the lines, bleed the brakes, wire the engine stuff and start it...
then lower the clam back down, bolt it on, plug in the lights, and go for a spin.
I know I could do it all alone but, damn, having a dude whose actually built a couple of these—even just standing back, sipping a brew, pointing and laughing at me—could be a big help.
So hold that thought. Should be getting to this point in a month or two (depending on the paint situation). I'll put you up if you want to blast down here for a weekend.
Lane: go to the Google. Type into the search box: barber pole vinyl 550 spyder

Attachments
Images (1)


Attachments
Images (1)
Dude, you left a Big-A$$ed wrench lying in there.........
But the welds look nice....... You do-em?
That's a braze, and yes.
They say, if you can gas-weld(braze) you can Tig easily.


Attachments
Images (2)

reference:

Attachments
Images (2)

And that is a...?
Lane Anderson posted:And that is a...?
breather/collector?
PS- Great work Ed!


I thought that might be it, having seen yours, but I wasn't sure. Pretty amazing work, Ed, as usual.
That's a pretty big hole in the case. Of course, they made it that way.
Yeah I won't be punching a hole in the top of the case, just piping the valve cover vents to it a la Danny P's method.
It also won't fit exactly where the originals had them, since my engine has that big honkin' Type IV oil cooler in the way, and the DTM shroud covering it. But the mount looks like it will fit well on the trans bolt, and that puts the tube up tight against the oil cooler shroud, running up just behind the passenger side air cleaner, so the look should be pretty close.
It's an aluminum tube with brazed and epoxied bits—the epoxy needed after trying to braze new stuff near previous brazes. That doesn't work.
Filled it loosely with some copper wool and the aluminum turnings from making the holes in the mounting plate—artisanal aluminum wool. The top hose will go into my bogus "oil tank"
and I'll probably put a little mushroom breather filter on top of that and a second drain-back fitting on the bottom, mainly in case anyone ever dumps oil in it.
The result will be too much more breather volume than the 1914 would ever need: over a gallon by my lights. But it's mostly to get the look close to what it should be and, I think, too much breather volume doesn't hurt anything does it?
Nope.
And remember, Oh meticulous one, that the original 550 4-cam was a whopping 1,500 cc's.
If a big breather tube was good enough for Porsche and Glöckler it will be good enough for a "Tribute Car".
Yeah, don't have to worry, Ed. I don't think an engine has ever actually 'suffered' from too much breather volume.
My new deadline for Spyder is late August. I'm hoping to drive it up to Lime Rock for the Historics. I gotta get after this thing.
But today was not the day. I set out to do the 200,000-mile service on the Frontier this am (oil change, some grease for the drive shaft, this and that, plus a look at the front and rear brakes) and got stymied.
Bought 5 quarts of High Mileage Semi-synth and a new filter, pulled the truck into the garage, spilled a bunch of oil draining it (it clung to the pan and diverted away from the catch basin), ripped a hole in my knee on a screw the PO half sank into the concrete floor, cut off the screw, got the filter changed and poured in the new oil.
I then took my collection of part-full 5-quart oil containers and combinated them into one container. Mostly 10-30 semi with a bit of 5-30 and some 5-20 full synth. Had about four quarts total and I was very pleased with the prospect of using that in the truck's next oil change in about 5000 miles.
Checked the oil in the truck and saw none on the stick. Checked again and
oooh. ****. REALLY?
Yup, really. I'd forgotten to put the drain plug back in.
So that was...messy. I reckon about a full quart came over the basin. $26 of new oil into the recycle tank and on the floor. I put the drain plug in, poured the mutt mix in and set about fixing the squeal the truck makes on start-up. Figured a little more tension on the inner belt might do it.
Climbed under to get at the lower idler pulley. The center bolt did not want to loosen. Finally got it a little backed off, put the wrench on the adjuster bolt and...
Broke the head off.
Seriously??
So that was fun. I didn't have another bolt that was right, but I did scrounge up one that was longer and, by turning it through a die for about three inches, then cutting an inch off the bottom, I made it work.
Those of you who know something about mechanical things already know that my new adjuster bolt got me nowhere near fixing the incessant squeal. Because the bearing in the pulley is shot.
So I put it back like it was. Fought it to a draw.
By this time it was raining, so I backed it out of the shop and brought Bridget in.
I'd hung laundry on the line though...
So I moved on to beers.
Some days it just doesn't pay to get after things with the wrenches.
Oh my. Those kind of days just you wonder why am I doing this? Hang in there!
 This one's for you...
I feel for you Ed.... Years ago I changed out a bad oil pressure switch on a Miata, it was a blind install I had to feel for the oil pressure port but there was also a boss right next to where I needed to be on the head that happened to be the same size hole as the oil pressure switch and that was where I wrenched it into ..... Started the Miata and in an instant five quirts of oil blew out of the motor ...Clean up in isles 1 & 2 ~ I was throwing down throw rugs, blankets anything I could grab.....
Ed, someone gave me a new chain saw for a gift about 20 years ago.
It's still in the box, never used.
Every time I think about firing it up, I remember all of the days I've had over the years like the one you just described and I put it back in the box.
...So I moved on to beers...
I'm opening 1 right now to join you so you're not drinking alone. Friends don't let friends drink alone (and you know, now that we've met, that that's the kind of guy I am!![]() ). Cheers!
). Cheers!
Your buddy Yoda (uurrrpppp!)
I saw someone SawZall a rusted spring hanger, as the blade made it's way through it took out a new rear tire ( not me !)